Series Basic Operation Guide What Can I Do with This Machine? Before Using the Machine Document Handling Series Print Media Sending Documents Receiving Fax/I-Fax Documents CANON INC. Basic Operation Guide 30-2, Shimomaruko 3-chome, Ohta-ku, Tokyo 146-8501, Japan CANON U.S.A., INC. One Canon Plaza, Lake Success, NY 11042, U.S.A. CANON CANADA INC. 6390 Dixie Road Mississauga, Ontario L5T 1P7, Canada CANON EUROPA N.V. Bovenkerkerweg 59-61 1185 XB Amstelveen, The Netherlands CANON FRANCE S.A.S.
Manuals for the Machine ● Machine Set-Up ● Software Installation ● ● ● ● Basic Features Maintenance Machine Settings Specifications ● ● ● ● Advanced Features Network and Remote User Interface System Monitor Reports and Lists Quick Start Guide Basic Operation Guide (This Document) Advanced Operation Guide CD-ROM (This manual is provided in print for the imageRUNNER 1019J.) ● Scanning Features Scanner Driver Guide CD-ROM (This manual is not available for the imageRUNNER 1019J.
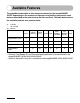
Available Features The procedures described in this manual are based on the imageRUNNER 1023iF. Depending on the system configuration and product purchased, some features described in the manuals may not be functional. The table below shows the available features on a product basis. ✔ : available – : not available opt. : optional COPY PRINT (UFRII LT) PRINT (PCL) SCAN FAX IFAX/ E-MAIL/ FTP/SMB RUI (Network Board) ADF imageRUNNER 1019J ✔ – – – – – – – imageRUNNER 1023 ✔ ✔ opt.
iii
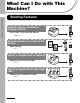
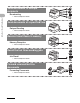
What Can I Do with This Machine? What Can I Do with This Machine? Sending Features Send documents with diverse sending methods Fax, E-Mail, I-Fax, and File Server → Chapter 4 Send documents in a variety of file formats Send Settings → p. 4-7 Specify a recipient with a single key Sending with One-Touch Keys → p. 4-15 Specify a recipient with a three-digit code Sending with Coded Dial Codes → p.
What Can I Do with This Machine? Specify multiple recipients as a group Sending to Group Addresses → p. 4-19 Look up a particular recipient AAAAA BBBBB CCCCC Address Book Search → p. 4-21 Specify a recipient with its scan/ send settings M1 Favorites Buttons → p.
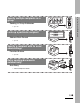
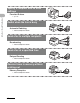
Send documents to multiple recipients What Can I Do with This Machine? Broadcasting → Advanced Operation Guide Send documents at a specified time Delayed Sending → Advanced Operation Guide Receive faxes/I-faxes in memory Memory Reception → Advanced Operation Guide Recall the last three sending jobs 1 Job Recall → Advanced Operation Guide Forward received fax/I-fax documents Forwarding Documents → Advanced Operation Guide vi 2 3
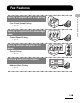
Fax Features What Can I Do with This Machine? Specify a recipient with a single key One-Touch Speed Dialing → p. 4-15 Specify a recipient with a three-digit code Coded Speed Dialing → p. 4-17 Specify multiple recipients as a group Group Dialing → p. 4-19 Look up a particular recipient AAAAA BBBBB CCCCC Address Book Dialing → p.
Specify a recipient with its scan settings What Can I Do with This Machine? Favorites Buttons → p.
Recall the last three sending jobs 1 Job Recall 3 What Can I Do with This Machine? → Advanced Operation Guide 2 Forward received fax documents Forwarding Documents → Advanced Operation Guide Copy Features Select a scan mode depending on the type of image Image Quality → p. 6-3 ABC ABC ABC ABC Adjust the density level of scanned images Density → p.
Enlarge or reduce copied images A What Can I Do with This Machine? Zoom Ratio → p.
System Manager Settings ID What Can I Do with This Machine? Restrict the use of the machine with department IDs 000001 Department ID Management → Advanced Operation Guide Printer Feature DE D EA FBC D E FA BC F A BC A BC 1 Print a document from a PC Printing* → Online Help * The optional Barcode Printing Kit is required for the BarDIMM function.
What Can I Do with This Machine? PC Fax Feature Send a fax from a PC PC Faxing → Online Help Remote UI Feature Access and manage the machine from a PC Remote UI → Advanced Operation Guide xii
Contents Manuals for the Machine................................................................. i Available Features .......................................................................... ii Sending Features ........................................................... iv Fax Features...................................................................vii Copy Features ................................................................ ix System Manager Settings...............................................
Users in the U.S.A....................................................................... xxx Preinstallation Requirements for Canon Facsimile Equipment.....................................................................xxx In Case of Equipment Malfunction.............................. xxxii Rights of the Telephone Company ............................. xxxii What Can I Do with This Machine? Users in Canada.......................................................................
Operation Panel Power Switch.................................................1-10 Energy Consumption in the Sleep Mode.................................1-11 Timer Settings............................................................................1-13 2 Document Handling................................................................. 2-1 Document Requirements ............................................................2-1 Scanning Area........................................................................
4 Sending Documents................................................................ 4-1 Scan Settings ...............................................................................4-3 What Can I Do with This Machine? Image Quality................................................................4-3 Density..........................................................................4-5 Two-Sided.....................................................................4-6 Send Settings...............................
7 Printing ..................................................................................... 7-1 8 Scanning .................................................................................. 8-1 9 PC Faxing ................................................................................. 9-1 11 System Manager Settings................................................... 11-1 Department ID Management .....................................................11-1 Procedure before Using the Machine .............
13 Troubleshooting .................................................................. 13-1 Clearing Jams ............................................................................13-1 What Can I Do with This Machine? Document Jams..........................................................13-1 Paper Jams.................................................................13-3 LCD Messages ...........................................................................13-6 Error Codes ..............................
15 Appendix .............................................................................. 15-1 Specifications ............................................................................15-1 Index ...........................................................................................15-8 xix What Can I Do with This Machine? General .......................................................................15-1 Copier .........................................................................
Preface What Can I Do with This Machine? Thank you for choosing a Canon product. Before using the machine, please read the following instructions for your safety. Important Safety Instructions WARNING Except as specifically described in this guide, do not attempt to service the machine yourself. Never attempt to disassemble the machine: opening and removing its interior covers will expose you to dangerous voltages and other risks. For all service, contact your local authorized Canon dealer.
Location – Place the machine on a flat, stable, vibration-free surface that is strong enough to support its weight. – Place the machine in a cool, dry, clean, well ventilated place. – Make sure the area is free from dust. – Make sure the location is not exposed to high temperature or humidity. – Keep the machine away from direct sunlight as this can damage it. If you have to place the machine near a window, install heavy curtains or blinds. – Do not use the machine near water.
What Can I Do with This Machine? – To ensure reliable operation of the machine and to protect it from overheating (which can cause it to operate abnormally and create a fire risk), do not block the exhaust vent. Never block or cover any openings on the machine by placing it on a bed, sofa, rug, or other similar surface. Do not place the machine in a cupboard or built-in installation, or near a radiator or other heat source unless proper ventilation is provided.
How to Use This Guide Symbols Used in This Manual WARNING Indicates a warning that may lead to death or serious injury if not observed. CAUTION Explains how to avoid actions that could injure you or damage your machine. NOTE Explains operating restrictions and how to avoid minor difficulties. In addition, this guide uses distinctive notations to identify keys and information in the LCD: – The keys you press appear in square brackets: [Stop].
Illustrations Used in This Manual What Can I Do with This Machine? Unless otherwise mentioned, illustrations used in this manual are those taken when no optional equipment is attached to the imageRUNNER 1023iF. The imageRUNNER 1023iF is used for illustration purposes in this manual. For information on the standard features and available options for each model, see “Available Features,” on p. ii.
Legal Notices Copyright Disclaimers The information in this document is subject to change without notice. CANON INC. MAKES NO WARRANTY OF ANY KIND WITH REGARD TO THIS MATERIAL, EITHER EXPRESS OR IMPLIED, EXCEPT AS PROVIDED HEREIN, INCLUDING WITHOUT LIMITATION, THEREOF, WARRANTIES AS TO MARKETABILITY, MERCHANTABILITY, FITNESS FOR A PARTICULAR PURPOSE OF USE OR NON-INFRINGEMENT. CANON INC.
What Can I Do with This Machine? Legal Limitations on the Usage of Your Product and the Use of Images Using your product to scan, print or otherwise reproduce certain documents, and the use of such images as scanned, printed or otherwise reproduced by your product, may be prohibited by law and may result in criminal and/or civil liability. A non-exhaustive list of these documents is set forth below. This list is intended to be a guide only.
Trademarks As an ENERGY STAR Partner, Canon U.S.A., Inc. has determined that this product meets the ENERGY STAR Program for energy efficiency. The International ENERGY STAR Office Equipment Program is an international program that promotes energy saving through the use of computers and other office equipment. The program backs the development and dissemination of products with functions that effectively reduce energy consumption.
FCC (Federal Communications Commission) What Can I Do with This Machine? imageRUNNER 1019J: Model F189204 imageRUNNER 1023/1023N: Model F189200 imageRUNNER 1023iF: Model F189202 This device complies with Part 15 of the FCC Rules. Operation is subject to the following two conditions: (1) This device may not cause harmful interference, and (2) This device must accept any interference received, including interference that may cause undesired operation.
If your equipment malfunctions, please contact your local authorized Canon dealer from whom you purchased the equipment (if under warranty), or with whom you have a servicing contact. If you are not sure who to contact, and have both purchased and are using the equipment in the U.S.A., please refer to the “SUPPORT” page on Canon USA’s Web site (http://www.usa.canon.com). What Can I Do with This Machine? Canon U.S.A. Inc. One Canon Plaza, Lake Success, NY 11042, U.S.A. TEL No.
What Can I Do with This Machine? Users in the U.S.A. Preinstallation Requirements for Canon Facsimile Equipment A. Location Supply a suitable table, cabinet, or desk for the machine. See Chapter 14, “Appendix,” for specific dimensions and weight. B. Order Information 1. A single telephone line (touch-tone or rotary) should be used. 2. Order an RJ11-C telephone wall jack (USOC), which should be installed by the telephone company.
C. Power Requirements The machine should be connected to a standard 120 volt AC, three-wire grounded outlet only. Connection of the Equipment This equipment complies with Part 68 of the FCC rules and the requirements adopted by the ACTA. On the rear panel of this equipment is a label that contains, among other information, a product identifier in the format of US:AAAEQ##TXXXX. If requested, this number must be provided to the telephone company.
What Can I Do with This Machine? In Case of Equipment Malfunction Should any malfunction occur which cannot be corrected by the procedures described in this guide or the Advanced Operation Guide, disconnect the equipment from the telephone line cable and disconnect the power cord. The telephone line cable should not be reconnected or the main power switch turned ON until the problem is completely resolved.
Users in Canada A. Location Supply a suitable table, cabinet, or desk for the machine. See Chapter 15, “Appendix,” for specific dimensions and weight. B. Order Information 1. A single telephone line (touch-tone or rotary) should be used. 2. Order a CA11A modular jack, which should be installed by the telephone company. If the CA11A jack is not present, installation cannot occur. 3. Order a normal business line from your telephone company’s business representative.
What Can I Do with This Machine? Notice ● This product meets the applicable Industry Canada technical specifications. ● The Ringer Equivalence Number is an indication of the maximum number of devices allowed to be connected to a telephone interface. The termination of an interface may consist of any combination of devices subject only to the requirement that the sum of the RENs of all the devices does not exceed five. ● The REN of this product is 1.0.
Utilisation au Canada A. Emplacement Prévoir une table, un meuble, ou un bureau suffisamment solide et de taille appropriée (voir le chapitre 14, Annexe (Appendix), pour les indications de poids et dimensions). B. Installation téléphonique 1. Une seule ligne téléphonique (tonalités ou impulsions) doit être utilisée. 2. Il faut commander un jack modulaire CA11A qui sera installé par la compagnie téléphonique. Sans ce jack, la mise en place serait impossible. 3.
What Can I Do with This Machine? Remarques ● Le présent matériel est conforme aux spécifications techniques applicables d’Industrie Canada. ● Avant d’installer cet appareil, l’utilisateur doit s’assurer qu’il est permis de le connecter à l’équipement de la compagnie de télécommunication locale et doit installer cet appareil en utilisant une méthode de connexion autorisée.
Laser Safety CDRH Regulations The Center for Devices and Radiological Health (CDRH) of the U.S. Food and Drug Administration implemented regulations for laser products on August 2, 1976. These regulations apply to laser products manufactured from August 1, 1976. Compliance is mandatory for products marketed in the United States. CAUTION Use of controls, adjustments, or performance of procedures other than those specified in this manual may result in hazardous radiation exposure.
Before Using the Machine Before Using the Machine Machine Components A A B C D ADF (Automatic Document Feeder) Holds documents and feeds them automatically into the scanning area. E B Slide guides Adjusts to the width of the document. C Document feeder tray Holds documents. D Document delivery tray Receives documents. E Paper delivery tray Receives copies, prints and faxes. F I H Prevents the paper from falling off the paper delivery tray.
K K L M N Left cover L Scanning area Scans documents from the ADF. M Platen glass Place documents. N Front cover Open this cover to replace the toner bottle. O Stack Bypass Feeds non-standard size or thick/thin type paper stacks. P Slide guides for stack bypass Adjusts to the width of the paper. Q Stack bypass extension Pull out to load paper stack. Q P O R R USB port Connect the USB (Universal Serial Bus) cable. S S Ethernet port Connect the network cable.
Operation Panel Main Operation Panel Before Using the Machine ● imageRUNNER 1023iF A D E F B C COPY ed l Address Book 4 M4 G H SEND I J K L M View Settings ABC @.
J Reset key U Press to return the machine to the standby mode. K System Monitor key Flashes or lights up when an error has occurred. V Press to check fax transmission, print, copy, or report output status. L View Settings key W O Press to clear entered alphanumeric characters. Y Log In/Out key Z Start key Counter Check key Press to display counter status. (Press again to close counter status.) R a Press to turn the operation panel on/off.
● imageRUNNER 1023N A B C D E G COPY H I J K L View Settings Reset Before Using the Machine Density Copy Ratio e d c Counter Check Clear 1 2 3 4 5 6 7 8 9 0 # ON/OFF C Collate Additional Functions OK Image Quality f S QR SCAN System Monitor Paper Select N OP M Stop Log In/Out Start ID 2 on 1 Frame Erase Two-Sided Processing/ Data Error Power b a Z Y X V U T ● imageRUNNER 1023 A B C D E G COPY H I J K L View Settings Reset S QR Density
Send Operation Panel A B C D E F CO Panel open Direct TX Pause Recall 15 16 01 17 18 19 20 05 06 07 08 21 22 23 09 10 11 12 M3 04 Address Book M4 Delayed TX G A I Direct TX key H F Press to set Direct Sending. B Pause key Hook key G Recall key Press to recall previously set send jobs, including the destinations, scan settings, and send settings. E Coded Dial key G Address Book key One-Touch keys Press to specify destinations registered under one-touch keys.
LCD (Standby Mode) Before Using the Machine Copy Mode ● Without optional paper drawer A B 100% A TEXT LTR D E ● With optional paper drawer A O1 100% A D A Zoom ratio B Paper size C Quantity D Density E Image quality 1-7 SEND AUTO TEXT E Scan Mode Send Mode SELECT FAX C B C METHOD SCANNING MODE O1
Toner Cartridge If a message prompting you to replace the toner cartridge appears on the LCD display, replace the toner cartridge with a new one. Use only the toner cartridges recommended for use with this machine. Before Using the Machine WARNING • Never dispose toner cartridges in a fire or incinerator, as this may result in an explosion. • Do not store toner cartridges in places exposed to open flames, as this may cause the toner to ignite and result in burns or a fire.
■ Genuine Supplies Before Using the Machine Canon has developed and manufactured Toner, Parts, and Supplies specifically for use in this machine. For optimal print quality and for optimal machine performance and productivity, we recommend that you use Genuine Canon Toner, Parts, and Supplies. Contact your Canon Authorized Dealer or Service Provider for Genuine Canon Supplies.
Operation Panel Power Switch To turn the operation panel ON or OFF, press the operation panel power switch. When turned OFF, the machine is in the Sleep mode. Machine Status ON Standby mode (ready for immediate copying or printing) OFF Sleep mode NOTE – The machine can receive and print documents from a personal computer when it is in the Sleep mode. I-fax/fax documents can also be received while the machine is in the Sleep mode.
Energy Consumption in the Sleep Mode Before Using the Machine You can set the amount of energy that the machine consumes when it is in the Sleep mode. If you set the power consumption to , the machine consumes less energy during the Sleep mode than when you set it to . However, it takes more time for the machine to resume normal operation.
NOTE SYSTEM SETTINGS COMMUNICATION MEMORY LOCK MEMORY RX TM is set to ON*. NETWORK SETTINGS TCP/IP SETTINGS SMB SETTINGS DHCP is set to ON. USE SMB CLIENT is set to ON. POP INTERVAL is set to more than 1MIN. E-MAIL/I-FAX * If there is more time than specified in remaining before the set time limit is reached, the machine consumes the same amount of energy as when the energy consumption level is set to . – The default setting is .
Timer Settings Before Using the Machine Setting the Sleep Mode When the machine remains idle for a certain period of time, it automatically enters the Sleep mode. 1 2 3 COPY ded al Address Book 04 M4 SEND SCAN View Settings System Monitor 1 Reset 08 2 ABC @.
COPY Address Book 04 M4 SEND SCAN View Settings System Monitor ABC @./ 1 Reset 2 JKL GHI Collate 4 Paper Select 08 2 Image Quality Additional Functions OK Density Copy Ratio Two-Sided 2 on 1 DEF PQRS 3 MNO Counter Check ON/OFF C ID 6 Stop Log In/Out 6 5 Start WXYZ TUV 7 Clear 8 Before Using the Machine 4 5 ded al 9 SYMBOLS Frame Erase 0 # Processing/ Data Error Power Tone [OK] 4 5 Confirm that is displayed, then press [OK].
Setting Auto Clear Time If the machine remains idle for a certain period of time, the display returns to the standby mode (Auto Clear function). Before Using the Machine 1 2 3 COPY ded al Address Book 04 M4 SEND SCAN View Settings System Monitor 1 Reset 08 2 ABC @.
COPY Address Book 04 M4 SEND SCAN View Settings System Monitor 1 Reset 2 Additional Functions OK Image Quality Density Copy Ratio Two-Sided 2 on 1 PQRS MNO Counter Check ON/OFF C Stop Log In/Out 6 5 ID Start 6 WXYZ TUV 7 Clear 3 JKL GHI Collate DEF 2 4 Paper Select 08 ABC @./ Before Using the Machine 4 5 ded al 9 8 SYMBOLS Frame Erase 0 # Processing/ Data Error Power Tone [OK] 4 5 Confirm that is displayed, then press [OK].
Setting Time Zone Before Using the Machine The standard time zones of the world are expressed globally in terms of the difference in hours (± up to 12 hours) from GMT (0 hours). A time zone is a region throughout which this time difference is the same. 1 2 3 4 COPY ded al Address Book 04 M4 SEND SCAN View Settings System Monitor ABC @.
Setting Daylight Saving Time In some countries or areas, time is advanced throughout the summer season. This is called “Daylight Saving Time.” COPY ded al Address Book 04 M4 SEND SCAN View Settings System Monitor 1 Reset 08 2 ABC @.
Before Using the Machine 6 7 8 9 COPY ded al Address Book 04 M4 SEND SCAN View Settings System Monitor 1 Reset 08 2 ABC @./ GHI Collate 2 JKL 4 Paper Select Image Quality Additional Functions OK Density Copy Ratio Two-Sided 2 on 1 DEF PQRS 3 MNO ID 9 SYMBOLS Frame Erase 0 # Processing/ Data Error Power 1-19 Confirm that is displayed, then press [OK]. ] or [ ] to select the month, then press [OK]. Confirm that is displayed, then press [OK].
COPY ded al Address Book 04 M4 SEND SCAN View Settings System Monitor 1 Reset 08 2 ABC @./ GHI Collate 2 JKL 4 Paper Select Image Quality Additional Functions OK Density Copy Ratio Two-Sided 2 on 1 DEF PQRS 3 MNO Counter Check ON/OFF C Stop Log In/Out 6 5 ID Start WXYZ TUV 7 Clear Before Using the Machine 10 11 12 13 9 8 SYMBOLS Frame Erase 0 # Processing/ Data Error Power Tone [OK] 10 11 12 13 Confirm that is displayed, then press [OK].
Before Using the Machine 14 15 16 17 18 COPY ded al Address Book 04 M4 SEND SCAN View Settings System Monitor 1 Reset 2 GHI Collate Image Quality Additional Functions OK Density Copy Ratio Two-Sided 2 on 1 DEF 2 PQRS MNO ID 1-21 ] or [ 9 SYMBOLS Frame Erase 0 # Processing/ Data Error Power ] to select the month, then press [OK]. Confirm that is displayed, then press [OK]. Press [ ] or [ ] to select the week, then press [OK].
Before Using the Machine 1-22
Document Handling Document Handling Document Requirements Platen Glass ADF Type – – – – – Plain paper Thick documents Photographs Small documents (e.g., index cards) Special types of paper (e.g., tracing paper*1, transparencies*1, etc.) – Book (Height: max. 7/8" (20 mm)) Plain paper (Multipage documents of the same size, thickness and weight or one page documents.) Size (W x L) Max. 8 1/2" x 14" (Max. 216 x 356 mm) Max. 8 1/2" x 14" (Max. 216 x 356 mm) Min. 5 1/2" x 5" (Min. 139.
2-2 Document Handling ● Do not place the document on the platen glass or in the ADF until the glue, ink or correction fluid on the document is completely dry. ● Remove all fasteners (staples, paper clips, etc.) before loading the document in the ADF.
Scanning Area Make sure your document’s text and graphics fall within the shaded area in the following diagram. Note that the margin widths listed are approximate and there may be slight variations in actual use.
Loading Documents On the Platen Glass Lift up the ADF/platen glass cover. 2 Place your document face down. 3 Align the document with the appropriate paper size marks. Document Handling 1 If your document does not match any of the paper size marks, align the center of your document with the arrow mark.
4 Gently lower the ADF/platen glass cover. Document Handling The document is ready for scanning. CAUTION – When closing the ADF/platen glass cover, be careful not to get your fingers caught, as this may result in personal injury. – Do not press down the ADF/platen glass cover forcefully, as this may damage the platen glass and cause personal injury. NOTE Remove the document from the platen glass when scanning is complete.
In the ADF Fan the document stack and even the edges. 2 Adjust the slide guides to the width of the documents.
Document Handling 3 Neatly place the documents face up in the document feeder tray. The document is ready for scanning. NOTE – Do not add or remove documents while they are being scanned. – When scanning is complete, remove the documents from the document delivery tray to avoid paper jams. – Avoid using ADF to scan the same document more than 30 times. When scanned repeatedly, documents can become folded or torn, which may cause paper jams.
Document Handling 2-8
Print Media Print Media Paper Requirements Paper Drawer Stack Bypass Size (W x L) LGL, LTR, OFICIO, FLSP, BRAZIL-OFICIO, MEXICO-OFICIO, A4 3" x 5" to Legal (8 1/2" x 14") (76 x 127 to 216 x 356 mm) Weight 17 to 24 lb bond (64 to 90 g/m2) 15 to 34 lb bond (56 to 128 g/m2) Quantity Max. 500 sheets*1 Max.
*1 21 lb bond (80 g/m2) paper From 17 to 21 lb bond (64 to 80 g/m2) *3 From 22 to 24 lb bond (81 to 90 g/m2) *4 From 24 to 28 lb bond (91 to 105 g/m2) *5 From 28 to 34 lb bond (106 to 128 g/m2) *6 20 lb bond (75 g/m2) *7 LTR size only *8 Use only LTR transparencies made especially for this machine. *2 Print Media NOTE The default paper size is LTR. If you use a different paper size, you must change the paper size settings. (See “Setting Paper Type and Size,” on p. 3-8.
Printable Area The shaded area indicates the approximate printable area of LTR paper. Note that the margin widths listed are approximate and there may be slight variations in actual use. Print Media Fax : 1/8" (4.0 mm) Copy : 1/8" (2.9 mm) Fax : 1/4" (6.0 mm) Copy : 1/4" (4.7 mm) Fax : 1/8" Fax : 1/8" (3.0 mm) (3.0 mm) 1 Copy : 1/8" Copy : /8" (3.6 mm) (2.
Paper Guidelines 3-4 Print Media ● To prevent paper jams, do not use any of the following: – Wrinkled or creased paper – Curled or rolled paper – Coated paper – Torn paper – Damp paper – Very thin paper – Paper which has been printed on using a thermal transfer printer (Do not copy on the reverse side.) ● The following types of paper do not print well: – Highly textured paper – Very smooth paper – Shiny paper ● Make sure the paper is free from dust, lint, and oil stains.
Loading Paper To load paper in the paper drawer, see “Set Up the Machine,” in the Quick Start Guide. In the Stack Bypass (e.g., Envelopes) Print Media If you are making prints on transparencies, labels, nonstandard-sized paper, or envelopes, load them into the stack bypass. ● Use standard envelopes with diagonal seams and flaps.
2 Pull out the stack bypass extension until it clicks, then open it. NOTE 3 Gently load the stack of envelopes with the address side facing down and the flap side to the left. Be sure to insert the envelopes as far as they will go. When you load the envelopes, arrange the stack of envelopes on a firm, clean surface first, then press down firmly on the edges to make the folds crisp. 3-6 Print Media Do not load the paper without using the stack bypass extension.
4 Adjust the slide guides to the width of the paper stack. NOTE Print Media – Make sure that the paper stack does not exceed the paper limit guide. – Some types of paper may not feed properly into the stack bypass. For high quality copies, be sure to use the paper and transparencies recommended by Canon. – When making copies of a small document or thick paper, etc., the copy speed may be slightly slower than usual.
Setting Paper Type and Size For the Paper Drawer The default settings are and . When you place other types and/or sizes of paper, follow this procedure to change the settings. COPY ded al Address Book 04 M4 SEND SCAN View Settings System Monitor 1 Reset 08 2 ABC @.
3 4 5 COPY ded al Address Book 04 M4 SEND SCAN View Settings System Monitor 1 Reset 08 2 ABC @./ GHI Collate 2 JKL 4 Paper Select Image Quality Additional Functions OK Density Copy Ratio Two-Sided 2 on 1 DEF PQRS 3 MNO Counter Check ON/OFF C Stop Log In/Out 6 5 ID Start WXYZ TUV 7 Clear 8 9 SYMBOLS Frame Erase 0 # Processing/ Data Error Power Tone Print Media [OK] 3 4 5 Press [ ] or [ ] to select
6 7 8 COPY ded al Address Book 04 M4 SEND SCAN View Settings System Monitor 1 Reset 2 JKL GHI Collate Image Quality Additional Functions OK Density Copy Ratio Two-Sided 2 on 1 DEF 2 4 Paper Select 08 ABC @./ PQRS 3 MNO Counter Check ON/OFF C Stop Log In/Out 6 5 ID Start 9 WXYZ TUV 7 Clear 8 9 SYMBOLS Frame Erase 0 # Processing/ Data Error Power Tone 6 7 8 Print Media [OK] Confirm that is displayed, then press [OK].
For the Stack Bypass Print Media To print using the stack bypass, follow this procedure to specify the paper size and type. 1 2 3 4 COPY ded al Address Book 04 M4 SEND SCAN View Settings System Monitor 1 Reset 2 GHI Collate Image Quality Additional Functions OK Density Copy Ratio Two-Sided 2 on 1 DEF 2 JKL 4 Paper Select 08 ABC @.
5 6 COPY ded al Address Book 04 M4 SEND SCAN View Settings System Monitor 1 Reset 08 2 ABC @./ GHI Collate 2 JKL 4 Paper Select Image Quality Additional Functions OK Density Copy Ratio Two-Sided 2 on 1 DEF PQRS 3 MNO Counter Check ON/OFF C Stop Log In/Out 6 5 ID Start WXYZ TUV 7 Clear 8 9 SYMBOLS Frame Erase 0 # Processing/ Data Error Power Tone 5 6 Print Media [OK] Confirm that is displayed, then press [OK].
7 8 COPY ded al Address Book 04 M4 SEND SCAN View Settings System Monitor 1 Reset 2 JKL GHI Collate Additional Functions OK Image Quality Density Copy Ratio Two-Sided 2 on 1 DEF 2 4 Paper Select 08 ABC @./ PQRS 3 MNO Counter Check ON/OFF C Stop Log In/Out 6 5 ID Start 9 WXYZ TUV 7 Clear 8 9 SYMBOLS Frame Erase 0 # Processing/ Data Error Power Tone Print Media [OK] 7 8 Confirm that
Print Media 3-14
Sending Documents Sending Documents Follow this procedure to send faxes, e-mails, and I-faxes, or to send documents to a file server. For network connection, see “Set the Machine for Network Usage,” in the Quick Start Guide, and for advanced sending features, see Chapter 1, “Advanced Send Features,” in the Advanced Operation Guide. 1 2 Set a Document Select the Sending Method COPY CBA SEND s Paper Select Image Quality Place the document on the platen glass or load it in the ADF.
3 Specify the Destination View Settings stem nitor ABC @./ set GHI Collate 2 JKL 4 tional ctions d 2 on 1 PQRS 3 MNO 5 Counter Check ON/OFF 8 ID 0 Stop set GHI Collate 2 on 1 DEF 2 JKL 4 onal ions 9 # ABC @./ Start SYMBOLS Frame Erase View Settings 1 Log In/Out 6 em itor C WXYZ TUV 7 Clear Send the Document PQRS MNO What if... ● You enter a wrong number when specifying a fax number: Go back to the wrong digit with [ ].
Scan Settings You can adjust the image quality and density of the document you send. The higher image quality you set, the better the output will be, but the longer the transmission will take. You can also scan two sided documents. Adjust the scan settings according to the type of document you are sending.
COPY 2 SEND SCAN View Settings System Monitor ress ok ABC @./ 1 Reset GHI Collate 2 JKL 4 Paper Select Additional Functions OK Image Quality Density Copy Ratio Two-Sided 2 on 1 DEF PQRS 3 MNO Counter Check ON/OFF C Stop Log In/Out 6 5 ID Start WXYZ TUV 7 Clear 8 9 SYMBOLS Frame Erase 0 # Processing/ Data Error Power Tone [OK] Press [ ] or [ Sending Documents 2 ] to select the image quality, then press [OK].
Density 1 COPY ded al Address Book 04 M4 SEND SCAN View Settings System Monitor ABC @.
Two-Sided 1 COPY 2 ded al Address Book 04 M4 SEND SCAN View Settings System Monitor 1 Reset 08 2 ABC @.
Send Settings You can optionally set the file format, if multiple images are sent as separate files or a single file, resolution, and original type after specifying the e-mail, I-fax, or file server address. 2 3 COPY SEND SCAN View Settings System Monitor s ABC @.
COPY 6 7 ded al Address Book 04 M4 SEND SCAN View Settings System Monitor 1 Reset 2 GHI Collate Image Quality Additional Functions OK Density Copy Ratio Two-Sided 2 on 1 DEF 2 JKL 4 Paper Select 08 ABC @./ PQRS 3 MNO Counter Check ON/OFF C Stop Log In/Out 6 5 ID Start WXYZ TUV 7 Clear 8 9 SYMBOLS Frame Erase 0 # Processing/ Data Error Power Tone [OK] Sending Documents 5 6 Press [OK]. Press [ ] or [ ] to select the file format, then press [OK].
COPY 8 ded al Address Book 04 M4 SEND SCAN View Settings System Monitor 1 Reset 2 GHI Collate Image Quality Additional Functions OK Density Copy Ratio Two-Sided 2 on 1 DEF 2 JKL 4 Paper Select 08 ABC @./ PQRS 3 MNO Counter Check ON/OFF C Stop Log In/Out 6 5 ID Start WXYZ TUV 7 Clear 8 9 SYMBOLS Frame Erase 0 # Processing/ Data Error Power Tone Sending Documents [OK] 8 Press [ ] or [ ] to select the resolution, then press [OK].
COPY 9 ded al Address Book 04 M4 SEND SCAN View Settings System Monitor ABC @./ 1 Reset GHI Collate 2 JKL 4 Paper Select 08 2 Additional Functions OK Image Quality Density Copy Ratio Two-Sided 2 on 1 DEF PQRS 3 MNO Counter Check ON/OFF C Stop Log In/Out 6 5 ID Start WXYZ TUV 7 Clear 8 9 10 SYMBOLS Frame Erase 0 # Processing/ Data Error Power Tone [OK] Press [ ] or [ Sending Documents 9 ] to select the original type, then press [OK].
Specifying Destinations Sending Documents This machine provides you with various ways to specify the destination: ● Using Numeric Keys (p. 4-12) – You can specify a fax number, e-mail address, or I-fax address using the numeric keys. ● Using One-Touch Keys (p. 4-15) – You can specify one or more destinations by pressing one-touch keys. You can register up to 23 one-touch keys, including group addresses and favorites buttons. ● Using Coded Dial Codes (p.
Using Numeric Keys NOTE – You can specify only one destination at a time using the numeric keys. – You cannot specify a file server using the numeric keys.
4 COPY ed l Address Book 4 M4 SEND SCAN View Settings System Monitor ABC @./ 1 Reset 2 JKL GHI Collate 4 Paper Select 8 2 Image Quality Additional Functions OK Density Copy Ratio Two-Sided 2 on 1 DEF PQRS 3 MNO Counter Check ON/OFF C Stop Log In/Out 6 5 ID Start WXYZ TUV 7 Clear 8 9 SYMBOLS Frame Erase 0 # Processing/ Data Error Power Sending Documents Tone 4 Enter the fax number or e-mail/I-fax address with the numeric keys.
COPY ded al Address Book 04 M4 5 08 2 SEND SCAN View Settings System Monitor ABC @./ 1 Reset 2 JKL GHI Collate 4 Paper Select Image Quality Additional Functions OK Density Copy Ratio Two-Sided 2 on 1 DEF PQRS 3 MNO Counter Check ON/OFF C Stop Log In/Out 6 5 ID Start 6 WXYZ TUV 7 Clear 9 8 SYMBOLS Frame Erase 0 # Processing/ Data Error Power Tone Sending Documents 5 Adjust any necessary settings for your document. For details, see “Scan Settings,” on p. 4-3.
Using One-Touch Keys You can specify up to 23 destinations using one-touch keys. NOTE – To use this feature, you must register destinations in one-touch keys beforehand. (See “Storing/Editing Address Book,” on p. 4-27.) – A maximum of 201 destinations can be specified at the same time. (Out of the 201 destinations, a number or address can be specified with the numeric keys.) If you specify a group, which is made up of several destinations, each destination in the group is counted as a separate address.
COPY SEND SCAN 4 View Settings System Monitor ss k ABC @./ 1 Reset GHI Collate 2 JKL 4 Paper Select Image Quality Additional Functions OK Density Copy Ratio Two-Sided 2 on 1 DEF PQRS 3 MNO Counter Check ON/OFF C Stop Log In/Out 6 5 ID Start 5 WXYZ TUV 7 Clear 8 9 SYMBOLS Frame Erase 0 # Processing/ Data Error Power Tone Sending Documents 4 Adjust any necessary settings for your document. For details, see “Scan Settings,” on p. 4-3. 5 Press [Start].
Using Coded Dial Codes You can specify up to 177 destinations using coded dial codes. NOTE – To use this feature, you must register destinations in coded dial code beforehand. (See “Storing/Editing Address Book,” on p. 4-27.) – A maximum of 201 destinations can be specified at the same time. (Out of the 201 destinations, a number or address can be specified with the numeric keys.
4 COPY SEND SCAN View Settings System Monitor dress ook 1 Reset 5 ABC @./ 2 JKL GHI Collate 4 Paper Select Image Quality Additional Functions OK Density Copy Ratio Two-Sided 2 on 1 DEF PQRS 3 MNO Counter Check ON/OFF C Stop Log In/Out 6 5 ID Start 6 WXYZ TUV 7 Clear 8 9 SYMBOLS Frame Erase 0 # Processing/ Data Error Power Tone Sending Documents 4 Enter the desired three-digit code (000 to 176) with the numeric keys. Ex.
Using Group Addresses NOTE – To use this feature, you must register destinations in a group address beforehand. (See “Storing/Editing Address Book,” on p. 4-27.) – A maximum of 201 destinations can be specified at the same time. (Out of the 201 destinations, a number or address can be specified with the numeric keys.) If you specify a group, which is made up of several destinations, each destination in the group is counted as a separate address.
COPY SEND SCAN 4 View Settings System Monitor ss k ABC @./ 1 Reset GHI Collate 2 JKL 4 Paper Select Image Quality Additional Functions OK Density Copy Ratio Two-Sided 2 on 1 DEF PQRS 3 MNO Counter Check ON/OFF C Stop Log In/Out 6 5 ID Start 5 WXYZ TUV 7 Clear 8 9 SYMBOLS Frame Erase 0 # Processing/ Data Error Power Tone Sending Documents 4 Adjust any necessary settings for your document. For details, see “Scan Settings,” on p. 4-3. 5 Press [Start].
Using Address Book Key [Address Book] search enables you to search for a recipient registered in the machine. This is useful when you forget which one-touch key or coded dial code the recipient you want is registered under. NOTE Sending Documents – You cannot search for the destinations registered under favorites buttons using [Address Book] key. – To use this feature, you must register destinations in Address Book beforehand. (See “Storing/Editing Address Book,” on p. 4-27.
3 COPY Direct TX Pause 4 01 05 09 M1 02 06 10 Hook M2 Recall 03 M3 07 11 Coded Dial 04 08 12 SEND SCAN Address Book System Monitor View Settings @./ Reset Collate GHI Additional Functions 2 on 1 PQRS 1 4 M4 Paper Select Image Quality OK Density Copy Ratio Two-Sided 7 Frame Erase To [OK] Sending Documents 3 Press [Address Book]. If no recipient is registered in Address Book, is displayed. 4 Press [ ] or [ then press [OK].
5 COPY SEND SCAN View Settings System Monitor s ABC @./ 1 6 Reset 2 JKL GHI Collate 4 Paper Select Additional Functions OK Image Quality Density Copy Ratio Two-Sided 2 on 1 DEF PQRS 3 MNO Counter Check ON/OFF C Stop Log In/Out 6 5 ID Start WXYZ TUV 7 Clear 9 8 SYMBOLS Frame Erase 0 # Processing/ Data Error Power Tone Sending Documents [OK] 5 Enter the first letter of the recipient’s name or the first part of the fax number/address with the numeric keys.
COPY SEND SCAN View Settings System Monitor ress ok 1 Reset 8 ABC @./ 2 JKL GHI Collate 4 Paper Select Image Quality Additional Functions OK Density Copy Ratio Two-Sided 2 on 1 DEF PQRS 3 MNO Counter Check ON/OFF C Stop Log In/Out 6 5 ID Start 9 WXYZ TUV 7 Clear 8 9 SYMBOLS Frame Erase 0 # Processing/ Data Error Power Tone [OK] Sending Documents 7 When the recipient’s name is displayed, press [OK].
Using Favorites Buttons NOTE – To use this feature, you must register destinations in favorites buttons beforehand. (See Chapter 1, “Advanced Send Features,” in the Advanced Operation Guide.) 2 Sending Documents 3 COPY Direct TX Pause 01 M1 02 Hook M2 Recall 03 M3 Coded Dial 04 05 06 07 08 09 10 11 12 SEND SCAN Address Book System Monitor View Settings @.
COPY ed l SEND SCAN View Settings System Monitor Address Book 1 Reset 4 8 ABC @./ Collate GHI 2 on 1 PQRS 2 JKL 4 M4 Paper Select 2 Image Quality Additional Functions OK Density Copy Ratio Two-Sided DEF 3 MNO Counter Check ON/OFF C ID Start WXYZ 9 8 4 Stop Log In/Out 6 5 TUV 7 Clear 5 SYMBOLS Frame Erase 0 # Processing/ Data Error Power Tone Sending Documents 4 Adjust any necessary settings for your document. For details, see “Scan Settings,” on p. 4-3.
Storing/Editing Address Book Sending Documents The Address Book is a feature used for storing fax, e-mail, I-fax, and file server destinations. The Address Book is divided into one-touch keys and coded dial codes. You can store up to 23 destinations in one-touch keys, and 177 destinations in coded dial codes, for a total of 200 destinations in the whole Address Book.
● Registering Fax Numbers 1 2 3 4 5 COPY SEND SCAN View Settings System Monitor s ABC @./ 1 Reset GHI Collate 2 JKL 4 Paper Select Image Quality Additional Functions OK Density Copy Ratio Two-Sided 2 on 1 DEF PQRS 3 MNO Counter Check ON/OFF C Stop Log In/Out 6 5 ID Start WXYZ TUV 7 Clear 8 9 SYMBOLS Frame Erase 0 # Processing/ Data Error Power Tone [OK] 4 Sending Documents 1 2 3 Press [Additional Functions]. Press [ ] or [ ] to select
6 8 COPY SEND SCAN View Settings System Monitor s ABC @./ 1 Reset Collate GHI Additional Functions 2 on 1 PQRS 2 JKL 4 Paper Select Image Quality OK Density Copy Ratio Two-Sided DEF 3 MNO Counter Check ON/OFF C ID 7 Stop Log In/Out 6 5 Start WXYZ TUV 7 Clear 8 9 SYMBOLS Frame Erase 0 # Processing/ Data Error Power Tone Sending Documents [OK] 6 7 Confirm that is displayed, then press [OK]. Enter the destination name (max.
10 11 9 COPY SEND SCAN View Settings System Monitor s ABC @./ 1 Reset GHI Collate 2 JKL 4 Paper Select Additional Functions OK Image Quality Density Copy Ratio Two-Sided 2 on 1 DEF PQRS 3 MNO Counter Check ON/OFF C Stop Log In/Out 6 5 ID Start WXYZ TUV 7 Clear 8 9 SYMBOLS Frame Erase 0 # Processing/ Data Error Power Tone [OK] Enter the fax number you register (max. 120 digits, including spaces and pauses) with the numeric keys, then press [OK].
12 13 14 15 COPY SEND SCAN View Settings System Monitor s ABC @./ 1 Reset GHI Collate 2 Image Quality Additional Functions OK Density Copy Ratio Two-Sided 2 on 1 PQRS MNO Counter Check ON/OFF C Stop Log In/Out 6 5 ID Start WXYZ TUV 7 Clear 3 JKL 4 Paper Select DEF 9 8 SYMBOLS Frame Erase 0 # Processing/ Data Error Power Tone Sending Documents [OK] 12 13 14 15 Confirm that is displayed, then press [OK].
16 17 COPY SEND SCAN View Settings System Monitor s ABC @./ 1 Reset GHI Collate 2 JKL 4 Paper Select Image Quality Additional Functions OK Density Copy Ratio Two-Sided 2 on 1 DEF PQRS 3 MNO Counter Check ON/OFF C Stop Log In/Out 6 5 ID Start 18 WXYZ TUV 7 Clear 8 9 SYMBOLS Frame Erase 0 # Processing/ Data Error Power Tone [OK] Confirm that is displayed, then press [OK]. Press [ ] or [ press [OK].
● Registering E-Mail/I-Fax Addresses 1 2 3 4 5 COPY ded al Address Book 04 M4 SEND SCAN View Settings System Monitor 1 Reset 08 2 ABC @./ GHI Collate 2 JKL 4 Paper Select Image Quality Additional Functions OK Density Copy Ratio Two-Sided 2 on 1 DEF PQRS 3 MNO Counter Check ON/OFF C Stop Log In/Out 6 5 ID Start WXYZ TUV 7 Clear 8 9 SYMBOLS Frame Erase 0 # Processing/ Data Error Power Tone Sending Documents [OK] 1 2 3 4 Press [Additional Functions].
6 8 COPY ded al Address Book 04 M4 SEND View Settings System Monitor GHI Collate Image Quality Additional Functions OK Density Copy Ratio Two-Sided 2 on 1 DEF 2 JKL 4 Paper Select 2 ABC @./ 1 Reset 08 7 9 SCAN PQRS 3 MNO Counter Check ON/OFF C Stop Log In/Out 6 5 ID Start 10 WXYZ TUV 7 Clear 9 8 SYMBOLS Frame Erase 0 # Processing/ Data Error Power Tone [OK] Confirm that is displayed, then press [OK]. Enter the destination name (max.
● Editing One-Touch Keys/Coded Dial Codes 1 2 3 4 COPY SEND SCAN View Settings System Monitor ABC @./ 1 Reset GHI Collate 2 JKL 4 Paper Select Image Quality Additional Functions OK Density Copy Ratio Two-Sided 2 on 1 DEF PQRS 3 MNO Counter Check ON/OFF C Stop Log In/Out 6 5 ID Start WXYZ TUV 7 Clear 8 9 SYMBOLS Frame Erase 0 # Processing/ Data Error Power Tone Sending Documents [OK] 1 2 3 4 Press [Additional Functions].
5 6 COPY ded al Address Book 04 M4 SEND SCAN View Settings System Monitor 1 Reset 6 08 2 ABC @./ GHI Collate 2 JKL 4 Paper Select Image Quality Additional Functions OK Density Copy Ratio Two-Sided 2 on 1 DEF PQRS 3 MNO Counter Check ON/OFF C Stop Log In/Out 6 5 ID Start WXYZ TUV 7 Clear 8 7 9 SYMBOLS Frame Erase 0 # Processing/ Data Error Power Tone [OK] Confirm that is displayed, then press [OK].
8 COPY ded al Address Book 04 M4 SEND SCAN System Monitor View Settings 1 Reset 9 08 2 ABC @.
● Deleting One-Touch Keys/Coded Dial Codes 1 2 3 4 COPY SEND SCAN View Settings System Monitor ABC @./ 1 Reset GHI Collate 2 JKL 4 Paper Select Image Quality Additional Functions OK Density Copy Ratio Two-Sided 2 on 1 DEF PQRS 3 MNO Counter Check ON/OFF C Stop Log In/Out 6 5 ID Start WXYZ TUV 7 Clear 8 9 SYMBOLS Frame Erase 0 # Processing/ Data Error Power Tone [OK] 4 Sending Documents 1 2 3 Press [Additional Functions].
5 6 COPY ded al Address Book 04 M4 SEND SCAN System Monitor View Settings ABC @.
Storing/Editing Group Addresses NOTE The destinations must be registered in one-touch keys, or coded dial codes beforehand. ● Registering Group Addresses COPY SEND SCAN View Settings System Monitor ABC @.
5 7 COPY Direct TX Pause 01 M1 02 Hook M2 Recall 03 M3 Coded Dial 04 05 06 07 08 09 10 11 12 SEND SCAN Address Book System Monitor View Settings @./ Reset Collate GHI Additional Functions 2 on 1 PQRS 1 4 M4 Paper Select Image Quality OK Density Copy Ratio Two-Sided 7 Frame Erase To Sending Documents [OK] 5 6 Confirm that
8 COPY ded al Address Book 04 M4 SEND SCAN View Settings System Monitor 1 Reset GHI Collate 2 Image Quality Additional Functions OK Density Copy Ratio Two-Sided 2 on 1 DEF 2 JKL 4 Paper Select 08 ABC @./ PQRS 3 MNO Counter Check ON/OFF C Stop Log In/Out 6 5 ID Start 9 WXYZ TUV 7 Clear 8 9 SYMBOLS Frame Erase 0 # Processing/ Data Error Power Tone [OK] Enter the group name (max. 16 letters, including spaces) with the numeric keys, then press [OK].
● Adding New Destination to Group 1 2 3 4 COPY SEND SCAN View Settings System Monitor ABC @./ 1 Reset GHI Collate 2 JKL 4 Paper Select Image Quality Additional Functions OK Density Copy Ratio Two-Sided 2 on 1 DEF PQRS 3 MNO Counter Check ON/OFF C Stop Log In/Out 6 5 ID Start WXYZ TUV 7 Clear 8 9 SYMBOLS Frame Erase 0 # Processing/ Data Error Power Tone Sending Documents [OK] 1 2 3 4 Press [Additional Functions]. Press [ ] or [ ] to select
COPY 5 SEND SCAN View Settings System Monitor ress ok ABC @./ 1 Reset GHI Collate 2 JKL 4 Paper Select Image Quality Additional Functions OK Density Copy Ratio Two-Sided 2 on 1 DEF PQRS 3 MNO Counter Check ON/OFF C Stop Log In/Out 6 5 ID Start 7 WXYZ TUV 7 Clear 8 9 SYMBOLS Frame Erase 0 # Processing/ Data Error Power Tone [OK] Sending Documents 5 6 Confirm that
● Deleting Destination from Group 1 2 3 4 5 COPY ded al Address Book 04 M4 SEND SCAN View Settings System Monitor 1 Reset 08 2 ABC @./ GHI Collate 2 JKL 4 Paper Select Image Quality Additional Functions OK Density Copy Ratio Two-Sided 2 on 1 DEF PQRS 3 MNO Counter Check ON/OFF C Stop Log In/Out 6 5 ID Start WXYZ TUV 7 Clear 8 9 SYMBOLS Frame Erase 0 # Processing/ Data Error Power Tone Sending Documents [OK] 1 2 3 4 Press [Additional Functions].
6 7 COPY SEND SCAN View Settings System Monitor s ABC @./ 1 Reset GHI Collate 2 JKL 4 Paper Select Additional Functions OK Image Quality Density Copy Ratio Two-Sided 2 on 1 DEF PQRS 3 MNO Counter Check ON/OFF C Stop Log In/Out 6 5 ID Start 10 WXYZ TUV 7 Clear 8 9 SYMBOLS Frame Erase 0 # Processing/ Data Error Power Tone [OK] 7 8 9 10 Press [ group. ] or [ ] to display the destination you want to delete from the Press [Clear].
● Changing Group Name 1 2 3 4 5 COPY SEND SCAN View Settings System Monitor s ABC @./ 1 Reset GHI Collate 2 JKL 4 Paper Select Image Quality Additional Functions OK Density Copy Ratio Two-Sided 2 on 1 DEF PQRS 3 MNO Counter Check ON/OFF C Stop Log In/Out 6 5 ID Start WXYZ TUV 7 Clear 8 9 SYMBOLS Frame Erase 0 # Processing/ Data Error Power Tone Sending Documents [OK] 1 2 3 4 Press [Additional Functions]. Press [ ] or [ ] to select
COPY SEND SCAN System Monitor s View Settings ABC @./ 1 Reset 2 JKL GHI Collate 4 6 Paper Select Additional Functions OK Image Quality Density Copy Ratio Two-Sided 2 on 1 DEF PQRS 3 MNO Counter Check ON/OFF C Stop Log In/Out 6 5 ID Start 8 WXYZ TUV 7 Clear 6 7 8 9 SYMBOLS Frame Erase 0 # Processing/ Data Error Power Tone [OK] Press [ ] repeatedly to go back to a wrong character, then press [Clear]. To delete the entire name, press and hold [Clear].
● Deleting Group Addresses 1 2 3 4 5 COPY ded al Address Book 04 M4 SEND SCAN View Settings System Monitor 1 Reset 08 2 ABC @./ GHI Collate 2 JKL 4 Paper Select Image Quality Additional Functions OK Density Copy Ratio Two-Sided 2 on 1 DEF PQRS 3 MNO Counter Check ON/OFF C Stop Log In/Out 6 5 ID Start WXYZ TUV 7 Clear 8 9 SYMBOLS Frame Erase 0 # Processing/ Data Error Power Tone Sending Documents [OK] 1 2 3 4 Press [Additional Functions].
6 COPY ded al Address Book 04 M4 SEND SCAN View Settings System Monitor ABC @./ 1 Reset GHI Collate 2 JKL 4 Paper Select 08 2 Image Quality Additional Functions OK Density Copy Ratio Two-Sided 2 on 1 DEF PQRS 3 MNO Counter Check ON/OFF C Stop Log In/Out 6 5 ID Start 7 WXYZ TUV 7 Clear 8 9 SYMBOLS Frame Erase 0 # Processing/ Data Error Power Tone [OK] Press [Clear] repeatedly until all destinations are deleted, then press [OK].
Manual Sending Use manual sending when you want to talk to the recipient before sending a document, or if the recipient does not have a fax machine that can receive automatically. NOTE – You cannot use the platen glass for manual sending. – You cannot use group dialing for manual sending. – You cannot use Two-Sided scanning mode for manual sending. Sending Documents 3 COPY SEND SCAN View Settings System Monitor s ABC @.
COPY 4 SEND SCAN View Settings System Monitor ress ok ABC @./ 1 Reset GHI Collate 2 JKL 4 Paper Select 5 Additional Functions OK Image Quality Density Copy Ratio Two-Sided 2 on 1 DEF PQRS 3 MNO Counter Check ON/OFF C Stop Log In/Out 6 5 ID Start WXYZ TUV 7 Clear 8 9 SYMBOLS Frame Erase 0 # Processing/ Data Error Power 5 Tone [OK] Press [ ] or [ Sending Documents 4 5 ] to select , then press [OK]. Adjust any necessary settings for your document.
7 6 COPY Pause Hook Recall Coded Dial S View Settings Address Book 1 M2 06 10 03 07 11 M3 04 08 12 4 M4 Paper Select Image Quality 2 on 1 DEF 2 JKL GHI Collate 02 ABC @./ PQRS ON/OFF C MNO Stop Start 6 5 10 WXYZ TUV 7 Clear 3 8 9 SYMBOLS Frame Erase Density 0 # Processing/ Data Error Power Sending Documents Tone 6 7 Press [Hook] or pick up the handset of your external telephone. Dial the recipient’s fax/telephone number.
Direct Sending With direct sending, the machine sends the document on the ADF as it scans one page, without storing all pages into memory at once. You can send a document ahead of other documents stored in memory. NOTE 2 COPY Direct TX Pause 01 05 09 M1 02 06 10 Hook M2 Recall 03 07 11 M3 Coded Dial 04 SEND SCAN Address Book System Monitor View Settings @.
3 4 COPY Direct TX Pause 01 M1 Hook 02 M2 Recall 03 M3 Coded Dial 04 05 06 07 08 09 10 11 12 SEND SCAN Address Book System Monitor View Settings @./ Reset Collate GHI Additional Functions 2 on 1 PQRS 1 4 M4 Paper Select Image Quality OK Density Copy Ratio Two-Sided 7 Frame Erase To Sending Documents [OK] 3 4 Press [ ] or [ ] to select , then press [OK]. Press [Direct TX]. To cancel direct sending, press [Direct TX] again.
6 COPY 5 ded al Address Book 04 M4 SEND SCAN View Settings System Monitor ABC @./ 1 Reset GHI Collate 2 JKL 4 Paper Select 08 2 Image Quality Additional Functions OK Density Copy Ratio Two-Sided 2 on 1 DEF PQRS 3 MNO Counter Check ON/OFF C Stop Log In/Out 6 5 ID Start WXYZ TUV 7 Clear 9 8 7 SYMBOLS Frame Erase 0 # Processing/ Data Error Power Tone Sending Documents 5 Adjust any necessary settings for your document. For details, see “Scan Settings,” on p. 4-3.
Receiving Fax/I-Fax Documents The following shows how the machine operates when it receives a fax or I-fax document. For advanced receiving features, see Chapter 1, “Advanced Send Features,” in the Advanced Operation Guide. 1 When documents are being received, the Processing/Data indicator on the operation panel flashes a green light.
2 When document reception is complete, the Processing/Data indicator on the operation panel maintains a steady green light. This indicates that documents are stored in memory. JKL MNO 5 Stop Log In/Out 6 ID Start WXYZ TUV 8 9 SYMBOLS 0 # NOTE – The Processing/Data indicator flashes or maintains a steady green light even when the machine enters the Sleep mode.
Copying Follow this procedure to make a copy. For advanced copying features, see Chapter 2, “Advanced Copy Features,” in the Advanced Operation Guide. 1 2 Set a Document Enter the Copy Mode COPY Copying CBA SEND s Paper Select Image Quality Place the document on the platen glass or load it in the ADF. For documents you can copy, see “Document Requirements,” on p. 2-1.
3 ystem onitor View Settings ABC @./ 2 JKL GHI Collate 4 ditional nctions ed 2 on 1 DEF PQRS 3 MNO Counter Check ON/OFF ID Stop Reset 0 # GHI Collate ditional nctions Processing/ Data Error Power ed 2 on 1 DEF 2 JKL 4 SYMBOLS Frame Erase ABC @.
Scan Settings Before pressing [Start] to begin copying, you can adjust the settings to better suit the document to be scanned. These settings return to the default values if the Auto Clear function is activated or if you press [Reset]. Image Quality Copying 1 2 COPY ded al Address Book 04 M4 SEND SCAN View Settings System Monitor 1 Reset 2 JKL GHI Collate Image Quality Additional Functions OK Density Copy Ratio Two-Sided 2 on 1 DEF 2 4 Paper Select 08 ABC @.
Density You can adjust the density to the most appropriate level for the document either automatically or manually. ● Adjusting Automatically 1 2 COPY ded al Address Book 04 M4 SEND SCAN View Settings System Monitor 1 Reset 2 GHI Collate Image Quality Additional Functions OK Density Copy Ratio Two-Sided 2 on 1 DEF 2 JKL 4 Paper Select 08 ABC @.
● Adjusting Manually 1 COPY ded al Address Book 04 M4 SEND SCAN View Settings System Monitor 1 Reset GHI Collate Paper Select 2 Image Quality Additional Functions OK Density Copy Ratio Two-Sided 2 on 1 DEF 2 JKL 4 08 2 ABC @./ PQRS 3 MNO Counter Check ID Stop Start WXYZ 8 9 SYMBOLS Frame Erase 0 # Processing/ Data Error Power Tone Copying [OK] 1 2 3 Press [COPY]. Press [Density] twice to select the manual mode.
Zoom Ratio ● Preset Zoom You can enlarge or reduce documents from one standard paper size to another. 1 COPY ded al SEND SCAN View Settings System Monitor Address Book 1 Reset 04 ABC @.
● Zoom Designation You can reduce or enlarge images by any copy ratio, in 1% increments. The available copy ratios are from 50% to 200%. 3 1 2 COPY ded al Address Book 04 M4 SEND SCAN View Settings System Monitor ABC @.
Copying 6-8
Printing Follow this procedure to print a document from your computer. Make sure that the printer driver is installed. For details on the printer driver settings, see Online Help. NOTE The optional Barcode Printing Kit is required for the bar code printing function. For details on the bar code printing function, see Bar Code Printing Guide (supplied with the optional Barcode Printing Kit).
3 Adjust Preferences 4 Print the Document Printing Click [Preferences] or [Properties] to open the dialog box. After finished, click [OK]. Click [Print] or [OK]. What if... ● You want to cancel printing: See Chapter 5, “System Monitor,” in the Advanced Operation Guide.
Scanning Follow this procedure to scan a document to your computer. Make sure that the scanner driver is installed. For details on the scanner driver settings, see the Scanner Driver Guide (in the User Software CD). 1 Set a Document 2 Enter the Scan Mode COPY Scanning CBA SEND Paper Select Image Quality Place the document on the platen glass or load it in the ADF. For documents you can scan, see “Document Requirements,” on p. 2-1.
3 4 Set the Scan Function m tor Start Scanning View Settings ABC @./ 1 et GHI Collate 2 PQRS MNO ID Stop Start WXYZ TUV 7 ON/OFF C Log In/Out 6 5 Counter Check Scanning 2 on 1 Clear 3 JKL 4 onal ons DEF 9 8 SYMBOLS Frame Erase 0 # Processing/ Data Error Power Tone Start iR Toolbox, then set the scanning format. The mark will be displayed above the button you select. Press [Start]. What if...
PC Faxing Follow this procedure to send a fax from your computer. Make sure that the fax driver is installed. For details on the fax driver settings, see Online Help. Start the Print Command 2 Select the Fax PC Faxing 1 From an open document on an application, click [File] > [Print]. Select the fax icon ([Canon iR1022/ 1023 (FAX)]), then click [Print] or [OK]. What if... ● You want to adjust the fax properties: Click [Preferences] or [Properties] and adjust the settings.
3 Set the Destination 4 Send the Document PC Faxing Specify the name and fax number in [Sending Settings], then click [Add to Recipient List]. What if... ● You want to send a fax with a cover sheet: Click the [Cover Sheet] tab and set the format for the cover sheet attachment. Click [OK] in the Fax Sending Settings. What if... ● You want to cancel sending a fax: See Chapter 5, “System Monitor,” in the Advanced Operation Guide.
Remote UI Follow this procedure for Remote UI management. For details, see Chapter 4, “Remote UI,” in the Advanced Operation Guide. Remote UI 1 Prepare the Network Set up the machine for use in a network, then connect the machine and the PC to your network router or a hub. For details, see “Set the Machine for Network Usage,” in the Quick Start Guide. 10-1 2 Startup Start the web browser, enter the IP address of the machine, then press [Enter] on the keyboard.
3 Log on Select the logon mode, then click [OK]. 4 Operate the Machine Now you can manage the machine on the web browser. Remote UI For details, see Chapter 4, “Remote UI,” in the Advanced Operation Guide.
System Manager Settings Department ID Management If Department ID Management is set to in , you must enter your department ID and password to be able to operate the machine. For details on Department ID Management, see Chapter 6, “System Manager Settings,” in the Advanced Operation Guide. Procedure before Using the Machine COPY SEND SCAN View Settings System Monitor ABC @.
Procedure after Using the Machine COPY ed l Address Book 4 M4 SEND SCAN View Settings System Monitor 1 Reset 8 2 ABC @./ 2 JKL GHI Collate 4 Paper Select Image Quality Additional Functions OK Density Copy Ratio Two-Sided 2 on 1 DEF PQRS 3 MNO Counter Check ON/OFF C Stop Log In/Out 6 5 ID Start 1 WXYZ TUV 7 Clear 8 9 SYMBOLS Frame Erase 0 # Processing/ Data Error Power Tone 1 Be sure to press [Log In/Out].
Optional Card Reader NOTE – If the standby display does not appear when the control card is inserted, make sure that: • The control card is inserted in the correct direction. • The control card is inserted as far as it can go. • An unusable control card is not inserted. (For example, cards which are damaged or cards prohibited from use.) – Insert a usable control card correctly. Procedure after Using the Machine 1 After you finish using the machine, remove the control card.
System Manager Settings 11-4
Maintenance Maintenance Cleaning the Machine Note the following before cleaning your machine: – Make sure no document is stored in memory, then turn off the main power switch and disconnect the power cord. – If the main power switch is turned OFF, all jobs waiting in the print queue will be erased. – Sending or receiving documents cannot be done when the main power switch is OFF. – Use a soft cloth to avoid scratching the components.
Fuser Roller 4 If black streaks appear with printing, the fuser roller in the main unit may be dirty. Should this occur, clean the fuser roller in the following procedure. The roller should also be cleaned each time the toner cartridge is replaced. Load a sheet of blank LTR paper into the stack bypass and start cleaning. Pull out the stack bypass extension until it clicks, then open it. NOTE Cleaning the roller takes approximately 100 seconds. 1 2 Load a sheet of blank LTR paper.
Scanning area 3 Keep the scanning area clean to avoid dirty copies or faxes to be sent. Close the ADF/platen glass cover. ● Platen glass 1 Open the ADF/platen glass cover. CAUTION Be careful not to get your fingers caught. ● ADF 2 Clean the platen glass and the underside of the ADF/platen glass cover with a cloth dampened with water. Then wipe the area with a soft, dry cloth.
3 Clean the rollers and rubber parts (A) inside the ADF cover with a cloth dampened with water. Then wipe the area with a soft, dry cloth. 5 Clean the rollers (B) below the document feeder tray with a cloth dampened with water. Then wipe the area with a soft, dry cloth. A B NOTE 6 Lower the document feeder tray. Do not dampen the cloth too much, as this may tear the document or damage the machine. 4 Lift the document feeder tray. CAUTION Be careful not to get your fingers caught.
7 Close the ADF cover. 9 Clean the ADF scanning area (on the left side of the platen glass) and the document feeding roller with a cloth dampened with water. Then wipe the area with a soft, dry cloth. CAUTION Be careful not to get your fingers caught. 8 Open the ADF/platen glass cover. 10 Close the ADF/platen glass cover. CAUTION Maintenance Be careful not to get your fingers caught. 11 12-5 Reconnect the power cord and turn on the main power switch.
Cleaning the ADF Automatically If your documents have black streaks or appear dirty after scanning them through the ADF, clean the ADF roller by repeatedly feeding blank sheets of paper through it. 1 2 3 COPY ded al Address Book 04 M4 SEND SCAN View Settings System Monitor 1 Reset 2 GHI Collate Image Quality Additional Functions OK Density Copy Ratio Two-Sided 2 on 1 DEF 2 JKL 4 Paper Select 08 ABC @.
Transcription Roller If the back of the paper is smudged after printing, the transcription roller may be dirty. Clean the transcription roller in the following procedure. 1 2 3 COPY ded al Address Book 04 M4 SEND SCAN View Settings System Monitor 1 Reset 08 2 ABC @.
Drum Unit If print quality decreases, the drum in the main unit may be dirty. Should this occur, use the Drum Cleaning function to clean the drum. 1 2 3 COPY ded al Address Book 04 M4 SEND SCAN View Settings System Monitor 1 Reset 08 2 ABC @.
Replacing the Toner Cartridge When toner runs out completely and prints can no longer be made, the message appears on the LCD display. Follow the procedure described below to help you replace the toner cartridge. 1 2 Pull the toner cartridge lever (A) towards you. Open the front cover. A CAUTION Do not pull the toner cartridge out until the message appears on the LCD display. Maintenance 3 12-9 Turn the lever as far as it will go clockwise.
4 Pull the cartridge out of the machine. 6 Open the case and remove the toner cartridge. Keep the box and case for future use. CAUTION Do not shake the used toner cartridge or hold it in a vertical position. Doing so may cause the toner to spill. Put the toner cartridge in the original plastic case for disposal. CAUTION – Do not touch the portions (A), and (B). – Do not pull out the seal (C) before inserting the cartridge into the machine as the toner may spill out.
7 Pull the toner cartridge lever (A) towards you and insert the cartridge into the machine with the arrow (B) pointing towards the machine. 9 Turn the toner cartridge lever as far as it will go counterclockwise. B 10 Push down the lever. 11 Close the front cover. A Holding the cartridge steady with one hand, pull out the seal completely with the other hand. Maintenance 8 NOTE Do not pull out the seal at an angle. CAUTION – Be careful not to get your fingers caught.
Replacing the Drum Unit When the message appears on the LCD display, replace the drum unit. 2 Holding the grips on the drum unit, slightly lower and remove it from the machine. WARNING Do not throw used drum unit into open flames, as they may ignite the toner remaining inside the unit, and result in burns or a fire. CAUTION If you use the machine without inserting the drum unit, appears on the LCD display.
4 Hold the unit by its grips on both sides. 5 Align the marks on both sides of the drum unit (B) with the marks on the machine (A), and push the unit into the machine as far as it will go. 6 7 After the unit is completely inserted, remove the orange paper. Close the left cover. A A CAUTION B B Maintenance CAUTION – Be careful not to get your fingers caught. – Do not touch the portion (A) as the image quality of printouts may deteriorate.
Transporting the Machine Follow this procedure to avoid vibration damage to the machine when transporting it over a long distance. CAUTION Be sure at least two people carry the machine. 1 2 3 Disconnect the power cord and all the cables from the back of the machine. CAUTION – Be sure at least two people carry the machine. – Do not lift the machine by any of its attachments. Dropping the machine can cause personal injury.
Troubleshooting Clearing Jams When a jam occurs in the machine, the paper jam message appears on the LCD display. Check the jam location indicator where the jam occurs, then remove the jammed paper. 1 Open the ADF cover. CAUTION – When removing jammed documents or paper, take care not to cut your hands on the edges of the document or paper.
3 4 5 Lift the document feeder tray. Remove any jammed documents. 6 7 Open the ADF/platen glass cover, and remove any jammed documents. Close the ADF/platen glass cover. Lower the document feeder tray and close the ADF cover. CAUTION CAUTION Be careful not to get your fingers caught. 13-2 Troubleshooting Be careful not to get your fingers caught.
Paper Jams 2 ● Inside the Machine or Paper Drawer When appears on the LCD display, remove jammed paper from inside the machine first, then from the paper drawer if necessary. Check the following if you experience repeated paper jams: – Even the edge of the paper stack by a flat surface before loading it in the machine. – Check that the paper you are using meets the requirements for use. (See “Print Media,” on p. 3-1.) – Make sure you have removed any scraps of paper from inside the machine.
4 Lift and hold the transcription frame (A), then remove the jammed paper (Only for 2-sided copying). 6 If you use the optional paper drawer, open the cover on the left side of the optional paper drawer. Remove any jammed paper, then close the cover. A 5 Close the left cover. 7 Pull out the paper drawer and push the corners of the stack under the tabs. CAUTION Be careful not to get your fingers caught.
8 Gently push the paper drawer back into the machine until it clicks. CAUTION Be careful not to get your fingers caught. ● Inside the Stack Bypass 1 Troubleshooting 2 Remove all paper from the stack bypass. Remove any jammed paper. NOTE If you cannot remove the jammed paper, follow the procedures in “Inside the Machine or Paper Drawer,” on p. 13-3.
LCD Messages See the table below when the LCD displays error messages. Message Description Action ADJUSTING WAITING TO SCAN The machine is not ready for scanning. Wait until the machine is ready. AUTO REDIAL This message appears when the recipient is engaged in direct sending and the job is waiting. Disappears when the transmission restarts. CHANGE PAPERSIZE The size of the paper in the paper drawer or stack bypass is different from that of the paper specified in
Message Description Action A document jam may have occurred in the ADF. Remove the jammed document. CLOSE COVER FRONT OR LEFT COVER A cover is open. Close the cover shown on the lower line of the LCD display. DATA ERROR The machine may have trouble. Contact your local authorized Canon dealer. DOCUMENT TOO LONG The document fed from the ADF is longer than 24 7/8" (630 mm), or is not feeding correctly. – Scan the document on the platen glass.
Message MEMORY FULL Description Action – Print, send, or delete any documents stored in memory. – Divide the document stack or data into a few parts and try again one by one. – Send the document with low resolution. – When this message appears during using the ADF, the scanning document stops halfway. In this case, clear the paper jam from the ADF. – The number of TX/RX jobs that can be stored in memory reached the maximum.
Troubleshooting Message Description Action NO APPROPRIATE SIZE Although is set to in in the menu, appropriate-sized paper is not set in the paper drawer or stack bypass. Select the paper size, or set the copy ratio. NOT AVAILABLE NOW – You pressed the onetouch key or coded dial code that has already been registered, when you are registering favorites buttons, onetouch keys, coded dial codes, or group addresses.
Message Description Action PLATEN GLASS DIRTY CLEAN PLATEN GLASS The ADF scanning area on the left side of the platen glass may be dirty. Clean the ADF scanning area, then press [OK]. RECEIVED IN MEMORY The machine received the fax/I-fax in memory because paper or toner ran out, paper jams occurred, or incorrectsize paper was loaded. Load the correct-size paper in the paper drawer, replace the toner cartridge, or clear the paper jams.
Message Description Action Some kind of error has occurred in the machine. Turn off the main power switch, wait for more than 10 seconds, then turn it on again. If the message persists, unplug the machine from the power supply and contact your local authorized Canon dealer. TONER LOW PREPARE NEW TONER The toner is running low. Prepare a new toner cartridge. TRANSMITTING... During the current transmission, the machine may have tried to send a document identified from the list of documents in memory.
Error Codes An error code is a four-digit code shown on an ERROR TX REPORT or an ERROR RX REPORT when an error occurs. 12/31/2006 10:50 FAX 123XXXXXX CANON 0001 *************************** *** ERROR TX REPORT *** *************************** TX FUNCTION WAS NOT COMPLETED TX/RX NO DEPT. ID RECIPIENT ADDRESS DESTINATION ID ST.
Error Code – The other party may not be using a G3 fax machine. #0009 The paper has run out or the paper drawer is not set properly. Load the paper or reset the paper drawer properly. #0012 You could not send because the recipient’s machine is out of paper. Contact the recipient and ask them to load the paper. #0018 There is no reply when you redial. You could not send, because your fax signal was not returned as the recipient’s line was engaged.
Error Code Description Action #0705 The send operation was interrupted because the size of the image data is larger than that specified in in in in . – Change the setting for in in in . – Select a lower resolution. – If you are using I-fax, decrease the number of pages containing images that you are sending each time, so that you do not exceed the Maximum TX Data Size.
Error Code #0755 Description – You cannot send jobs because TCP/IP is not functioning correctly. – The IP address is not set. – When the machine was turned ON, an IP address was not assigned to the machine by the DHCP, RARP, or BOOTP server. Troubleshooting #0801 13-15 – A timeout error occurred while the machine was communicating with the SMTP server to send an email message or send/receive an I-fax. – The SMTP server returned an error while trying to connect. The destination is not correct.
Error Code Description Action #0802 – The name of the SMTP Server in in in is incorrect. – The DNS server name in in in in is incorrect. – Connection to the DNS server failed. – Check the name of the SMTP Server in in in . – Check the DNS server name in in in in .
Description Action #0810 – A POP (Post Office Protocol) server connection error occurred while receiving an I-fax. – The POP server returned an error during the connection. – A timeout error occurred on the server while connecting to the POP server. Check the POP Server name in in in . Confirm that the POP server is functioning normally. Check the network status. #0812 The POP password setting is incorrect.
Error Code Description Action #0820 You have received data that cannot be processed (BASE 64 or uuencode is incorrect). Check the settings, and then ask the sender to resend the data. #0821 You have received data that cannot be processed (TIFF analysis error). Check the settings, and then ask the sender to resend the data. #0827 You have received data that cannot be processed (contains MIME information that is not supported). Check the settings, and then ask the sender to resend the data.
If a Power Failure Occurs Troubleshooting If power is suddenly lost due to an outage or accidental unplugging, a built-in battery retains the user data settings and the Address Book settings. Any sent or received documents stored in memory are backed up for about 60 minutes. During a power cut, functions are limited as follows: – You cannot send, receive, copy, scan, or print documents. – You may not be able to make telephone calls using an external telephone, depending on the type of telephone you use.
Service Call Message If the machine malfunctions, service call messages appear on the LCD display. • E000 • E100 • E716 • E001 • E196 • E719 • E002 • E197 • E730 • E003 • E246 • E733 • E007 • E247 • E736 • E010 • E350 • E739 • E019 • E354 • E805 • E052 • E355 • E808 Contacting Your Local Authorized Canon Dealer If a malfunction occurs and the machine cannot operate normally, service call messages appear on the LCD display.
1 2 Turn the main power switch OFF. Allow at least ten seconds before turning the main power switch back ON. If the machine still does not operate normally, follow the procedure below, and contact your local authorized Canon dealer. – Turn OFF the main power. – Disconnect the power cord from the wall outlet.
Troubleshooting 13-22
Machine Settings Machine Settings You can adjust the machine settings from the Setting Menu to customize the way the machine works. To see the list of the current settings, print out USER’S DATA LIST. Printing USER’S DATA LIST 1 COPY ded al Address Book 04 M4 2 SEND SCAN View Settings System Monitor 1 Reset 08 2 ABC @.
3 4 COPY ded al Address Book 04 M4 SEND SCAN View Settings System Monitor 1 Reset 08 2 ABC @./ GHI Collate 2 JKL 4 Paper Select Image Quality Additional Functions OK Density Copy Ratio Two-Sided 2 on 1 DEF PQRS 3 MNO Counter Check ON/OFF C Stop Log In/Out 6 5 ID Start WXYZ TUV 7 Clear 8 9 SYMBOLS Frame Erase 0 # Processing/ Data Error Power Tone [OK] 3 4 Press [ ] or [ ] to select , then press [OK].
Accessing the Setting Menu 1 COPY 2 ded al Address Book 04 M4 SEND SCAN View Settings System Monitor 1 Reset 2 JKL GHI Collate Image Quality Additional Functions OK Density Copy Ratio Two-Sided 2 on 1 DEF 2 4 Paper Select 08 ABC @./ PQRS 3 MNO Counter Check ON/OFF C Stop Log In/Out 6 5 ID Start WXYZ TUV 7 Clear 9 8 SYMBOLS Frame Erase 0 # Processing/ Data Error Power Tone [OK] 1 2 Press [Additional Functions]. Press [ [OK].
COPY 3 ded al Address Book 04 M4 SEND SCAN View Settings System Monitor ABC @./ 1 Reset GHI Collate 2 JKL 4 Paper Select 08 2 Image Quality Additional Functions OK Density Copy Ratio Two-Sided 2 on 1 DEF PQRS 3 MNO Counter Check ON/OFF C Stop Log In/Out 6 5 ID Start 5 WXYZ TUV 7 Clear 8 9 SYMBOLS Frame Erase 0 # Processing/ Data Error Power Tone [OK] 3 Press [ ] or [ ] to select a submenu, then press [OK].
Setting Menu The menus described in this section are based on the imageRUNNER 1023iF. Depending on the model of your machine, some settings may not be available and the number on the top of each menu may vary. COMMON SETTINGS Setting Item Description 1. DEFAULT SETTINGS Selects which standby display appears when turning on the power. – COPY – SEND – SCAN 2. AUTO CLEAR SET. Selects which standby display appears after the Auto Clearing function is activated.
COMMON SETTINGS 2. ERROR TONE Beeps when an error (e.g., paper jam) occurs. – ON (1-3) – OFF 3. TX JOB DONE TONE Beeps when a document is sent. – ERROR ONLY (1-3) – OFF – ON (1-3) 4. RX JOB DONE TONE Beeps when a document is received. – ERROR ONLY (1-3) – OFF – ON (1-3) 5. SCAN DONE TONE Beeps when scanning is completed. – ERROR ONLY (1-3) – OFF – ON (1-3) 6. PRINT DONE TONE Beeps when printing is completed. – ERROR ONLY (1-3) – OFF – ON (1-3) 4.
COMMON SETTINGS 6. AUTO DRAWER SELCT Sets whether to change to another paper source of the same size if the current paper source runs out while processing a job. Sets whether to select the appropriate paper source based on the original’s size and copy ratio settings (when making a copy), or the set ratio of the image (when receiving a fax). 1. COPY Sets whether to activate the Auto Drawer Select function when copying. – 1. DRAWER 1 (ON/OFF) – 2. DRAWER 2 (ON/OFF)* – 3. STACK BYPASS (OFF/ON) 2.
COMMON SETTINGS 8. REG. PAPER SIZE Sets the paper size for the paper drawer. (See “For the Paper Drawer,” on p. 3-8.) 1. DRAWER 1 Sets the paper size for paper drawer 1. 2. DRAWER 2* Sets the paper size for paper drawer 2. 9. ENERGY IN SLEEP Selects power consumption when the machine is in the Sleep mode between two levels. – LOW – HIGH 10.BYPASS STD SET Sets the standard paper size and type for the stack bypass if you always use a same kind of paper. (See “For the Stack Bypass,” on p. 3-11.
COMMON SETTINGS 2. DRAWER 1 Selects the paper feed method for paper drawer 1. SPEED PRIORITY Print speed has priority. PRINT SIDE The machine starts printing on the side of paper loaded facing down. Print speed becomes slower for one-sided print. 3. DRAWER 2* Selects the paper feed method for paper drawer 2. SPEED PRIORITY Print speed has priority. PRINT SIDE The machine starts printing on the side of paper loaded facing down. Print speed becomes slower for one-sided print. 12.
COPY SETTINGS Setting Item 1. IMAGE DIR PRIORTY Description Sets whether to activate the image direction priority. OFF Copy orientation is same as the document. ON Copy orientation is rotated at 180 degrees. 2. STANDARD SETTINGS Sets the default setting for copying. 1. IMAGE QUALITY Sets the document type for copying. – TEXT – PHOTO – TEXT/PHOTO 2. DENSITY Sets the density for copying. – AUTO – MANUAL (1-9) 3. ZOOM RATIO Sets the zoom ratio for copying.
COPY SETTINGS 6. TWO-SIDED Sets the type of two-sided copying. – OFF – 1 > 2-SIDED – 2 > 2-SIDED – 2 > 1-SIDED 7. FRAME ERASE Sets the type of Frame Erase copying. – OFF – ORG. FRAME ERASE – BOOK FRAME ERASE – BINDING HOLE 8. PAPER SELECT Sets the paper source for copying. – AUTO – DRAWER 1 – DRAWER 2* 3. SHARPNESS Adjusts the sharpness of the copied image. (1-9) 4. PAPER SIZE GROUP Selects a paper size group for your machine. – INCHES – A – AB 5.
TX/RX SETTINGS Setting Item 1. COMMON SETTINGS 1. TX SETTINGS Description Sets the features common to the fax and send functions. Sets the transmission features. 1. UNIT NAME Registers your name/company name (max. 24 characters, including spaces). (See “Set the Machine for Sending Faxes,” in the Quick Start Guide.) 2. DATA COMPRESSION Sets the compression ratio for color scanned data. A high compression ratio reduces the amount of memory used for the document, but results in low quality images.
TX/RX SETTINGS 2. IMAGE QUALITY Sets the default image quality for the document you send. (200x200dpi, 200x400dpi, 300x300dpi, 400x400dpi, 600X600dpi, 100X100dpi, 150X150dpi, 200x100dpi) 3. IMAGE FORMAT Sets the default file format for the document you send. – PDF – TIFF (B&W) – PDF (COMPACT) – JPEG 4. ORIGINAL TYPE Sets the default original type for the document you send. – TEXT/PHOTO – TEXT – PHOTO 5. DIVIDE INTO PAGES Sets whether to use as default. – OFF – ON 6.
TX/RX SETTINGS 4. REPLY-TO Sets the reply-to address for your e-mail/I-fax message. (max. 120 characters, including spaces.) 5. E-MAIL PRIORITY Sets the priority for your e-mail message. – NORMAL – LOW – HIGH 7. TX TERMINAL ID Sets the options for sender information. 1. PRINTING POSITION Selects where the sender information is printed in small type at the top of each page. – OUTSIDE IMAGE – INSIDE IMAGE 2.
TX/RX SETTINGS 10. COLOR TX SCAN SET Sets the priority for color scanned data. SPEED PRIORITY Reduces the time spent in sending the document, but results in low quality images. IMAGE PRIORITY Increases the time spent in sending the document, but results in high quality images. 11. INIT STANDARD SET 2. RX SETTINGS Sets whether to restore in to the default. – OFF – ON Sets the reception features. 1. TWO-SIDED PRINT Sets the type of two-sided printing for faxing.
TX/RX SETTINGS 3. CONT. PRINTING Selects how the machine responds when the message appears. RX TO MEMORY The machine stores all documents in memory. KEEP PRINTING The machine does not store documents in memory if the toner runs out. Reset to after replacing the toner cartridge. 2. FAX SETTINGS 1. USER SETTINGS Sets the fax features. Specifies the basic operation settings in the fax mode. 1. UNIT TELEPHONE # Registers your fax number (max.
TX/RX SETTINGS 2. TX SETTINGS Sets the transmission features. 1. ECM TX Sets whether the ECM (Error Correction Mode) transmission is activated. – ON – OFF 2. PAUSE TIME Sets the pause time when you insert pause into the dialing sequence. (1SEC–15SEC) 3. AUTO REDIAL Sets whether to redial automatically when the other line is busy or a transmission error occurs. (See Chapter 1, “Advanced Send Features,” in the Advanced Operation Guide.) ON 1. REDIAL TIMES Sets the number of retries.
TX/RX SETTINGS 5. DIALING LINE CHCK 3. RX SETTINGS Sets whether to check the telephone line condition. – OFF – ON Sets the reception features. 1. ECM RX Sets whether the ECM (Error Correction Mode) reception is activated. – ON – OFF 2. RX MODE Selects the receive mode. (See “Set the Machine for Receiving Faxes,” in the Quick Start Guide.) – FaxOnly – FaxTel – AnsMode – DRPD – Manual 3. FAX/TEL OPT. SET Sets the optional items in the mode.
TX/RX SETTINGS 4. DRPD:SELECT FAX Selects the ring pattern for fax calls. – DOUBLE RING – SHORT-SHORT-LONG – SHORT-LONG-SHORT – OTHER RING TYPE – NORMAL RING 5. INCOMING RING Sets whether the external telephone rings when the machine receives a voice call or fax, enabling you to answer the voice call. This function is only available when the is set to or . OFF The telephone does not ring when the machine receives a voice call or fax.
TX/RX SETTINGS 7. MANUAL/AUTO Sets whether the machine switches to the document receive mode after the external telephone rings for a specified length of time in the manual receive mode. OFF The external telephone keeps ringing until someone answers the call manually. ON The machine switches to the document receive mode after the external telephone rings for a specified time. F/T RING TIME Sets the length of time to elapse before the machine switches to document receiving.
ADDRESS BOOK SET. Setting Item 1. FAVORITES BUTTONS FAX Description Registers destinations together with a combination of the scan and send settings for frequent use. (M1–M4: Onetouch keys 01 to 04 are used for this feature.) Registers fax numbers. Registers the recipient’s name (max. 16 characters, including spaces). 2. TEL NUMBER ENTRY Registers the recipient’s fax number (max. 120 digits, including spaces). 3. IMAGEQUALITY Sets the image quality.
ADDRESS BOOK SET. E-MAIL Registers e-mail addresses. 1. NAME Registers the recipient’s name (max. 16 characters, including spaces). 2. E-MAIL ADDRESS Registers the recipient’s e-mail address (max. 120 digits). 3. IMAGE FORMAT Sets the file format for the file attached to e-mail message. – PDF – TIFF (B&W) – PDF (COMPACT) – JPEG 4. DIVIDE INTO PAGES Sets if multiple images are sent as separate files or as a single file. OFF Sends multiple images as a single file without dividing them.
ADDRESS BOOK SET. 3. DIVIDE INTO PAGES Sets if multiple images are sent as separate files or as a single file. OFF Sends multiple images as a single file without dividing them. ON Separates multiple images and send them as separate files. 4. IMAGEQUALITY Sets the resolution of the document you send. (200x200dpi, 200x400dpi, 300x300dpi, 400x400dpi, 600X600dpi, 100X100dpi, 150X150dpi, 200x100dpi) (See Chapter 1, “Advanced Send Features,” in the Advanced Operation Guide.) 5.
ADDRESS BOOK SET. 7. DIVIDE INTO PAGES Sets if multiple images are sent as separate files or as a single file. OFF Sends multiple images as a single file without dividing them. ON Separates multiple images and send them as separate files. 8. IMAGEQUALITY Sets the resolution of the document you send. (200x200dpi, 200x400dpi, 300x300dpi, 400x400dpi, 600X600dpi, 100X100dpi, 150X150dpi, 200x100dpi) (See Chapter 1, “Advanced Send Features,” in the Advanced Operation Guide.) 9.
ADDRESS BOOK SET. 6. IMAGE FORMAT Sets the file format. – PDF – TIFF (B&W) – PDF (COMPACT) – JPEG 7. DIVIDE INTO PAGES Sets if multiple images are sent as separate files or as a single file. OFF Sends multiple images as a single file without dividing them. ON Separates multiple images and send them as separate files. 8. IMAGEQUALITY Sets the resolution of the document you send.
ADDRESS BOOK SET. 3. OPTIONAL SETTING Sets the optional settings for sending faxes. OFF The optional setting is not set. ON The optional setting is set. 1. ECM Selects whether to use ECM (Error Correction Mode). – ON – OFF 2. TX SPEED Selects the transmission speed. (33600bps, 14400bps, 9600bps, 4800bps) 3. INTERNATIONAL Selects a mode for documents you are sending. – DOMESTIC – LONG DISTANCE 1 – LONG DISTANCE 2 – LONG DISTANCE 3 (See “Registering Fax Numbers,” on p. 4-28.
ADDRESS BOOK SET. FTP Registers FTP addresses. 1. NAME Registers the recipient’s name (max. 16 characters, including spaces). 2. HOST NAME Registers the name of the file server (max. 120 characters). 3. FILE PATH Registers the path to the file server (max. 120 characters). 4. LOGIN NAME Registers the login name to access the file server (max. 24 characters). 5. PASSWORD Registers the password to access the file server (max. 24 characters). SMB Registers SMB addresses.
ADDRESS BOOK SET. 3. CODED SPD DIAL FAX Registers the destinations for coded dial codes. Up to 177 destinations can be registered. (See “Storing/Editing OneTouch Keys/Coded Dial Codes,” on p. 4-27.) Registers fax numbers. 1. NAME Registers the recipient’s name (max. 16 characters, including spaces). 2. TEL NUMBER ENTRY Registers the recipient’s fax number (max. 120 digits, including spaces). 3. OPTIONAL SETTING Sets the optional settings for sending faxes. OFF The optional setting is not set.
ADDRESS BOOK SET. E-MAIL Registers e-mail addresses. 1. NAME Registers the recipient’s name (max. 16 characters, including spaces). 2. E-MAIL ADDRESS Registers the recipient’s e-mail address (max. 120 digits). IFAX Registers I-fax addresses. 1. NAME Registers the recipient’s name (max. 16 characters, including spaces). 2. I-FAX ADDRESS Registers the recipient’s I-fax address (max. 120 digits). FTP Registers FTP addresses. 1. NAME Registers the recipient’s name (max.
ADDRESS BOOK SET. 3. FILE PATH Registers the path to the file server (max. 120 characters). 4. LOGIN NAME Registers the login name to access the file server (max. 24 characters). 5. PASSWORD Registers the password to access the file server (max. 14 characters). 4. GROUP DIAL Registers destinations in group addresses. Up to 199 destinations can be registered in a group. (See “Storing/ Editing One-Touch Keys/Coded Dial Codes,” on p. 4-27.) 1.
PRINTER SETTINGS 3. COPIES Sets the number of documents printed. (1-999) 4. 2-SIDED PRINTING Sets whether to activate two-sided printing. – OFF – ON 5. PRINT QUALITY Sets the image quality, density or toner saving mode for printing. 1. IMAGE REFINEMENT Sets whether to print smoothly the jagged outlines of characters and graphics. – ON – OFF 2. DENSITY Adjusts the print density. (1-9) 3. TONER SAVER Sets whether the toner saving mode is enabled. – OFF – ON 6.
PRINTER SETTINGS 8. ERROR TIME OUT Sets the length of time before the machine returns an error when no data is received from the computer. ON Sets the error time out period. (5SEC–300SEC) OFF The error time out is off. 9. INIT. PRINTER SET Restores all to the default. – OFF – ON 10.PCL SETTINGS** Sets the PCL printer setting. ** 1. ORIENTATION Sets the paper orientation. – PORTRAIT – LANDSCAPE 2.
PRINTER SETTINGS 1. UNIT OF MEASURE Selects the unit of measurement to specify a custom paper size. – INCHES – MILLIMETERS 2. X DIMENSION Specifies the horizontal size of the custom paper. (05.00–14.00" (127–356 mm)) 3. Y DIMENSION Specifies the vertical size of the custom paper. (03.00–08.50" (76–216 mm)) 8. APPEND CR TO LF Sets whether to append a carriage return (CR) when line feed code (LF) is received.
TIMER SETTINGS Setting Item Description 1. DATE&TIME SETTING Sets the current date and time. (See “Set Up the Machine,” in the Quick Start Guide.) 2. TIME ZONE SETTING Sets the time zone of your machine’s location. (See “Setting Time Zone,” on p. 1-17.) 3. DATE TYPE SELECT Sets the date format. – MM/DD/YYYY – DD/MM YYYY – YYYY MM/DD 4. AUTO SLEEP TIME Sets the auto sleep mode when the machine remains idle for a certain period of time. (3MIN.–30MIN.) (See “Setting the Sleep Mode,” on p. 1-13.
ADJUST./CLEANING Setting Item Description 1. TRANS. ROLR CLEAN Cleans the transcription roller. (See “Transcription Roller,” on p. 12-7.) 2. DRUM CLEANING Cleans the drum. (See “Drum Unit,” on p. 12-8.) 3. FIX.UNIT CLEANING Cleans the fuser roller. (See “Fuser Roller,” on p. 12-2.) 4. FEEDER CLEANING Cleans the ADF. (See “Cleaning the ADF Automatically,” on p. 12-6.) 5. SPECIAL MODE M Sets to improve print quality or fix irregular print density.
ADJUST./CLEANING 8. SPECIAL MODE S Sets whether to reduce the waiting time for the next printout. When you change the paper size after continuous printing, the machine may take a while to start the next printing. OFF Does not reduce the waiting time next set of printout. (default) SPEED PRIORITY Reduces the waiting time to start the next set of printout. Print speed has priority; however, a condition that an previously printed image also appears faintly on the next output may occur. 9. CONT.
ADJUST./CLEANING Sets whether to prevent back edge of paper from smudging. – OFF – ON 11.LARGE PAPER MODE Sets whether to improve toner fix on large-sized paper. – OFF – ON 12.AUTO ADF DRTY ADJ Sets whether to activate smudge (due to dust or dirt) reduction during printing. When the ADF is dirty, copies may contain unwanted dots or lines. – ON – OFF 13.MAINTENANCE CODE This setting is not functional in this model. Machine Settings 10.
REPORT SETTINGS Setting Item 1. SETTINGS 1. TX REPORT PRINT ERROR ONLY REPORT WITH TX IMAGE OUTPUT YES REPORT WITH TX IMAGE OUTPUT NO Description Sets the report functions. (See Chapter 7, “Reports and Lists,” in the Advanced Operation Guide.) Sets whether the transmission report prints out. Prints a report only when a transmission error occurs. Sets whether to print the first page of the document under the report. – OFF – ON Prints a report every time you send a document.
REPORT SETTINGS 2. LIST PRINT Prints reports/lists. Prints the transaction report (max. last 40 transactions) manually. 2. SPEED DIAL LIST Prints the list of destinations registered in Address Book. – 1. 1-TOUCH LIST – 2. CODED DIAL LIST – 3. GROUP DIAL LIST 3. ADD BOOK DETAILS Prints the details of Address Book. – 1. 1-TOUCH (DETAILS) – 2. CODED (DETAILS) 4. USER DATA LIST Prints the setting list registered in the menu. (See “Printing USER’S DATA LIST,” on p. 14-1.) Machine Settings 1.
SYSTEM SETTINGS Setting Item 1. SYS. MANAGER INFO Description Sets the system manager information to protect the contents of . Once the system manager ID and system password is set, they must be entered every time you access the menu. 1. SYS. MANAGER ID Sets the system manager ID (seven digits). 2. SYSTEM PASSWORD Sets the system manager password (seven digits). 3. SYSTEM MANAGER Sets the system manager name (max. 32 characters, including spaces). 2.
SYSTEM SETTINGS 2. COPY 1. RESTRICT COPY Sets if the copy limit is used. – OFF – ON 2. COPY LIMIT Sets page limits for from 0 to 999,999 pages. 3. SCAN Sets if the scan limit is used. – OFF – ON 2. SCAN LIMIT Sets page limits for from 0 to 999,999 pages. Sets the limit for color scans. 1. RESTRICT CLR SCAN Sets if the color scan limit is used. – OFF – ON 2. COLOR SCAN LIMIT Sets page limits for from 0 to 999,999 pages. 5. PRINT Sets the limit for prints. 1.
SYSTEM SETTINGS 2. PAGE TOTALS Displays, clears, and prints counter information. 1. VIEW PAGE TOTALS Displays how much paper was used by each department. – 1. TOTAL PRINT – 2. COPY – 3. SCAN – 4. RESTRICT CLR SCAN – 5. PRINT 2. CLEAR ALL TOTAL Clears counter information. – OFF – ON 3. PRINT LIST Prints counter information. – OFF – ON 3. PDL JOBS W/OUT ID Sets if print jobs from computers with unknown IDs are accepted or rejected. ON Accepts print jobs from computers with unknown IDs.
SYSTEM SETTINGS 2. IP ADDRESS Registers a fixed IP address to the machine. (See “Set the Machine for Network Usage,” in the Quick Start Guide.) 3. SUBNET MASK Registers a fixed subnet mask to the machine. 4. GATEWAY ADDRESS Registers a fixed gateway address to the machine. 5. DNS SETTINGS Sets the DNS server settings. 1. PRIMARY SERVER Registers the primary server address. 2. SECONDARY SERVER Registers the secondary server address. 3. HOST NAME Registers the host name of the DNS server. 4.
SYSTEM SETTINGS 8. RAW SETTINGS Sets whether to use RAW as the print application. ON Enables to use RAW. 1. USE BIDIRECTIONAL Sets whether to use bi-directional communication. – ON – OFF OFF Disables to use RAW. 9. USE PASV MODE Sets the PASV mode for FTP. – OFF – ON 10.FTP EXTENSION Sets the FTP Extension settings. – OFF – ON 11.USE HTTP Sets whether to activate HTTP (HyperText Transfer Protocol) for the Remote UI. – ON – OFF 12.PROXY SETTINGS Sets whether to use Proxy server. 1.
SYSTEM SETTINGS 14.SET IP ADD RANGE OFF Disables restriction of IP address of computers. ON Enables restriction of IP address of computers from which data (print/fax jobs) can be sent to the machine. 1. PERMIT/ REJECT Selects whether to permit or reject access from a specified IP address. – REJECT – PERMIT 2. SET IP ADDRESS Specifies the IP address range. and must be entered for each setting. – 1. IP ADDRESS 1 – 2. IP ADDRESS 2 – 3. IP ADDRESS 3 – 4.
SYSTEM SETTINGS 2. SMB SETTINGS 1. USE SMB CLIENT Sets the SMB settings to use the machine on a NetBIOS network. Sets if SMB client is used. OFF SMB client is not used. ON SMB client is used. 1. SERVER Enters the NetBIOS name of the machine. 2. WORKGROUP Enters the name of the workgroup the machine belongs to. 3. COMMENT Enters a comment about the printer. 4. LM ANNOUNCE Sets if the machine notifies the LAN Manager of its existence. – OFF – ON 3.
SYSTEM SETTINGS 4. DEDICATED PORT Sets or browses detailed information on the machine with a Canon printer driver or utility. – ON – OFF 5. ETHERNET DRIVER Specifies the type of network connection. 1. AUTO DETECT Selects the detection method of Ethernet driver. AUTO Sets the machine to determine the communication mode (Half duplex/Full duplex) and Ethernet type (10Base-T/ 100Base-TX) automatically. MANUAL Sets the communication mode and Ethernet type manually. 1.
SYSTEM SETTINGS 7. E-MAIL/I-FAX 1. SMTP RX Sets whether to receive e-mail/l-faxes using the machine’s own SMTP receiving function. – OFF – ON 2. SMTP SERVER Registers the host name of the machine with the DNS server. 3. POP Sets whether to receive e-mail/l-faxes using a POP server. – OFF – ON 4. E-MAIL ADDRESS Enters the e-mail address your machine will use (max. 64 characters). 5. POP SERVER Enters the POP server IP address or name (max. 48 characters). 6.
SYSTEM SETTINGS 6. COMMUNICATIONS 1. E-MAIL/I-FAX Sets the fax, e-mail, and I-fax communication. Sets the e-mail/I-fax communications. 1. MAX TX DATA SIZE Sets the maximum data size for outgoing e-mail messages and I-fax documents. If the e-mail message exceeds this data size limit, it is split up into several e-mail messages before being sent. However, if an I-fax transmission exceeds the data size limit, it is handled as an error, and it is not sent. (0 to 99 MB) 2.
SYSTEM SETTINGS 3. MEMORY RX TIME Sets whether to set a period for memory reception. OFF Disables setting a period of memory reception. ON Enables setting a period of memory reception. – 1. MEM RX START TIME – 2. MEM. RX END TIME 7. FORWARD ERR. SET. Sets the machine to print and/or store received documents when document forwarding fails. 1. PRINT Sets whether to print out the image if forwarding fails. – ON – OFF 2. STORE TO MEMORY Sets whether to store the image in memory if forwarding fails.
SYSTEM SETTINGS 3. FAX DRIVER TX Sets whether to restrict sending faxes from a computer using the fax driver. – ON – OFF 4. CONFIRM FAX NO. Sets whether to confirm the entered fax numbers each time you send a fax. – OFF – ON 10.CHECKING THE LOG Sets whether to allow displaying the log. ON Enables confirmation of logs using [System Monitor]. OFF Disables confirmation of logs using [System Monitor]. Activity Report will not be printed automatically.
Machine Settings 14-52
Appendix Specifications General Personal Desktop ● Power Source 120 V-127 V, 60 Hz (Power requirements differ depending on the country in which you purchased the product.) ● Power Consumption Approx. 848 W (max.) ● Warm-up Time • imageRUNNER 1023N/1023iF Less than 16 sec.* • imageRUNNER 1019J/1023 Less than 13.5 sec.
General ● Dimensions • imageRUNNER 1023N/1023iF 17 7/8" (H) x 18" (D) x 20 1/2" (W) (453 mm (H) x 457 mm (D) x 520 mm (W)) 22 7/8" (H) x 18" (D) x 20 1/2" (W) (581 mm (H) x 457 mm (D) x 520 mm (W)) (with optional paper drawer) • imageRUNNER 1019J/1023 14 7/8" (H) x 18" (D) x 20 1/2" (W) (378 mm (H) x 457 mm (D) x 520 mm (W)) 19 7/8" (H) x 18" (D) x 20 1/2" (W) (506 mm (H) x 457 mm (D) x 520 mm (W)) (with optional paper drawer) ● Installation Space 38 3/4" (D) x 44" (W) (984 mm (D) x 1,117 mm (W)) (includ
Copier ● Scanning Resolution 600 dpi x 600 dpi ● Printing Resolution 1200 dpi enhanced x 600 dpi ● Magnification 1:1 ± 1.0%, 1:2.000, 1:1.290, 1:0.780, 1:0.640, 1:0.500 Zoom 0.500 - 2.000, 1% increments ● First Copy Time Platen glass: less than 8 sec. (LTR) ADF: less than 12 sec. (LTR) ● Copy Speed • imageRUNNER 1023/1023N/1023iF Direct: LTR 23 cpm • imageRUNNER 1019J Direct: LTR 19 cpm ● No. of Copies Max.
Facsimile ● Modem Speed 33.6 Kbps Automatic fallback ● Transmission Speed Approx. 3 seconds/page*2 at 33.6 Kbps, ECM-JBIG, transmitting from the memory ● Fax Resolution FINE: 203 pels/in. x 196 lines/in. (8 pels/mm x 7.7 lines/mm) PHOTO: 203 pels/in. x 196 lines/in. (8 pels/mm x 7.7 lines/mm) SUPER FINE: 203 pels/in. x 392 lines/in. (8 pels/mm x 15.4 lines/mm) ULTRA FINE: 406 pels/in. x 392 lines/in. (16 pels/mm x 15.4 lines/mm) STANDARD: 203 pels/in. x 98 lines/in. (8 pels/mm x 3.
Telephone ● Connection External telephone/answering machine/data modem Appendix *1 The Public Switched Telephone Network (PSTN) currently supports 28.8 Kbps modem speed or lower, depending on telephone line conditions. 2 * Based on ITU-T Standard Chart No. 1, JBIG standard mode.
Send Feature Scan Features ● Communication Protocol FTP (TCP/IP), SMB (TCP/IP) ● Data Format TIFF (B&W), PDF (B&W), JPEG (Color), PDF (Compact) (Color) ● Resolution 100 x 100 dpi, 150 x 150 dpi, 200 x 100 dpi, 200 x 200 dpi, 200 x 400 dpi, 300 x 300 dpi, 400 x 400 dpi, 600 x 600 dpi ● System Environment Windows 98/Me/XP, Windows 2000 Server/ Professional (SP1 or later), Windows Server 2003, Solaris Version 2.6 or later, Mac OS X, Red Hat Linux 7.2 ● Interface USB 2.
Cassette Feeding Module-N1 (Optional) ● Paper Feeding System 500 sheets x 1 drawer (21 lb bond (80 g/m2)) ● Acceptable Paper Stock » p. 3-1 ● Power Source From the main unit ● Dimensions 6 1/4" (H) x 17 3/8" (D) x 20 1/2" (W) (158 mm (H) x 440 mm (D) x 520 mm (W)) ● Weight Approx. 11.46 lb (5.
Index Symbols & Numerics Cleaning the ADF automatically 12-6 2 on 1 key 1-4 Clear key 1-4 Clearing Jams 13-1 A Accessing the Setting Menu 14-3 Additional Functions key 1-4 Address Book Storing/Editing 4-27 Address Book key 1-6 Using 4-21 Document jams 13-1 Paper jams 13-3 Coded Dial Codes Deleting 4-38 Editing 4-35 Registering 4-28, 4-33 Storing/Editing 4-27 Using 4-17 ADDRESS BOOK SET. 14-21 Coded Dial key 1-6, 4-17 ADF 1-1, 2-6 Collate key 1-4 ADJUST.
D F Daylight Saving Time 1-18 Favorites Buttons Delayed TX key 1-6 Density Copying 6-4 Sending 4-5 Density key 1-4 Using 4-25 Fax Features vii Fax Numbers Registering 4-28 Faxes Department ID Management 11-1 After using the machine 11-2 Before using the machine 11-1 Direct Sending 4-54 Direct TX key 1-6, 4-55 Document Receiving 5-1 Frame Erase key 1-4 Front cover 1-2 G Group Addresses 4-40 Handling 2-1 Jams 13-1 Loading 2-4 Requirements 2-1 Scanned area 2-3 Adding destination 4-43 Changing name 4-
J N Jam Location indicator 1-3, 13-1 Numeric keys 1-4 Jams Document 13-1 Paper 13-3 Using 4-12 O OK key 1-3 L ON/OFF key 1-4 LCD 1-3 One-Touch Keys 1-6 Messages 13-6 Standby Mode 1-7 Deleting 4-38 Editing 4-35 Registering 4-28, 4-33 Storing/Editing 4-27 Using 4-15 Left cover 1-2 Legal 3-1 Letter 3-1 Loading Document 2-4 Envelopes 3-5 Paper 3-5 Operation panel 1-1, 1-3 Main operation panel 1-3 Send operation panel 1-6 Operation panel Power Switch 1-10 Optional Card Reader 11-3 M After using t
PAPER JAM message 13-3 S Paper Select indicator 1-3 SCAN key 1-3 Paper Select key 1-4 Scan Settings 4-3 Pause key 1-6 PC Fax Feature xii Copying 6-3 Sending 4-3 PC Faxing 9-1 Scanner Feature xi Platen glass 1-2, 2-4 Scanning 8-1 Power Failure 13-19 Scanning area 1-2, 2-3 Power indicator 1-4 SEND key 1-3 Print Media 3-1 Send Operation Panel 1-6 Printable Area 3-3 Send Settings 4-7 Printer Feature xi Sending Documents 4-1 PRINTER SETTINGS 14-30 Sending Features iv Printing 7-1 Service
Specifying Destinations 4-11 Two-Sided Stack bypass 1-2, 3-5 Sending 4-6 Extension 1-2 Slide guide 1-2 Two-Sided key 1-4 TX/RX SETTINGS 14-12 Stack bypass extension 1-2, 3-6 Standby mode Copy 1-7 Scan 1-7 Send 1-7 Start key 1-4 U USER DATA LIST 14-1 Printing 14-1 Using Address Book key 4-21 Coded dial codes 4-17 Favorites buttons 4-25 Group addresses 4-19 Numeric keys 4-12 One-touch keys 4-15 Stop key 1-4 Storing/Editing Address Book 4-27 Coded Dial Codes 4-27 Group Addresses 4-40 One-Touch Keys 4-2
Series Basic Operation Guide What Can I Do with This Machine? Before Using the Machine Document Handling Series Print Media Sending Documents Receiving Fax/I-Fax Documents CANON INC. Basic Operation Guide 30-2, Shimomaruko 3-chome, Ohta-ku, Tokyo 146-8501, Japan CANON U.S.A., INC. One Canon Plaza, Lake Success, NY 11042, U.S.A. CANON CANADA INC. 6390 Dixie Road Mississauga, Ontario L5T 1P7, Canada CANON EUROPA N.V. Bovenkerkerweg 59-61 1185 XB Amstelveen, The Netherlands CANON FRANCE S.A.S.