
iPF760/iPF765 Setup Guide


4
b
a
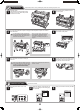
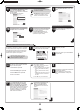
Push the printhead fi xer lever all the way
back.
Pull the printhead fi xer cover down toward
the front to lock the printhead in place.
Insert the printhead into the carriage (b)
with the ink holes (a) facing away from the
printer as shown in the fi gure. Carefully
push the printhead fi rmly into the carriage
(b), ensuring that the part covered by
the protective part does not touch the
carriage.
6
7
8
Close the top cover .
9
Remove the orange protective part (a).
To remove orange protective part (b),
push the grip (c) as you remove the
part
.
5
• Do not reattach the protective part after
removing it. Dispose of these materials
according to local regulations.
Never touch the parts covered by the
protective part.
This may damage the
printhead
and affect printing quality.
•
The printhead contains ink, so be careful
not to spill it once the protective
part
is
removed.
•
Lift the printhead fi xer cover to open it
fully.
Hold the printhead by the grips (a) as you
remove it from the pouch.
a
a
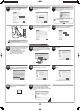
3
4
a
b
c
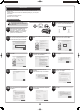
Follow these steps to load the provided sample paper for printhead adjustment.
Load Paper to Adjust the Printhead
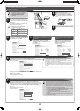
Return unused paper to the pouch it
came in, and store it away from heat,
humidity and direct sunlight.
•
Slide the width guide (a) and align it
with the mark for the size of paper to be
loaded. In this example, align the width
guide with A2 to align it with the size of the
sample paper.
Select type of paper for printhead adj.
is shown on the display screen. Check
that Cut Sheet is selected and press OK.
Instructions on loading cut sheets are
shown on the display screen.
Prepare one sheet of paper.
Refer to the packaging for the paper to
check which side is the printable surface.
1
2
a
3
Pull the printhead fi xer lever forward all
the way to open it completely.
2