
iPF760/iPF765 Setup Guide


8
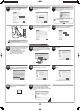
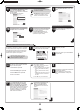
For TCP/IP (network) connections
Install the printer driver
4
In the Printer Selection window, select
The printer is connected to computers
in a network and click Next.
When searching the available printer on
the network
After reading the precautions in the
Getting Ready window, select Find
available printers in the network and
click Next.
Proceed to step 6.
When entering the printer's IP address
manually
After reading the precautions in the Getting
Ready window, select Specify the IP
address of available printers in the
network and click Next.
Proceed to step 8.
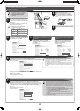
55
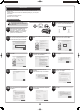
When searching the available printer on the network
Available printers are listed in the Search Results window.
Select a printer from the list on either their IPv4 Devices or IPv6 Devices
tabs and click Next.
Select the printer with the IP Address Status is Available, and then click
Next to start installation.
Proceed to step 9 in this case.
66
• If the printer is already connected to
the network, confirm the IP address
assigned to the printer. Ask your
network administrator for further
information.
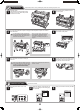
1
Use the LAN cable to connect the LAN port
on the back of the printer to the hub port.
Pass the network cable through the wiring
bracket (a).
If the printer is already connected to the
network, proceed to step 2.
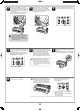
MEM
O
• If the printer is on, the Link indicator
under the LAN port lights.
1000Base-T
connection
The LED on the bottom
lights green.
100Base-TX
connection
The LED on the top lights
orange.
10Base-T
connection
The LED on the top lights
green.
a
2
Make sure the printer is on.
Turn the computer on and insert the
provided User Software CD-ROM for
your operating system in the CD-ROM
drive.
3
Perform procedures of steps 2-8 on page
6.
When searching the available printer on the network
In the Method of Confi guring IP Addresses window, enter the IP
address in Confi gure manually, under Method of Confi guring IP
Addresses. Click Install to start the installation process. Also enter your
preferred name for the printer in Device Name and the installation location
in Printer Location under Information About Printer to Confi gure, as
desired.
The installation process begins.
Proceed to step 9.
77
• If you use a DHCP server for automatic assignment of the printer's
IP address, printing may no longer be possible after the printer is
turned off and on. This is because a different IP address has been
assigned. When using DHCP server functions, consult your network
administrator and configure the settings in one of the following ways:
• Configure the setting for dynamic DNS updating
In the printer menu, either set DNS Dync update to On, or activate
the setting Enable DNS Dynamic Update in RemoteUI.
(→"Menu Settings", User Manual)
(→"Configuring the Printer's TCP/IP Network Settings", User
Manual)
• Configure the setting for assignment of the same IP address each
time the printer starts up
MEM
O
• The IPv6 Devices tab is displayed in Windows 7, Windows Vista,
Windows Server 2008 R2, and Windows Server 2008.
• If the printer you want to use is not displayed in the list on the IPv6
Devices tab, connect via IPv4 instead.
• If the printer you want to use is not displayed in the list of printers on
the IPv4 Devices tab, refer to "When the printer cannot be found on
the network" on page 9 to setup and configure an IP address for the
printer.