Quick Start Guide Photo Printer Series Quick Start Guide The following ink tanks are compatible with this printer. For details on ink tank replacement, refer to “Replacing an Ink Tank” in this guide. QT5-0115-V02 XXXXXXXX ©CANON INC.
Getting Help from Canon Ordering Information For additional supplies, use the following descriptions and order numbers. Help Us Help You Better Before you contact Canon, please record the following information. Serial Number (located on the inside of the product): Model Number (located on the top of the product): Setup CD-ROM number (located on the CD-ROM): Purchase Date: Customer Technical Support Sequence* 1. Internet — www.canontechsupport.
Photo Printer Quick Start Guide
Canon PIXMA Pro9000 Photo Printer Quick Start Guide. Copyright This manual is copyrighted by Canon U.S.A., Inc. with all rights reserved. Under the copyright laws, this manual may not be reproduced in any form, in whole or in part, without the prior written consent of Canon U.S.A., Inc. © 2006 Canon U.S.A., Inc. Disclaimer Canon U.S.A., Inc. has reviewed this manual thoroughly in order that it will be an easy-to-use guide to your Canon PIXMA Pro9000 Photo Printer.
Contents Contents Basic Printing Turning on the Printer . . . . . . . . . . . . . . . . . . . . . . . . . . . . . . . . . . . . . . . . . . . . . . . . . . . . . . . . . . . . . 2 Turning off the Printer . . . . . . . . . . . . . . . . . . . . . . . . . . . . . . . . . . . . . . . . . . . . . . . . . . . . . . . . . . . . . 3 Loading Paper . . . . . . . . . . . . . . . . . . . . . . . . . . . . . . . . . . . . . . . . . . . . . . . . . . . . . . . . . . . . . . . . . . . 4 Using Specialty Media . . . . . .
Basic Printing Basic Printing This Quick Start Guide describes some of the features of your printer and how to use them. For more information, view the Pro9000 User’s Guide, Printer Driver Guide, Photo Application Guide, and Digital Photo Printing Guide installed on your computer, or use the online help within your printer driver interface: While in the printer’s properties window, press the F1 key, or click in the upper right corner.
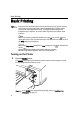
Basic Printing Turning off the Printer 1 To turn off the printer, press the POWER button. When the POWER lamp stops blinking, the printer is turned off. About the Power Plug When removing the power plug after turing off the printer, be sure to check that the POWER lamp is not lit. If the power plug is removed from the wall outlet with the POWER lamp lit or blinking green, the printer cannot protect its print heads and may be unable to print.
Basic Printing Loading Paper This section describes how to load paper in the Auto Sheet Feeder and the Front Tray. Using the Auto Sheet Feeder and the Front Tray You can load paper in both the Auto Sheet Feeder and the Front Tray. Loading paper in the Auto Sheet Feeder is easy, and is convenient if you frequently switch to and print on various sizes or types of paper. Use the Front Tray to print on large size paper or to print on thick paper such as art paper.
Basic Printing Loading Paper in the Auto Sheet Feeder For detailed information on the Canon genuine media for use with its various printers, refer to “Using Specialty Media” on page 15, or “Printing Media” in the User’s Guide. 1 Flatten the four corners of the paper before loading it. z When paper is curled, gently bend it in the opposite direction of the curl (without curling the reverse side) and then load the paper. For details on how to flatten paper curl, refer to “Media is curled” on page 68.
Basic Printing 3 Load the paper. Load Limit Mark Do not load beyond this Load Limit Mark. (1) Load the paper into the Auto Sheet Feeder with the print side facing UP. (2) Align the paper stack with the right edge of the Auto Sheet Feeder. (3) Pinch the Paper Guide and slide it against the left side of the paper stack. Set the Paper Guide correctly when printing from the Auto Sheet Feeder. The paper may not feed correctly if the Paper Guide is not set correctly.
Basic Printing temperature / low humidity). If this happens, reduce the number of sheets of paper by about half (approximately 5 mm / 0.2 inches). z When printing on art paper that is not produced by Canon that is up to 200 gsm / 53 lb, load one sheet at a time. z When printing on plain paper, do not stack more than 50 sheets in the Front Tray. z Do not touch the printed surfaces until the ink dries. For specific drying times, refer to the instructions packaged with your media.
Basic Printing Loading Envelopes in the Auto Sheet Feeder Use either European DL or US Comm. Env. #10 size envelopes. The address is rotated automatically to match the direction of the envelope when printing. z Do not use envelopes with embossed or treated surfaces, a double flap, pressure seals or sticker flaps. z Select either DL Env. (Windows) / DL Envelope (Macintosh) or Comm. Env. #10 (Windows) / #10 Envelope (Macintosh) in the printer driver according to the envelope size you are using.
Basic Printing Loading 4" x 6" or 5" x 7"-Sized Paper in the Auto Sheet Feeder Cutting plain paper to 4" x 6" / 101.6 mm x 152.4 mm or 5" x 7" / 127.0 x 177.8 mm size for a trial printing can cause paper jams. (1) Load the paper and align it with the right edge of the Auto Sheet Feeder with the print side facing UP. • Load the paper lengthways regardless of the direction of the document. • You can load up to 20 sheets of 4" x 6"-sized paper; 10 sheets of 5" x 7"-sized paper.
Basic Printing Loading Paper in the Front Tray FRONT FEED Button You can check the printer status by FRONT FEED button indication. The FRONT FEED button flashes quickly (two flashes at a time) when preparations for loading the paper in the Front Tray are finished. Load the paper in the Front Tray correctly. The FRONT FEED button flashes slowly (one long flash at a time) when preparations to start printing from the Front Tray are complete. Start printing from the Front Tray.
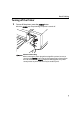
Basic Printing 2 Set the Front Tray. To set the Front Tray in the Front Paper Feeding Position, follow the procedure below. Side view of the printer (2) Lift the Front Tray. (1) Tilt the Front Tray upward. (3) Tilt the Front Tray forward to set it in the Front Paper Feeding Position. The FRONT FEED button lights. (4) Press the REAR SUPPORT button to open the Rear Support.
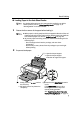
Basic Printing 3 Prepare to load paper. (2) Press the right corner of the Rear Support to open the Rear Support Extension. When loading paper that is Letter size or smaller, this procedure is not necessary. (1) Pull out the Front Tray Extension completely. (3) Press the FRONT FEED button. The printer starts making operating noises and then the POWER lamp flashes for about 20 seconds. Do not load paper when the POWER lamp is flashing. Otherwise, the paper or the printer may be damaged.
Basic Printing z When paper is curled, gently bend it in the opposite direction of the curl (without curling the reverse side) and then load the paper. For details on how to flatten paper curl, refer to “Media is curled” on page 68. z To prevent paper from being curled, we recommend handling it in the following ways: - Put unused paper back into the package, and store them horizontally. - Remove only as many sheets from the package as you need right before printing.
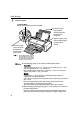
Basic Printing Returning the Front Tray to Its Normal Printing Position When using the Auto Sheet Feeder, set the Front Tray to its normal printing position. z Be sure to follow the procedure below when returning the Front Tray to its normal printing position. Otherwise, the printer may be damaged. z When the Front Tray is set to the Front Paper Feeding Position, printing by using the Auto Sheet Feeder is not possible. Be sure to set it to its normal printing position.
Basic Printing Using Specialty Media Canon recommends that you use Canon genuine media to ensure optimal print quality.
Basic Printing Canon Genuine Media Media Type Paper Support Load Limit Auto Sheet Feeder Front Tray High Resolution 13" x 19": up to 20 13" x 19": 1 sheet Paper sheets 11" x 17": up to 50 11" x 17": 1 sheet sheets Letter: up to 80 Letter: 1 sheet sheets Super White Paper Up to 13 mm or 1 sheet 0.
Basic Printing Media Type Fine Art Paper “Museum Etching”*4*5 Fine Art Paper “Photo Rag”*4 Fine Art Paper Premium Matte*5 Photo Stickers*2 Paper Support Load Limit Auto Sheet Feeder Front Tray Not loadable*3 13" x 19": 1 sheet Letter: 1 sheet Printer Driver Setting for Media Type 13" x 19": 1 sheet Letter: 1 sheet Not loadable*3 Fine Art Photo Rag 1 sheet 13" x 19": 1 sheet Letter: 1 sheet 13" x 19": 1 sheet Letter: 1 sheet 1 sheet Fine Art Museum Etching Fine Art Premium Matte Photo Paper Plus Glos
Basic Printing Printing with Windows z Menu and command names may differ between software applications, and more steps may be required. For details, refer to the documentation for each software application you use. z The steps described in this section are for printing in Windows® XP Service Pack 2 (hereafter, called Windows XP SP2). z You can use Easy-PhotoPrint or Easy-PhotoPrint Pro to easily do print operations when printing photographs.
Basic Printing 4 Open the printer properties dialog box. (1) Select Print from the application software’s File menu. The Print dialog box opens. (2) Ensure that your printer is selected. (3) Click Preferences or Properties. 5 Specify the required settings. (1) Click Media Type to select the type of media loaded in the printer. (2) Ensure that Paper Source is set to the position in which you loaded the paper in step 2. (3) Click OK.
Basic Printing z From the Page Setup tab, select the correct document size to be printed. If the size is different from that set in the application, then you need to set it to the same size or use Scaled Printing or Fit-to-Page Printing. Refer to the Printer Driver Guide. z To adjust the Print Quality settings, select Custom and click Set on the Main tab. You can control the print quality in the Custom dialog box.
Basic Printing Printing with Macintosh z Menu and command names may differ between software applications, and more steps may be required. For details, refer to the documentation for each software application you use. z The steps described in this section are for printing in Mac® OS X v.10.4.x (hereafter called Macintosh®). z You can use Easy-PhotoPrint or Easy-PhotoPrint Pro to easily do print operations when printing photographs. Easy-PhotoPrint and Easy-PhotoPrint Pro are provided on the Setup CD-ROM.
Basic Printing 4 Select Paper Size. (1) Select Page Setup from the application software’s File menu. The Page Setup dialog box opens. (2) Confirm that Pro9000 is selected in Format for. (3) Select the desired paper size from Paper Size. (4) Click OK. 5 Specify the required settings. (1) Select Print from the application software’s File menu. The Print dialog box opens. (2) Select Quality & Media from the pop-up menu. (3) Select the desired media type from Media Type.
Basic Printing When you select the print mode appropriate to your document from Print Mode, the document will be printed in color and at a print quality suited to the characteristics of the Media Type you have selected. - Printing a top-quality photo: Select when printing documents consisting mainly of photographs and graphics featuring fine color gradation. - Printing tables and charts: Select when printing documents consisting mainly of graphs and graphics (illustrations) with strong color definition.
Basic Printing 6 Print the document. (1) Click Print. Do not open the Top Cover while printing. You can cancel a print job while printing. See “Canceling Printing” on page 25.
Basic Printing Canceling Printing You can cancel a print job while printing, with the RESUME/CANCEL button on the printer. 1 Press the RESUME/CANCEL button while printing. (1) Press the RESUME/CANCEL button. Printing is canceled and paper is fed out. You can also cancel a print job by clicking Cancel Printing on the Canon IJ Status Monitor. To display the Canon IJ Status Monitor, click Canon Pro9000 on the taskbar. 1 Click the printer’s icon in the Dock and display the list of print jobs in progress.
Advanced Printing Advanced Printing Printing Photographs Directly from a PictBridge Compliant Device Connecting a PictBridge compliant device such as a digital camera, camcorder or mobile phone to the printer allows you to print recorded images directly without using a computer. z PictBridge is an industry standard enabling a range of digital photo solutions, including the Direct Printing of photos from a digital camera, camcorder or mobile phone* without the need to use a computer.
Advanced Printing Connecting to a PictBridge Compliant Device To connect a PictBridge compliant device to this printer, use the USB cable supplied with the device. Do not connect any equipment other than PictBridge compliant devices to the Direct Print Port of the printer. If you do so, electric shock, fire, or damage to the device could result. z When printing photos with the digital device connected to the printer, it is advisable to use the AC adapter supplied with the device.
Advanced Printing 4 Connect the PictBridge compliant device to the printer. Depending on the model or brand of your PictBridge compliant device, you may have to select a print mode of producing photos before connecting the device. You may also have to turn on the device or select Play mode manually after connecting the device to the printer. Perform necessary operations according to the instruction manual supplied with your device. (1) Make sure the device is turned off.
Advanced Printing (3) Set up the device for Direct Printing. When the connection between the device and printer has been established, the POWER lamp on the printer flashes twice. * The power-on sequence may differ depending on the model or brand of the device. will appear on the LCD display of the device when the printer is correctly connected.
Advanced Printing The following sizes and types of paper can be loaded in the printer by selecting options from Paper size and Paper type. “Paper size” setting “Paper type” setting 4" x 6" (Default) Photo (Default) Photo Photo Semi-gloss*2 Fast Photo Photo Semi-gloss*2 *3 5" x 7" 8" x 10" 8.
Advanced Printing About “Layout” and “Trimming” By default, Borderless is selected for Layout and Off (No trimming) is selected for Trimming for this printer. When printing onto Photo Stickers (PS-101) (16-up), Select N-up for Layout, then select 16. z Some PictBridge compliant devices display the Layout option; 2-up, 4up, 9-up, and 16-up. In this case always select 16-up. z If there are no options on the PictBridge compliant device that correspond to 16-up, printing on stickers is not possible.
Advanced Printing z When Warm tone is selected, the photo is printed in a warm black and white tone. z If the printing troubles have occurred on the top and/or bottom edges of the paper such as uneven coloration or white streaks when printing with B/W, Cool tone, or Warm tone selected, we recommend printing it from the computer with the top and bottom margins set to more than 45 mm / 1.77 inches.
Advanced Printing Checking or Changing PictBridge Print Settings From the Printer You can change the printer’s default PictBridge print settings, such as paper size and type. To do this, install the Canon Setup Utility from the included CD-ROM and connect the printer to a computer. For details, refer to “Canon Setup Utility Menu (Windows)” or “Canon Setup Utility Menu (Macintosh)” in the User’s Guide.
Advanced Printing 3 Open the File menu and select Printing Preferences (or Properties). The printer properties dialog box opens. When opening the printer properties dialog box from Properties, the tabs related to the Windows function (e.g., the Ports tab, or the Details tab) are displayed. These tabs are not displayed, when the printer properties dialog box is opened from Printing Preferences or application programs. For details about these tabs, refer to the Windows documentation.
Advanced Printing Using the Bundled Software The Setup CD-ROM includes photo applications designed to edit the photographs taken by a digital camera and print them as photo-lab quality prints without standard white borders. Please use the application(s) suitable for your print purposes. z To install applications, refer to the Easy Setup Instructions. z For details about using the photo applications, refer to the Photo Application Guide.
Printing Maintenance Printing Maintenance Replacing an Ink Tank Replace ink tank(s) if they are out of ink. When replacing them, check the model numbers and their installation positions. With this printer, the following ink tanks are used. z Green: CLI-8G z Photo Cyan: CLI-8PC z Red: CLI-8R z Cyan: CLI-8C z Photo Magenta: CLI-8PM z Magenta: CLI-8M z Black: CLI-8BK z Yellow: CLI-8Y z Carefully check the labels on the ink tanks so you do not mistakenly insert them in the wrong positions.
Printing Maintenance Getting the Ink Level Information Ink Level Indication on the Printer You can confirm the ink level in each ink tank through the ink lamps. Open the Top Cover of the printer to see how the ink lamps light or flash. Ink is low: The ink lamp flashes slowly (at about three second interval). You can continue printing, but we recommend preparing a new ink tank to replace the associated ink tank.
Printing Maintenance Open the Canon IJ Printer Utility to check the ink level information. 1. Select Applications from the Go menu, and then double-click the Utilities folder. 2. Double-click the Printer Setup Utility icon. When using Mac OS X v.10.2.8, double-click the Print Center icon. 3. Select the name of your printer from the Name list and click Utility. When using Mac OS X v.10.2.8, select the name of your printer from the Name list and click Configure. 4.
Printing Maintenance Knowing When to Replace Ink Tanks The ALARM lamp on the printer flashes orange four times once any one of the ink tanks is out of ink. If ink is out during printing, a message will be displayed on your PC. Check to see which ink tank is out of ink, and replace it with a new one. Close the Top Cover after ink tank replacement to resume printing.
Printing Maintenance z If printing has not finished, you can continue printing for a while by pressing the RESUME/CANCEL button on the printer with the empty ink tank installed. However, you will need to replace it with a new one as soon as printing finishes. If you continue printing with an empty ink tank, it may damage the printer. * Printing does not resume if any of the ink tanks are removed. Be sure to press the RESUME/CANCEL button with the ink tanks installed.
Printing Maintenance Replacing Ink Tanks When an ink tank runs out of ink, replace it using the following steps. 1 Ensure that the printer is on, and then open the Front Tray. Gently press the 2 mark on the Front Tray. Open the Top Cover. The Print Head Holder moves to the center. z If the Top Cover is left open for more than 10 minutes, the Print Head Holder moves to the right. Close and reopen the Top Cover to return the Print Head Holder to the center.
Printing Maintenance 4 Prepare a replacement tank. Do not touch the electrical contacts. (1) Unpack the new ink tank and completely pull off the orange tape. Then, remove the film completely. (2) Remove the orange protective cap from the bottom of the ink tank and discard it. z Be sure to remove the clear film from the ink tank in the exact order shown in (1) in step 4, as failure to follow this step may cause the ink to leak and stain your clothes and hands.
Printing Maintenance 5 Insert the ink tank. Lamp lights red (1) Insert the ink tank into the Print Head. (2) Press on the mark on the ink tank until the ink tank snaps firmly into place. (3) Ensure that the ink lamp lights red. Ensure that all the ink tanks are installed in the order directed by the label. The printer cannot be used unless all the ink tanks are installed.
Printing Maintenance 6 Close the Top Cover. The ink tank installation process is now complete. z The ALARM lamp still flashes orange after the Top Cover is closed if an ink tank is not installed properly. Open the Top Cover and make sure that all the ink tanks are installed in the correct order directed on the label. z To maintain optimal print quality, use an ink tank within six months of its first use. z Once an ink tank has been used, do not remove it from the printer and leave it out in the open.
Printing Maintenance When Printing Becomes Faint or Colors are Incorrect When printing becomes faint or colors are incorrect, even if ink remains in the ink tanks, the Print Head nozzles are probably clogged. Follow the procedures below to clean the nozzles. If the ruled lines are shifted after running the print head maintenance, align the Print Head.
Printing Maintenance z If the ruled lines are shifted Step 1 See “Aligning the Print Head” on page 58 Printing the Nozzle Check Pattern Print the nozzle check pattern to determine whether the ink ejects properly from the Print Head nozzles. Use this function when printed results are blurred or the color is incorrect. z Nozzle check pattern cannot be printed from the Front Tray. Always load paper in the Auto Sheet Feeder. z Ensure that the Inner Cover is closed.
Printing Maintenance 3 Print the Nozzle Check Pattern. (1) Click the Maintenance tab. (2) Click Nozzle Check. (3) Read the message and click Print Check Pattern. The nozzle check pattern will be printed. Do not open the Top Cover while printing. Clicking Initial Check Items displays the items to be checked before printing the pattern. 4 Examine the pattern and take the appropriate action. See “Examining the Nozzle Check Pattern” on page 49.
Printing Maintenance 2 Open the Canon IJ Printer Utility dialog box. (1) Select Applications from the Go menu, and then double-click the Utilities folder. (2) Double-click the Printer Setup Utility icon. When using Mac OS X v.10.2.8, double-click the Print Center icon. (3) Select the name of your printer from the Name list and click Utility. When using Mac OS X v.10.2.8, select the name of your printer from the Name list and click Configure.
Printing Maintenance Examining the Nozzle Check Pattern The nozzle check pattern should appear as follows when ink is discharged properly. Examine the nozzle check pattern output by the printer, and clean the Print Head when necessary. The nozzle check pattern will not be printed correctly if there is not enough ink. Replace the ink tank if the remaining amount of ink is insufficient. See “Replacing an Ink Tank” on page 36. 1 Confirm the printed nozzle check pattern.
Printing Maintenance 2 When cleaning is necessary, click Cleaning on the Pattern Check dialog box. If you want to continue to clean the Print Head from here, go to (3) in step 3 of the Windows or Macintosh Print Head Cleaning procedures as appropriate. See “Print Head Cleaning” on page 51. If both of the group (1) and the group (2) patterns have no white stripes, click Exit or Quit. Nozzle Check Pattern examination finishes.
Printing Maintenance Print Head Cleaning Clean the Print Head if white stripes appear in the nozzle check pattern. Note that cleaning the Print Head causes ink used for cleaning to be absorbed in the ink absorber. Cleaning the Print Head consumes ink, so perform Print Head Cleaning only when necessary. z Ensure that the Inner Cover is closed. Cleaning the Print Head Without a Computer z The Print Head can also be cleaned from the printer itself.
Printing Maintenance 3 Start Print Head Cleaning. (1) Click the Maintenance tab. (2) Click Cleaning. (3) Select the ink group to clean. Clicking Initial Check Items displays the items to be checked before cleaning. (4) Click Execute. Print Head Cleaning starts when the POWER lamp starts blinking green. Do not perform any other operations until the Print Head Cleaning finishes. This takes about 90 seconds. (5) Read the message and click Print Check Pattern to print the nozzle check pattern.
Printing Maintenance 4 Check the Print Head condition with the printed nozzle check pattern. See “Examining the Nozzle Check Pattern” on page 49. If the problem remains after performing Print Head Cleaning twice, try Print Head Deep Cleaning. See “Print Head Deep Cleaning” on page 55. The Cleaning dialog box of (3) in step 3 is directly displayed when you click Cleaning on the Pattern Check dialog box. See “Examining the Nozzle Check Pattern” on page 49. 1 2 Ensure that the printer is on.
Printing Maintenance (3) Select the ink group to clean. Clicking Initial Check Items displays the items to be checked before cleaning. (4) Click OK. Print Head Cleaning starts when the POWER lamp starts blinking green. Do not perform any other operations until the Print Head Cleaning finishes. This takes about 90 seconds. (5) Read the message and click Print Check Pattern to print the nozzle check pattern. The nozzle check pattern is printed.
Printing Maintenance Print Head Deep Cleaning If print quality does not improve by standard Print Head Cleaning, try Print Head Deep Cleaning, which is a more powerful process. Note that cleaning the Print Head causes ink used for cleaning to be absorbed in the ink absorber. Print Head Deep Cleaning consumes more ink than standard Print Head Cleaning, so perform this procedure only when necessary. Ensure that the Inner Cover is closed. 1 2 Ensure that the printer is on.
Printing Maintenance (5) When the confirmation message is displayed, click OK. Print Head Deep Cleaning starts when the POWER lamp starts blinking green. Do not perform any other operation until the Print Head Deep Cleaning finishes. This takes about 120 seconds. 4 Print the nozzle check pattern to check the Print Head condition. See “Printing the Nozzle Check Pattern” on page 46. If a particular color is not printed properly, replace the ink tank of that color. See “Replacing an Ink Tank” on page 36.
Printing Maintenance 3 Start Print Head Deep Cleaning. (1) Ensure that Cleaning is selected from the pop-up menu. (2) Click Deep Cleaning. (3) Select the ink group to clean. Clicking Initial Check Items displays the items to be checked before cleaning. (4) Click OK. Print Head Deep Cleaning starts when the POWER lamp starts blinking green. Do not perform any other operation until the Print Head Deep Cleaning finishes. This takes about 120 seconds.
Printing Maintenance Aligning the Print Head Aligning the Print Head positions allows you to print without shifts in the color registration. Print head alignment is performed either automatically or manually. This section deals with automatic Print Head alignment only. z Automatic print head alignment cannot be performed from the Front Tray. Always load paper in the Auto Sheet Feeder. z Ensure that the Inner Cover is closed.
Printing Maintenance 3 Print the pattern. (1) Click the Maintenance tab. (2) Click Print Head Alignment. (3) Read the message and click Print Head Alignment. Two pattern sheets are printed. It takes about four minutes to complete printing. Do not open the Top Cover while printing. Print head alignment is automatically adjusted by printing the patterns. The printer is now ready to use.
Printing Maintenance z If the patterns are not printed successfully, refer to “Eleven flashes” in “Handling Error Messages” on page 73. z If results of Automatic Print Head Alignment are not satisfactory, refer to “Routine Maintenance” of the User’s Guide and align the Print Head manually. z Clicking Check Setting prints the current settings and finishes the print head alignment.
Printing Maintenance (3) Read the message and click Print Head Alignment. Two pattern sheets are printed. It takes about four minutes to complete printing. Do not open the Top Cover while printing. Print head alignment is automatically adjusted by printing the patterns. The printer is now ready to use. z If the patterns are not printed successfully, refer to “Eleven flashes” in “Handling Error Messages” on page 73.
Troubleshooting Troubleshooting This section provides troubleshooting tips for the most common printing problems. Troubleshooting usually falls into one of the following categories.
Troubleshooting Cannot Install the Printer Driver or an Application Program Problem Possible Cause Cannot Install the Installation Printer Driver procedure not followed correctly Try This Follow the Easy Setup Instructions packaged with your printer for proper printer driver installation. If the installer was forced to be terminated due to an error, Windows may be unstable. Remove the CD-ROM from the CD-ROM drive and restart your computer. Reinstall the printer driver.
Troubleshooting Cannot Connect to PC Properly Problem Printing Speed Is Slow / USB 2.0 Hi-Speed Connection Does Not Work Possible Cause Try This Your environment is If your environment is not fully compatible with USB 2.0, the printer will operate at not fully compatible a lower speed provided under USB 1.1. with USB 2.0. Check the following to ensure that your PC environment supports USB 2.0 HiSpeed connection. z The USB port on your PC supports USB 2.0 Hi-Speed connection.
Troubleshooting Print Results Not Satisfactory or Contains Errors Problem Possible Cause Ink does not eject Print Head nozzles are properly/Printing is clogged Blurred/Colors are Wrong/White Streaks appear Try This Open the Top Cover and check if all ink lamps are lit. See “Replacing an Ink Tank” on page 36. Print the nozzle check pattern to check for uneven ink output. See “Printing the Nozzle Check Pattern” on page 46.
Troubleshooting Problem Printed Ruled Lines are Displaced Possible Cause Try This Print Head is misaligned Align the Print Head. See “Aligning the Print Head” on page 58. Print Quality not set properly Be sure to set the Print Quality setting to High in Windows, or Fine in Macintosh. 1. Open the printer properties dialog box. 2. On the Main tab, click High for the Print Quality setting.
Troubleshooting Problem Printed Surface is Scratched/Back of Paper is Smudged Possible Cause Thick paper is used Try This Select the Prevent paper abrasion check box to widen the clearance between the Print Head and the loaded paper. The settings here are also applied under Direct Printing from a digital camera. Clear the Prevent paper abrasion check box once printing is complete, and then click Send. 1. Open the printer properties dialog box. 2. Click the Maintenance tab and then Custom Settings.
Troubleshooting Problem Printed Surface is Scratched/Back of Paper is Smudged Possible Cause Media is curled Try This If the paper is curled, it may become marked or not feed properly. Use paper after correcting paper curl as follows. 1. Place the paper on a flat surface with the print side*1 face up, then cover it with plain regular paper to avoid damaging the surface. 2. Roll up the paper in the opposite direction as shown in the figure below. (1) (2) *1 3.
Troubleshooting Problem Printer Does Not Start or Printer Stops During Print Jobs Possible Cause Try This Ink tank is not fully inserted When the ink lamp is unlit, press the mark on the ink tank until it clicks into place. The ink lamp lights red when the ink tank is fully inserted. Make sure all of the orange tape is peeled off the ink tank as illustrated in Figure 1. If any orange parts are left like in Figure 2, remove all of the orange parts. (1) Correct * An L-shaped notch appears on the ink tank.
Troubleshooting Problem Printer Does Not Start or Printer Stops During Print Jobs Possible Cause There may be problems with your operating system Try This Restart your computer. It may solve the problem. Delete an undesired print job, if there is any. Use Canon IJ Status Monitor in Windows or click the printer’s icon in the Dock in Macintosh for the deletion. 1. Open the printer properties dialog box. See “Opening the Printer Properties Dialog Box Directly from the Start Menu” on page 33. 2.
Troubleshooting Paper Does Not Feed Properly Problem Paper Does Not Feed Properly Possible Cause Try This Inappropriate paper Check to see if the paper you are printing on is too thick, too heavy, or curled. type is used See “Print Media to Avoid” on page 4. Flatten paper when it is curled. Paper Feed Roller is Follow the steps described below to clean the Paper Feed Rollers. dirty Cleaning the Paper Feed Rollers consumes them, so perform this procedure only when necessary. 1.
Troubleshooting Paper Jams Problem Paper Jams Possible Cause Paper jams in the Auto Sheet Feeder/ Front Tray/Rear Support Try This Remove the paper according to the following procedure. 1. Slowly pull the paper out, from the Auto Sheet Feeder, the Front Tray, or the back of the printer, whichever is easier. Feeding from the Auto Sheet Feeder Feeding from the Front Tray If the paper tears and a piece remains inside the printer, open the Top Cover and remove it.
Troubleshooting Handling Error Messages When a printer error occurs, the ALARM lamp flashes orange in the way as shown below. The number of flashes (orange) indicates the type of error that has occurred. Count the flashes and take the appropriate action to correct the error. Repeats Note the number of flashes Number of Flashes Possible Cause Try This Two flashes No paper in the Auto Sheet Feeder Reload paper to the Auto Sheet Feeder and press the RESUME/CANCEL button.
Troubleshooting Number of Flashes Eight flashes Possible Cause Try This Ink absorber almost The printer has a built-in ink absorber for the ink used during print head cleaning, full for example. Eight flashes indicates that the ink absorber is nearly full. Press the RESUME/CANCEL button to cancel the error so you can continue printing. Before the ink absorber becomes completely full, contact the Customer Care Center. (You will need to replace a particular part of the printer.
Troubleshooting Number of Flashes Possible Cause Try This Eleven flashes Automatic print When performing Automatic Print Head Alignment head alignment Possible causes are as follows: failed/The Page z Letter-sized paper is not loaded on the Auto Sheet Feeder. Size setting does Press the RESUME/CANCEL button on the printer to clear the error, then load not match the size two sheets of Letter-sized plain paper in the Auto Sheet Feeder.
Troubleshooting Number of Flashes Possible Cause Try This An error that requires contacting the Customer Care Center may have occurred. POWER (green) and ALARM Disconnect the printer cable from the printer, and then turn the printer off and (orange) lamps flash unplug the printer from the power supply. Plug the printer back in and turn the alternately printer back on after leaving it for a while. If the problem remains, contact the Customer Care Center.
Troubleshooting Problem Possible Cause Try This Error Regarding the The printer is not Load the paper correctly in the Front Tray according to the procedure described Auto Sheet Feeder or ready to feed paper in “Loading Paper in the Front Tray” on page 10 and press the RESUME/CANCEL Front Tray from the Front Tray button on the printer. yet A paper size that cannot feed from Click Cancel Printing, in the dialog box that is displayed.
Troubleshooting Problem Possible Cause Try This Error Regarding the Width of Paper The Page Size setting does not match the size of the paper loaded in the printer Press the RESUME/CANCEL button on the printer to clear the error. Then check the Page Size setting in the Page Setup tab (Windows) or the Page Setup dialog box (Macintosh) in the printer driver and load paper that is the same size as the setting and try printing again.
Troubleshooting Problem Possible Cause Try This “Error No.: 300” Printer you want to use is not selected on the Printer popup menu on the Print dialog box Select Pro9000 on the Printer pop-up menu on the Print dialog box. If Pro9000 does not appear on the Printer pop-up menu, do the following to confirm the printer settings: 1. Select Print and Fax Preferences from the Printer pop-up menu. When using Mac OS X v.10.3.x or Mac OS X v.10.2.8, select Edit Printer List from the Printer pop-up menu. 2.
Troubleshooting Problem “Error No.: 2001” “Error No.: 2500” Possible Cause Try This Disconnect the camera cable and reconnect it. A specified period of time has elapsed Depending on the model or brand of your PictBridge compliant without receiving a device, you may have to select a print mode before connecting the response from the device. digital camera/The You may also have to turn on the device or select Play mode digital camera or manually after connecting the device to the printer.
Troubleshooting Camera Error Message Paper Error Possible Cause Try This The Paper size setting does not match the size of the paper loaded in the printer (Printer ALARM lamp flashes orange eleven times.) Select Stop in the display on your camera to stop printing. Check the Paper size setting on the PictBridge compatible device and then load paper that is the same size as the setting and try printing again.
Troubleshooting Camera Error Message Possible Cause Try This Some ink tanks are not installed in place, or more than one ink tanks of the same color are installed (Printer ALARM lamp flashes orange seven times/ink lamp flashes fast (at about one second interval)) Confirm that the ink tanks are installed in the appropriate positions. See “Replacing an Ink Tank” on page 36.
Troubleshooting z PictBridge-compatible digital cameras can be connected to your printer for Direct Printing. z This section describes errors that are indicated on Canon-brand PictBridgecompatible cameras. The error messages and operations may vary depending on the camera you are using. For errors on non-Canon PictBridge-compatible cameras, check the status of ALARM lamp and take the appropriate action to clear the error. For details, see “Handling Error Messages” on page 73.
Appendix Appendix Specifications Printer Maximum resolution (dpi): 4800 (horizontal) x 2400 (vertical) Print speed * Black printing (text pattern) Max Speed (Custom Setting 5): 16 ppm Standard: 4.7 ppm * Print speed will vary depending on system configuration, software, document complexity, print mode and page coverage. Color printing Max Speed (Custom Setting 5): 15 ppm Standard: 4.4 ppm Photo printing (PR-101 A4) Standard: 1.20 ppm Print width: Auto Sheet Feeder: 322.2 mm max. (12.
Appendix Camera Direct Print (PictBridge) Paper size Default (Photo Paper Plus Glossy 10 x 15 cm/4" x 6") 4" x 6" (Photo Paper Plus Glossy, Photo Paper Pro, Photo Paper Plus Semi-gloss, Glossy Photo Paper, Photo Stickers*1) 5" x 7" (Photo Paper Plus Glossy)*2 8" x 10" (Photo Paper Plus Semi-gloss, Photo Paper Pro) 8.
Appendix Minimum System Requirements*1 *2 Interface Operating System USB 2.0 Hi-Speed Windows XP SP1, SP2 USB Windows XP SP1, SP2 Windows 2000 Professional SP4 Processor Pentium III*3 (Celeron 566 MHz) RAM 128 MB Hard Disk Space*4 400 MB Pentium II 300 MHz *3 Windows 2000 Professional SP2, SP3, SP4 Windows Millennium Edition*5 Windows 98*5, 98 Second Edition*5 *2 Interface Operating System USB 2.0 Hi-Speed Mac OS X v.10.4 USB Mac OS X v.10.2.8 - v.10.
Appendix Safety Precautions Please read the safety warnings and cautions provided in this manual to ensure that you use your printer safely. Do not attempt to use printer in any way not described in this manual. You may cause an electric shock, fire or damage the printer if you ignore any of these safety precautions. Choosing a location Do not place the printer close to flammable solvents such as alcohol or thinners.
Appendix You may cause injury or damage the printer if you ignore any of these safety precautions. Choosing a location Do not install the printer in a location that is unstable or subject to excessive vibration. Do not install the printer in locations that are very humid or dusty, in direct sunlight, outdoors, or close to a heating source.
Appendix Regulatory Information FCC Notice (U.S.A. Only) For 120V, 60Hz model Model Number: K10271 This device complies with Part 15 of the FCC Rules. Operation is subject to the following two conditions: (1) This device may not cause harmful interference, and (2) this device must accept any interference received, including interference that may cause undesired operation.
Appendix Canon U.S.A., INC. LIMITED WARRANTY --- (USA Only) The limited warranty set forth below is given by Canon U.S.A., Inc. ("Canon USA") with respect to the new or refurbished Canon- brand product ("Product") packaged with this limited warranty, when purchased and used in the United States only.
Appendix Canon USA offers a range of customer technical support* options: z Interactive troubleshooting, e-mail technical support, the latest driver downloads and answers to frequently asked questions (www.canontechsupport.
Index Index A Accessing the Printer Driver ......................................... 33 Advanced Printing ........................................................ 26 ALARM lamp................................................................. 73 Aligning the Print Head................................................. 58 An Error Message Appears on the Screen...................... 76 B Borderless Printing ...................................................... 66 C Camera Error Message......................
Index Photo Paper Pro ........................................................... 16 Photo Stickers ............................................................. 17 PhotoRecord ................................................................ 35 POWER button................................................................ 2 POWER lamp .................................................................. 2 Print dialog box...................................................... 19, 22 Print Head Alignment .........
This product uses the following copyrighted software: exit.c Copyright © 1990 The Regents of the University of California. All rights reserved. Redistribution and use in source and binary forms are permitted provided that the above copyright notice and this paragraph are duplicated in all such forms and that any documentation, advertising materials, and other materials related to such distribution and use acknowledge that the software was developed by the University of California, Berkeley.
Getting Help from Canon Ordering Information For additional supplies, use the following descriptions and order numbers. Help Us Help You Better Before you contact Canon, please record the following information. Serial Number (located on the inside of the product): Model Number (located on the top of the product): Setup CD-ROM number (located on the CD-ROM): Purchase Date: Customer Technical Support Sequence* 1. Internet — www.canontechsupport.
Quick Start Guide Photo Printer Series Quick Start Guide The following ink tanks are compatible with this printer. For details on ink tank replacement, refer to “Replacing an Ink Tank” in this guide. QT5-0115-V05 092006AB10 ©CANON INC.