
Network Video Recording Software RM Series Administrator’s Manual
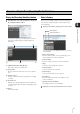


Record on a Regular Basis (Repeating Weekly Schedules)
77
Setting a Recording Schedule
5
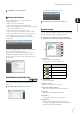
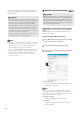
Specify the Recording Mode
For example, if you want continuously record for the
entire duration of the recording schedule, select the
check box next to [Continuous Recording].
The settings are different for each recording mode.
• Continuous recording
Records continuously for the specified recording
period. For details, see “Continuous Recording
Settings” (p. 78).
• Sensor recording
Starts recording when there is a signal from a sensor
connected to the camera. For details, see “Sensor
Recording Settings” (p. 79).
• Motion detection recording
Starts recording when motion is detected. For details,
see “Motion Detection Recording Settings” (p. 80).
• Intelligent function recording
Starts recording when motion that meets the intelligent
function detection criteria is detected. For details, see
“Intelligent Function Recording Settings” (p. 83).
• Volume detection recording
Starts recording when the volume detection criteria are
met. For details, see “Volume Detection Recording
Settings” (p. 83).
Intelligent function recording and volume detection
recording are not supported.
Note
• You can specify the priority of the events generated by sensor
recording, motion detection recording, intelligent function
recording and volume detection recording. For details, see
p. 79 and p. 80. When two events occur simultaneously, the
event with the higher priority takes precedence.
• Only supports continuous recording mode.
Hint
You can specify more than one recording mode at the same time.
For example, you can select motion detection recording and
specify a frame rate that is higher than continuous recording. This
way, a high frame rate is used only when motion is detected.
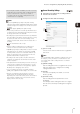
Specify Advanced Settings
Advanced settings are available when the [Advanced]
button is displayed in the recording settings area. For
details, see “Configure the Advanced Recording Settings”
(p. 84).
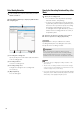
Save the Recording Schedule
The schedule that was set is displayed in the
schedule area. The schedule becomes active as soon
as it is displayed in the schedule area.
1
Select the check box next to the recording mode in the
list that best suits the type of recording you require.
2
Configure the recording mode settings in the recording
settings area.
1
Click [OK] to close the dialog box.