
Network Video Recording Software RM Series Administrator’s Manual


Record on a Regular Basis (Repeating Weekly Schedules)
79
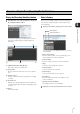
Setting a Recording Schedule
5
Note
• If you select [MPEG-4] or [H.264] for the [Video Format]
setting, the [Aspect Ratio] and [Maximum Frame Rate] settings
cannot be changed. The settings on the camera are used for
recording.
Only supports [JPEG] for the [Video Format].
• It may not be possible to record at the specified frame rate or
recording may pause intermittently, depending on the load on
the Storage Server CPU or the hard disk.
• Recording may be performed at lower than the specified frame
rate, depending on the number of Viewers that are accessing
the camera, the load on the camera and Storage Server,
variation in network traffic, and the environment at the time of
recording.
• The maximum frame rate is 5 fps.
• Audio recording is enabled when the recording mode is
selected. You cannot schedule audio-only recording.
• If [MPEG-4] or [H.264] recording format is used, the recorded
audio will not be in sync with the recorded video. If [JPEG]
recording format is used, the recorded audio will be in sync
with the recorded video for the most part, however it is not
guaranteed that it will be completely in sync.
• Recording mode stream operates only with cameras that
support the recording mode stream function and if a stream
has been acquired.
• If an upload function is already being used on the camera, you
cannot use the recording-mode stream function. To use the
recording-mode stream function, select [Upload] > [Upload
Disabled] on the setting page of the camera.
• To use recording mode stream, select [Video Format] >
[JPEG], and set [Maximum Frame Rate] to “10” or lower value.
• When the recording-mode stream function is used, the
streamed video has a higher priority than the live video.
Depending on the load on the camera, such as the number of
Viewers that are simultaneously connected to the camera,
display of the live video may stop.
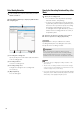
Sensor Recording Settings
(1) [Do not record]
Select to not record even when there is a signal from
this sensor.
Hint
You can individually enable or disable recording for each sensor.
For example, you may not want to record when there is door
sensor signal, but to start recording when there is a window
sensor signal.
(2) [Start Recording]
Start recording when there is a signal from the sensor.
After selecting the item, configure the recording
settings below the item.
(3) [Priority]
Select the event priority. For details, see “Check
Events” (p. 105).
(4) [Invert this event]
Start recording when the input from the sensor
disappears.
For example, start recording when there is no signal
from the sensor, and stop recording when a signal is
present.
• Even if the [Record audio if available] check box is selected,
audio will not be recorded if the audio sending function has
not been activated on the camera. If you schedule a
recording, make sure the audio sending function on the
camera has been set to [Enable].
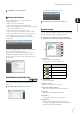
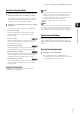
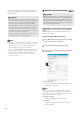
1
Click [Sensor Recording] in the recording mode list
and select the check box.
2
Configure the video and event settings.
(1)
(2)
(3)
(4)