
User guide


19
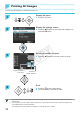
Printing ID Photos
You can print your image as an ID photo. You can
select the size from [Multi-size], [Standard]*, and
[Custom].
Also, you can select 2 types of images to be printed
on one sheet.
* The Standard size conforms to the ICAO international
standards.
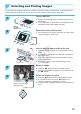
Set to print ID photos.
O Press the k button.
O Press the ud buttons to select [ID Photo], and then
press the o button.
Specify the ID photo size.
O Press the lr buttons to select the size, and then press
the o button.
O If you have selected [Custom], press the ud buttons to
select [Long Side], press the lr buttons to specify the
length, then specify the length for [Short Side], and then
press o again. The values which can be specied in
[Short Side] change automatically according to the value
you have specied in [Long Side].
O If you have selected [Multi-size], the size of the image to
be printed is displayed.
Select and print the images.
O Select the image by pressing the lr buttons, and press
the u button. is displayed at the bottom right of the
screen (up to 2 images).
O Press the EDIT button to set the cropping range (p. 18).
O Print as described in Step 6 on p. 14.
O The ID photo may not be accepted ofcially, depending on the institution the ID photo is required for. Please
contact the appropriate institution for regulation details.
O You cannot use card size paper.
O [Borders] settings will be ignored.
O Settings are cleared when printing is nished.
O The date and le number will not be printed.
O If you have selected 2 types of images, these 2 types are printed in equal numbers for the number of columns in
the layout.
O If you have selected 2 types of images and the number of columns is an odd number, nothing will be printed in
the center column.
1
2
3
COPY