
User Manual


11
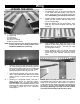
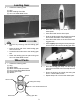
2. Mount the elevator and rudder servo as
shown above.
Attach the EZ connectors to the servo arms
the same way you did the aileron servos.
Insert the pushrod wires through the EZ con-
nectors and mount the two servo arms to the
top of the servos.
Cut off the excess pushrod wire.
Radio Installation
1. Collect the following parts:
(1) Fuselage
(2) Micro Servos with Hardware (Not Included)
(1) Micro Receiver (Not Included)
(1) Servo “Y” Harness (Not Included)
(2) Mini- Pushrod Connectors
Rudder
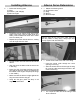
3. Plug the elevator and rudder servos into your
receiver.
Attach the “Y” harness to the receiver.
Plug in the speed control.
Cut foam and wrap around the receiver.
4. Put the receiver wrapped in foam in front of
the servos.
1. Collect the following parts:
(1) Fuselage
(1) Wing
(1) 4-40 x 3/4 Socket head bolt
(1) 3 cell Li-Po Battery
Battery Installation
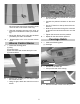
2. Mount the wing to the fuselage.
Look down through the fuselage hatch and
make sure all the radio wires are not pinched
between the fuselage and the wing.
Insert foam into the front battery compart-
ment.
Slide the Li-Po battery into the front compart-
ment.