
Specifications


7
Table 2 — User Configurable Items
Only the OAT (Outside Air Temperature) and SPT (Space
Temperature) items can be forced. To force one of these items,
position the pointer at the item. Press the key and the
current value will flash. Use the arrow keys to adjust the tem-
perature to the desired value. Press the key when fin-
ished and the Navigator will display a lowercase ‘f’ to the right
of the value indicating that it has been forced. To clear a force,
press so that the value is again flashing. Simulta-
neously press the up and down arrow keys. The value will stop
flashing, the ‘f’ will be removed and the value will read the
corresponding input channel for its value.
To edit a user-configuration item, operate the chiller in
Service Test mode, enter run hours and compressor starts or re-
set current alarms or history, use the key to make the
value flash. Next, use the arrow keys to adjust the item so that
the desired value is displayed and press .
Adjusting the Contrast —
The contrast of the display
can be adjusted to suit ambient conditions. To adjust the con-
trast of the Navigator, press the key until the dis-
play reads, “Select a menu item.” Using the arrow keys move
to the Configuration mode. Press to obtain access to
this mode. The display will read:
>TEST OFF
METR OFF
LANG ENGLISH
Pressing will cause the “OFF” to flash. Use the up
or down arrow to change “OFF” to “ON”. Pressing
will illuminate all LEDs and display all pixels in the view
screen. Pressing and simultaneously al-
lows the user to adjust the display contrast. The display will
read:
Adjust Contrast
- - - + - - - - - - - - - - - -
Use the up or down arrows to adjust the contrast. The
screen’s contrast will change with the adjustment. Press
to accept the change. The Navigator will keep this
setting as along as it is plugged in to the LEN bus.
Adjusting the Backlight and Brightness —
The
backlight of the display can be adjusted to suit ambient condi-
tions. The factory default is set to the highest level. To adjust
the backlight of the Navigator, press the key until
the display reads, “Select a menu item.” Using the arrow keys
move to the Configuration mode. Press to obtain ac-
cess to this mode. The display will read:
>TEST OFF
METR OFF
LANG ENGLISH
ADJUSTING BRIGHTNESS — Pressing will
cause the “OFF” to flash. Use the up or down arrow keys to
change “OFF” to “ON”. Pressing will illuminate all
LEDs and display all pixels in the view screen. Pressing
and simultaneously allows the user to adjust the display
brightness. The display will read:
Adjust Brightness
- - - - - - - - - - - - - - - +
Use the up or down arrow keys to adjust the brightness.
The screen’s brightness will change with the adjustment. Press
to accept the change. The Navigator will keep this
setting as along as it is plugged in to the LEN bus.
CLEANING, SERVICE and MAINTENANCE
Cleaning —
The Navigator can be cleaned with a mild
detergent. Isopropyl alcohol or a glass cleaner can be used on
all Navigator surfaces.
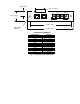
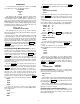
Connection Cord/Plug Assembly Replace-
ment —
If the RJ14 plug is damaged, it can be replaced. If it
is replaced, the wiring to the plug must be as shown below:
The connection cable can be replaced if damaged. Replace-
ment cables are available from Replacement Components
Division. Remove the Navigator from the LEN connection be-
fore proceeding.
1. Remove the 6 screws from the back of the case to gain
access to the internal plug for the device, and keep
them for installation later.
2. The back cover is connected to the touch pad by a ribbon
cable. The ribbon cable is not long enough to allow the
two halves to be completely separated. To be able to ac-
cess the plug connection, slightly offset the back cover.
Be careful not to damage the ribbon cable.
3. Unplug the damaged cable.
4. Plug in the new cable.
5. Insert the rubber grommet (included with new cable as-
sembly) into the cable entrance hole.
6. Realign the two halves of the Navigator. Be sure that the
grommet is properly seated in the cable entrance hole.
7. Reinstall the 6 screws previously removed.
NOTE: Failure to properly seal the Navigator with the screws
and grommet will compromise the watertight integrity of the
device.
MODE SUB-MODE ITEM COMMENT
Run Status
RUN
HOUR
STRT
All
Edit when replacing MBB to
keep total machine hours/
starts
Service Test
All All —
Temperatures
UNIT OAT.SPT —
Setpoints
All All —
Configuration
All All
All items in all sub-modes
can be changed except for
“TYPE” in sub-mode “UNIT”
Time Clock
All All —
Alarm History
RCRN
RHIS
——
ENTER
ENTER
ENTER
ENTER
ENTER
ESCAPE
ENTER
ENTER
ENTER
ENTER ESCAPE
ENTER
ESCAPE
ENTER
PIN 123456
Wire Color
Black Green Blue Yellow Red White
ENTER
ENTER
ENTER
PIN 1
2345
6
TAB