
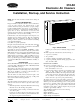
Instruction manual


Cabinets will support a maximum weight of 400 lbs. when
installed beneath a vertical furnace or air-handling unit. When
setting furnace on cabinet, do not drop it into place. Position
furnace correctly on cabinet to prevent a corner from slipping
down and damaging cabinet.
3. Allow minimum of 16-in. clearance in front of unit for
cleaning and maintenance.
Never use air cleaner to collect grease or other flammable
contaminants.
4. Air outlets and returns must not be blocked with furniture,
drapes, or other objects.
5. Air cleaner should be installed where all air circulated by
system will pass through it.
B. HUMIDIFIERS
An evaporative, supply-duct-mounted humidifier may be installed
without affecting the EAC. A bypass-type evaporative humidifier
should be installed so that the moist air does not contact the air
cleaner. When an atomizing-type humidifier is used, it should
always be installed in the supply-air system.
If an atomizing-type humidifier is installed upstream from the
air cleaner, the efficiency of the electronic cells will be
decreased by high humidity, salts, and minerals. Service
problems will result.
If the bypass-type humidifier is installed upstream from the EAC,
the following precautions should be taken.
1. Humidifier must be installed as far from EAC as possible.
2. A standard, disposable furnace filter must be installed between
humidifier and EAC to trap water droplets and mineral salts.
3. Electronic cells of air cleaner must be washed frequently to
prevent mineral deposit buildup.
C. OUTDOOR AIR
When outdoor air is added to the return-air duct, sufficient heat
must be added to maintain the return-air temperature of 40°F
minimum or minimum specified by air handling equipment.
Temperatures lower than 40°F can cause ionizer wire failure under
certain conditions.
NOTE: The maximum operating temperature of the EAC is
125°F.
Step 2—Installation
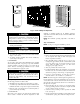
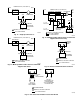
NOTE: See Fig. 4 for suggested installation positions.
Turn off all power to furnace before beginning any proce-
dures.
Proceed as follows to install EAC:
1. Remove and discard existing furnace mechanical filters. They
are not required when using an EAC. Thoroughly clean
blower compartment of furnace.
2. Move ON-OFF switch to OFF and remove power door by
rotating knob (approximately 10 turns counterclockwise) until
door is free. Grasp power door by knob and remove it from
cleaner cabinet by pulling it towards you. This motion
disengages power supply connector.
3. Slide out pre-filters and air cleaner cells.
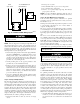
4. For Model 016 EAC furnace side application, cut open return
knockout at the side of the furnace cabinet. For Models 012
and 020, cut opening as shown in Fig. 5—Opening Detail.
5. In order to prevent air leakage, use foam tape provided to
attach air cleaner to side of furnace or system blower.
NOTE: The unit is shipped for furnace right side application. For
left side application, rotate rear mounting flange 180° by removing
4 screws in the back of the air cleaner. Be sure all 4 screws are in
place after the rotation. Relocate the junction box on the furnace to
the right side, if required.
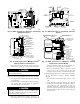
6. Hook back flange into the opening. Use air cleaner cabinet
front support flange adjacent to the unit as template and drill
2 holes on furnace casing. (See Fig. 6.)
7. Secure the unit by screwing 2 screws provided into drilled
holes. (See Fig. 6.)
8. Prepare return-air duct for installation to unit. Return air must
use full cabinet opening. Duct should run straight into unit.
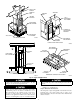
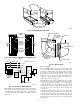
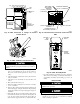
Fig. 3—View of Major Components
A91467
POWER DOOR
ASSEMBLY
PRE-FILTERS CELL ASSEMBLY
3