
Instruction manual


Be sure all field electrical connections are tight before power
is restored to the unit.
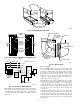
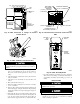
1. Slide pre-filters and air cleaner cells into cabinet.
NOTE: Units are shipped for air entering the right-hand side of
the air cleaner. Reverse the position of the pre-filter and the air
cleaner cells in the cabinet for air entering the left-hand side of the
air cleaner as indicated in Fig. 8. Be sure all airflow arrows are
pointing in the direction of the airflow through the air cleaner and
that the pre-filter is on the entering-air side.
2. Check contact spring location. Cell contact springs MUST be
relocated for left-hand units or applications. Remove screw
holding contact spring to cells and reinstall at opposite end.
(See Fig. 24.) Be sure all airflow arrows are pointing in the
direction of the airflow through the air cleaner and that the
pre-filters are on the entering-air side.
3. Deform pre-filter guide on side opposite pre-filters to that
pre-filters may not be reinstalled incorrectly.
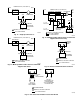
4. Replace power door by first inserting bottom tab into place on
bottom edge of door opening. Push top of door and guide door
attachment knob screw into threads. Turn knob clockwise
until screw engages threads in casing. Turn knob clockwise
until door is secure. Ensure good electrical contact between
power door and unit components.
5. Unit can be installed with airflow through cabinet in either
direction. Apply airflow decal provided to cabinet, observing
actual airflow direction. (See Fig. 24.)
Step 4—Startup and Adjustments
The electronic components of the unit convert the incoming vac to
vdc power supply. Unfiltered, contaminated air passes through an
aluminum mesh pre-filter which removes large air borne particles
and distributes the air uniformly across the ionizer-collector
assembly. The air passes through the ionizer and is charged with
7300vdc. The ionizer imparts a positive electrical charge to the
remaining contaminants. As the air continues through the collector
section, the charged contaminants are attracted to the alternately
charged collector plates. The charged contaminants are electro-
statically held by the collector, purifying the airstream.
1. Ensure that entire EAC is clean, dry, and free of foreign
objects.
2. Restore power to system.
3. Move ON-OFF switch on power door to ON position.
4. Set room thermostat to start blower.
5. Check to see if operation light is glowing. This indicates
proper power to the cells.
NOTE: Leave these Installation Instructions with the owner to
enable to the owner to perform routine maintenance and service.
Step 5—Routine Maintenance and Service
Your new EAC requires periodic maintenance for optimum
performance. You may perform this service or have your service-
man handle it for you.
Cleaning of the cell assembly and pre-filter is required 2 or 3 times
a year. Frequency will depend on size of home, number of
occupants, smoking habits, etc.
The odor of ozone may be noticeable during operation of an EAC.
A somewhat higher ozone generation rate during the first week or
2 of operation may be caused by sharp edges on some of the new
high-voltage parts. Normal use dulls these sharp edges in a short
time.
The odor of ozone is detectable by an average person at levels as
low as 0.0030 to 0.010 parts per million (PPM). The concentration
of ozone produced in a home by an EAC ranges from 0.006 to
0.020 PPM. Average concentration of ozone in the air of major
cities range from 0.020 to 0.040 PPM and even higher. This is well
above the level produced by an EAC.
Because normal maintenance (cleaning) is so simple, most home-
owners will choose to personally perform the necessary operations.
Clean the unit where dust from air cleaner cells will not
soil carpets or floor.
Before removing the electronic cells, be sure to de-energize
the system fan to avoid any possibility of circulating unfil-
tered air back into the system.
To gain access to the pre-filter and air cleaner cells, simply push
power switch to OFF position and remove the power door. Lay it
to the side. Pull out the first-stage pre-filters and vacuum from
entering-air side, or wash in detergent and water. Allow to dry
thoroughly. Reinstall. Do not spray pre-filters with any filter
coatings.
A. CLEANING THE CELL
For optimum performance the electronic cells must be washed
regularly to remove the dirt cleaned from the air. The required
frequency of cell washing varies from one environment to another,
depending on a large number of variables. In nearly all cases, the
correct period is between 1 and 6 months. Where building
infiltration and internal generation of dust is low, as in a smaller
home, washing every 5 or 6 months may be adequate. Where there
is considerable infiltration, cooking, dust, and tobacco smoke,
more frequent washing will be required. If a heavy buildup of dirt
is found on the collector plates or the cell is not clean after
washing, it should be cleaned more often. If there is only light dirt
on collector plates, the period between washing can probably be
lengthened. The electronic plate cells may be washed a number of
different ways, depending on home-owner preference.
1. Automatic Dishwasher Washing—The easiest and most con-
venient way to remove the accumulated dirt from the plate-
type electronic cells is to wash them in an automatic dish-
washer.
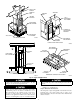
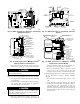
Fig. 16—KFAIR0101ACR Wiring Layout
A93217
24 VDC RELAY
FK4B 110 VAC BRANCH CKT
AUX1 AUX2 GND HOT NEUT
GRN
BLK
WHT
EAC
PLUG
8