
Installation manual

GB - 9
40 GKX
ENGLISH
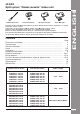
IMPORTANT:
During the unit installation make first refrigerant connections
and then electrical connections. If unit is uninstalled first
disconnect electrical cables, then refrigerant connections.
Refer to the outdoor unit installation manual for tube sizing,
and limitations (slope, length, number of curves allowed,
refrigerant charge, etc.).
Tube diameter
Gas Liquid
Mod. (suction line) (discharge line)
mm (inches) mm (inches)
12 - 18 12 (1/2") 6 (1/4")
24 - 28 16 (5/8") 6 (1/4")
36 - 48 - 60
19 (3/4") 10 (3/8")
For refrigerant tubes use seamless, insulated refrigeration grade tube
(Cu DHP type according to ISO 1337), degreased and deoxidised,
suitable for operating pressures of at least 3000 kPa.
Under no circumstances use sanitary type copper pipe.
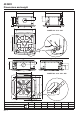
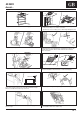
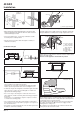
Flaring the end of pipes
Remove the protection caps from the copper pipe ends.
Holding the tube downward, cut the extreme end off, removing any
copper shavings with a deburring blade.
Remove the flare nuts from the “FLARE” connection body of the
indoor unit and insert them into the pipes.
Make the flare to the pipe end with the proper flaring tool.
Flare end must not have any burrs or imperfections.
The length of the flared walls must be uniform.
Lubricate the end of pipe and the thread of the flare connection
with anti-freeze oil.
Tighten by hand and then use two wrenches to tighten all
connections fully, applying the tightening torque shown in the table.
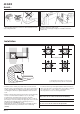
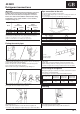
Refrigerant connections
a
b
c
a Pipe
b Pipe insulation
c Adhesive tape
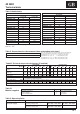
Pipe connection to the unit
Use two wrenches to tighten all connections.
Insufficient tightening torque could cause a refrigerant leak from
the connection.
Excessive tightening torque will damage the pipe flare.
Tube diameter Torque
mm (inches) Nm
6 (1/4") 15 - 20
10 (3/8") 15 - 20
12 (1/2") 50 - 55
16 (5/8") 50 - 55
19 (3/4") 50 - 55
Once all connections have been completed, check for leaks using
soapy water.
Finally, wrap connections with anti-condensate insulation and
tighten with tape, without exerting excessive pressure on the
insulation. Repair and cover any possible cracks in the insulation.
Extra charge of refrigerant
With pipe lengths up to 8 metres, the models shown below need an
extra charge of refrigerant (R22).
For longer pipes, refer to the outdoor unit installation manual.
40GKX024 40GKX018 40GKX048
Indoor unit model 40GKX024W 40GKX018W 40GKX048W
40GKX124W 40GKX118W 40GKX148W
Outdoor unit model 38GL024 38YL018 38YL048
Pipe lengths
70 g 110 g 150 g
up to 8 m
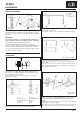
Checking
Pour several litres of water into the condensate drain pan and
check that it flows freely to the drain.
Check pipe gradient and look for possible obstructions.