
Operating instructions

7
point button or a blank button to update the highlighted button
with the source point’s name. Press to add the highlighted
point to the group and return to the table display.
To Remove a Point From a Group Display — From the Point
Data Dialog box, press the REMOVE button and follow the
prompts. The display will return to the Group Display screen
from which the point was removed, and the button correspond-
ing to the deleted point will be blank and disabled.
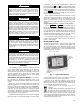
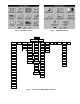
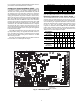
NAVIGATOR™ DISPLAY MODULE — The Navigator dis-
play module provides a mobile user interface to the
ComfortLink control system. The display has up and down ar-
row keys, an key, and an key. These keys
are used to navigate through the different levels of the display
structure. Press the key until ‘Select a Menu Item’ is
displayed. Use the up and down arrow keys to move through
the top 11 mode levels indicated by LEDs on the left side of the
display. See Fig. 7. See Table 2 and Appendix B for more de-
tails about the display menu structure.
Once within a mode or sub-mode, a “>” indicates the
currently selected item on the display screen. Pressing the
and keys simultaneously will put the
Navigator module into expanded text mode where the full
meaning of all sub-modes, items, and their values can be dis-
played. Pressing the and keys when the
display says ‘Select Menu Item’ (Mode LED level) will return
the Navigator module to its default menu of rotating display
items (those items in Run StatusVIEW). In addition, the
password will be disabled, requiring that it be entered again be-
fore changes can be made to password protected items. Press
the key to exit out of the expanded text mode.
When a specific item is located, the item name appears on
the left of the display, the value will appear near the middle of
the display and the units (if any) will appear on the far right of
the display. Press the key at a changeable item and
the value will begin to flash. Use the up and down arrow keys
to change the value, and confirm the value by pressing the
key.
Changing item values or testing outputs is accomplished in
the same manner. Locate and display the desired item. Press
so that the item value flashes. Use the arrow keys to
change the value or state and press the key to accept
it. Press the key to return to the next higher level of
structure. Repeat the process as required for other items.
Items in the Configuration and Service Test modes are pass-
word protected. The words Enter Password will be displayed
when required, with 1111 also being displayed. The default
password is 0111. Use the arrow keys to change each number
and press to accept the digit. Continue with the
remaining digits of the password. The password can only be
changed through CCN operator interface software such as
ComfortWORKS
®
, ComfortVIEW™ and Service Tool.
Power-Up Display
— When the Navigator display is powered
up it will display:
ComfortLink
Navigator
By
Carrier
This indicates an initialization period while the Navigator™
display initiates communication with the Main Base Board.
Once communication is established, the default rotating
display will be shown. If communication is not established, the
Navigator module will display:
Communication
Failure
If the Navigator module is connected to a Main Base Board
without software loaded, the display will remain at the
powered-up initialization display.
Setting the Time and Date
— The ComfortLink control has a
time and date function. This can be useful for diagnostics to de-
termine when alarms occur. The control is factory configured
for the proper date and for use in the Eastern Time Zone. The
control must be checked and corrected if necessary. The correct
time is important if the machine is to function on an internal
time schedule and display a proper time and date stamp for
alarms. The time and date will be displayed on the default ro-
tating display of the Navigator module. The time and date can
also be checked and changed under the Time Clock mode as
described below.
To change the time, press the arrow key to move to the cor-
rect hour and press . The minutes can be changed in a
similar manner.
To check or change the date, the following items must be
checked and changed if necessary.
NOTE: WW is the current month of the controller, (01=January,
02=February, etc.).
XX is the current day of the month
YY is the day of the week, (01=Monday, 02-Tuesday, etc.)
ZZ is the year of the century, (06=2006, 07=2007)
Changing the Unit of Measure — The Navigator display has
two options for unit of measure on the display, English or SI
(metric). The factory default for the units of measure is
English. To change the unit of measure, the following item
must be changed.
ENTER
ESCAPE
ESCAPE
ENTER
ESCAPE
ENTER
ESCAPE
ESCAPE
ENTER
ENTER
ENTER
ENTER
ESCAPE
ENTER
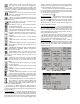
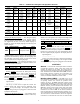
ITEM ITEM EXPANSION PATH VALUE
HH.MM Time of Day Time ClockTIME XX.XX
ITEM ITEM EXPANSION PATH VALUE
MNTH Month of Year Time ClockDATE WW
DOM Day of Month Time ClockDATE XX
DAY Day of Week Time ClockDATE YY
YEAR Year of Century Time ClockDATE ZZ
ITEM ITEM EXPANSION PATH VALUE
METR Metric Display ConfigurationDISP
OFF – English
ON – SI (Metric)
ENTER
Run Status
Service Test
Temperatures
Pressures
Setpoints
Inputs
Outputs
Configuration
Time Clock
Operating Modes
Alarms
ENTER
ESC
MODE
Alarm Status
ComfortLink
Fig. 7 — Navigator Display Module
a30-3924