
Instruction manual


3
A
B
C
FA CT ORY SHIPPED
HORIZONTAL LEFT
APPLICATION
AIR SEAL
ASSEMBLY
HORIZONTAL
DRAIN PAN
REFRIGERANT
CONNECTIONS
SECONDARY DRAIN
HORIZONTAL LEFT
PRIMARY DRAIN
HORIZONTAL LEFT
COI L
SUPPORT
RAIL
COIL
BRACKET
DRAIN PA N
SUPPORT
BRACKET
COIL
BRACKET
A00072
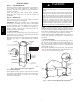
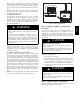
Fig. 3 -- A--Coil in Horizontal Left Application
(Factory Ready)
PROPERTY DAMAGE HAZARD
Failure to follow this caution may result in product or property
damage.
For optimum condensate drainage performance in horizontal
installations, unit should be leveled along its length and width.
CAUTION
!
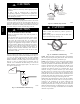
NOTE: Modular units can be disassembled and components
moved separately to installation area for reassembly. This process
accommodates small scuttle holes and limiting entrances to
installation sites. (See Fig. 4.)
2 SCREWS
2 SCREWS
REAR CORNER
BRACKET
BLOWER BOX
COIL BOX
2 SCREWS
A95293
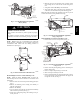
Fig. 4 -- Removal of Brackets on Modular Units
Horizontal Right Conversion of Units With Slope Coils
NOTE: Gasket kit number KFAHD0101SLP is required for
horizontal slope coil conversion to maintain low air leak/low sweat
performance.
1. Remove blower and coil access panel and fitting panel. (See
Fig. 5.)
2. Remove coil mounting screw securing coil assembly to
right side casing flange.
3. Remove coil assembly.
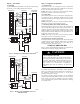
4. Lay fan coil unit on its right side and reinstall coil assembly
with condensate pan down. (See Fig. 5.)
5. Attach coil to casing flange using coil mounting screw pre-
viously removed.
6. Make sure the pan cap in the fitting door is properly seated
on the fitting door to retain the low air leak rating of the
unit.
7. Add gaskets from kit KFAHD per kit instructions.
8. Align holes with tubing connections and condensate pan
connections, and reinstall access panels and fitting panel.
Make sure liquid and suction tube grommets are in place to prevent
air leaks and cabinet sweating. Install after brazing.
COIL MOUNTING
SCREW
BLOWER
ASSEMBLY
REFRIGERANT
CONNECTIONS
SECONDARY DRAIN
PRIMARY DRAIN
DRAINPAN
SLOPE COIL
SKI
COIL
SUPPORT
RAIL
A03001
Fig. 5 -- Conversion for Horizontal Right Applications
Using a Slope Coil
Horizontal Right Conversion of Units With A-- Coils
1. Remove blower and coil access panels. (See Fig. 6.)
COIL
SUPPORT
RAIL
COIL
BRACKET
DRAIN PAN
SUPPORT
BRACKET
COIL
SUPPORT
RAIL
COIL
BRACKET
HORIZONTAL
DRAIN PAN
PRIMARY DRAIN
HORIZONTAL RIGHT
SECONDARY DRAIN
HORIZONTAL RIGHT
REFRIGERANT
CONNECTIONS
AIR SEAL
ASSEMBLY
A
B
C
HORIZONTAL
RIGHT
APPLICATION
A00071
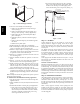
Fig. 6 -- Conversion for Horizontal Right Applications
Using A--Coil
2. Remove metal clip securing fitting panel to condensate pan.
Remove fitting panel.
3. Remove 2 snap--in clips securing A -- coil in unit.
4. Slide coil and pan assembly out of unit.
5. Remove horizontal drain pan support bracket from coil sup-
port rail on left side of unit and reinstall on coil support rail
on right side of unit. (See Fig. 7.)
FX4D