
Owner`s manual


14
SECURITY FEATURE
Pressing the ‘SECURITY’ button will start the Security lighting
light will automatically turn ON and OFF in a seemingly random
manner over an eight and a quarter hour programmed cycle that
is designed to give the home a “lived-in” look.
Regardless of the light setting when switching to the Security
mode (lights on or off, dim or bright), the lights will increase
is then repeated continuously until cancelled by pressing the
‘SECURITY’ button.
At any time during the Security mode you may adjust the fan
Saver or run the Test mode without affecting Security mode.
You may still turn the light ON and OFF (or OFF and ON)
manually for temporary lighting, but the light will continue to
operate automatically at its programmed times.
SECURITY MODE CYCLE
1. On for 60 minutes (80% bright) 4. Off for 60 minutes
2. Off for 30 minutes 5. On for 90 minutes (50% bright)
3. On for 120 minutes (30% bright) 6. Off for 60 minutes
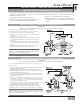
CHANGING FREQUENCY SETTING
Note: All fans leave the factory set to "10000"
You will have to change the dip switch settings in the remote
if you are using more than one fan in the same area and want
to control them separately.
Step 1. At the circuit breaker or fusebox, turn the power off
for the fan you want to change.
and remove the first battery on the left to gain access to the
dip switches.
Step 3. Change the dip switch settings, assuring that they are
Step 4. Re-install the battery in the proper polarity and the
battery door on the control.
Step 5. At the circuit breaker or fuse box, turn the power back
on for the fan whose frequency you are changing.
and down buttons at the same time. Hold for a few seconds.
You will see the LCD Screen flash all of the graphics. You
will now have control of the fan.
Note: You may want to label your controls to ensure you do
not mix them up.
Dip Switch
Location
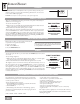
IF THE FAN DOES NOT WORK
If the fan is not functioning after installation:
Step 1. Check to make sure the batteries are installed properly in the control.
Step 2. Turn the power off to the fan (from the circuit breaker) for at least 5 seconds.
Step 3. Turn the power back on (at the circuit breaker) and push the up and down buttons at the same time, within 20
seconds from restoring power.
Ad v A n •to u c h
®