
Owner`s manual

7
CC
CC
C
HEHE
HEHE
HE
LSEALSEA
LSEALSEA
LSEA
™™
™™
™
M
O
T
O
R
S
H
I
E
L
D
L
E
A
V
E
I
N
P
L
A
C
E
U
N
T
I
L
I
N
S
T
A
L
L
A
T
I
O
N
A
N
D
W
I
R
I
N
G
C
O
M
P
L
E
T
E
R
E
M
O
V
E
T
H
I
S
S
H
I
E
L
D
W
H
E
N
I
N
S
T
A
L
L
A
T
I
O
N
I
S
C
O
M
P
L
E
T
E
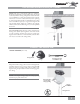
CAUTION
DAMP LOCATION RATED FANS
REQUIRE A GROUND FAULT INTERRUPTER (GFI)
USE A WEATHER PROOF OUTLET BOX
PROPERLY CONNECT GROUND WIRES
USE ONLY UNDER A WEATHER
PROOF STRUCTURE
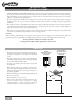
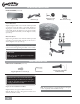
DANGER
IT IS IMPERITIVE THAT THE LOCKSCREW
BE SET TIGHTLY AGAINST THE DOWNROD
THREADS AFTER FAN IS ASSEMBLED
FAILURE TO DO SO WILL CAUSE FAN TO FALL
TIGHTEN
LOCKSCREW
TIGHTEN
LOCKSCREW
INSTALLER
GIVE THIS TAG TO THE
CONSUMER AFTER
INSTALLATION COMPLETE
INSTALLER
CONFIRM LOCKSCREW
IS PROPERLY TIGHTENED
DO NOT OIL SEALED BEARINGS!
P/N 1942640 SRB4/96
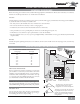
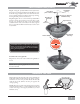
Motor Wires
(leave at least 6" long)
Ground Wire
(green)
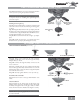
Perma•Lock™ Downrod
and Ball Assembly
Tapered Thread
Allen Wrench
Allen
Set Screw
Motor Housing
Assembly
Motor
Coupling
CAUTION: Failure to fully lock in the downrod
before securely tightening the Allen set screw may
cause the fan to separate from the downrod and fall
during normal operation.
Step 6c. Using the provided Allen wrench (attached to
the paper motor warning shield), loosen the Allen set screw
from the hanger adaptor. Insert the downrod into the
motor coupling and turn it clockwise until it stops turning,
ensuring that the pole has bottomed out.
Step 6d. Tighten the set screw with the provided Allen
wrench to ensure safe operation of your fan. If it is tight
enough, you should not be able to turn the downrod
counterclockwise with your hands. If in doubt, tighten
the set screw with the Allen wrench until you cannot turn
it any further.
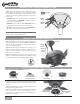
Install Incandescent Lightbulbs
Step 7. Screw in four 25-watt incandescent lightbulbs as
shown.
NOTE: When replacing lightbulbs, be sure to use only
25-watt maximum.
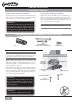
Caution Shield
FAN PREPARATION (CONT.)
HANGING THE FAN
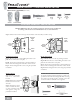
Step 8a. To hang the fan body in the canopy, hold the fan
body firmly and insert the ball into the canopy opening.
Check that no wires were pinched. Rotate the fan body
until the slot in the ball fits into the pin opposite the
canopy opening.
Step 8b. Trim excess motor wires, leaving at least 6 inches
above the downrod. Strip
1
/
2
-inch insulation from the end
of each wire using a wire stripper (available at your local
hardware store).
Ball
Slot
Pin