
Installation Guide


hot wate r
switch H
(red)
cold wat er
switch C
(blue)
hot water
cold water
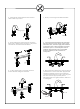
4、taking apart the tee and the hex nut under
water oulet components.
7、Finally connecting the double head tube.
5、Firstly rotating the switch shell into the switch
base, then screwing down the switch component
with hex nut and reload the handle bar.
taking apart
9、Attach the main water lines to the proper inlet
on the bottom of each valve stem. Apply thread
sealant or plumber's tape to each threaded
connection. Ensure that you are connecting the
hot and cold lines appropriately. Use an
adjustable wrench to tighten, but be careful not
to overtighten.
6、locking water outlet conponents from the
bottom and reloading the swivel tee.
8、 Connect the braided water lines attachedto
the spout to their proper outlets on the side of
each valve stem, as shown. Apply thread sealant
or plumber's tape to each threaded connection.
Ensure that you .are-connectingthe-hotand-
coldlines-appropriately: Use an adjustable
wrench to tighten, but be careful not to
overtighten.
Hot
Cold