
Installation Guide

PAGE: 6 / 8
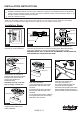
Screw
Canopy
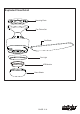
Position both slots on the canopy directly
under and in line with two screws and
lock washers in the mounting plate. Lift
the canopy, allowing the two screws and
lock washers to slide into the mating slots.
Rotate the canopy counterclockwise until
both screws from the mounting plate drop
into the slot recesses. Tighten screws
securely. Install the other two screws and
lock washers into the mating holes of the
mounting plate and tighten to secure the
canopy to the mounting plate.
Insert the fan blade through the slot
on the fan fixture set.
and fasten fan blade to the fan
fixture set with screws. Repeat for
remaining fan blades.
F A N C O
181008
Fig.8
Mounting Plate
Lock Washer
Fan Blade
Fan Fixture Set
Blade Screw
Fig.9
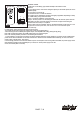
Turn ON the electric power at the
main fuse or circuit breaker box.
Fig.13
Fig.12
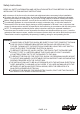
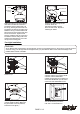
Install the glass shade by screwing it
onto the central fan fixture. (Make sure
the glass shade is securely attached,
but DO NOT over tighten.)
Fan Light Installation:
WARNING:
As per EPACT 2005 requirements, this fan light has a built-in current limiting device in the receiver of remote control to
conserve energy. The fan light will not be brighter when you press dimmer button if the combined wattage of the
installed bulbs exceeds 190 Watts.
Install
Fan Light
.
Make wire connection. Plug the male
connector from the motor into the female
connector from the LED Module .
Carefully put the wires into the switch box.
Secure the LED Module up to the bottom
of the motor with LED Module screws.
Fig.10
Fig.11
Male Connector
Female Connector
LED Module Screw
LED Module
Fan Light