
Installation Guide

PAGE: 7 / 8
F A N C O
181008
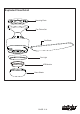
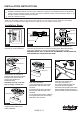
Fig.14
SET
1
2
3 4
ON
D
Remote control
Install one 12 volt battery (type 23AE included) to the remote control.
Buttons:
1- Fan speed control: controls the ceiling fan speed (I for the lowest speed, VI for the
fastest speed)
2- Fan OFF: turns the fan off
3- Reverse function: controls fan direction
4- Lighting control: adjusts the intensity of the light (if applicable, depending on bulb).
5- CODE setting: using method as below
Step 1: Finish the installation of the ceiling fan.
Step 2: Turn the power on for the ceiling fan and within 60 seconds, press and hold
SET button on back of remote control for 5 seconds. The light of the ceiling fan
flashes twice when setup is completed.
Step 3: After setup is completed, switch to the desired speed. The fan will run
on the
highest and lowest speed first, and will then turn to the selected speed
automatically.
1
2
3
4
5
6
6- Light setting: selects On/Off or Dimming function for light
<D> On/Off function without dimming (required for energy saving lamps [CFL]).
<ON> Dimming function enabled (for tungsten lamps; not compatible with energy saving lamps [CFL]).
Note: After changing the blades, the CODE setting has to be performed again.
Note: The receiver provides protection in the following two situations:
1- Lock protection: The receiver has a built-in protection against obstruction during operation. The motor will be locked and the
power will be disconnected after 30 seconds of obstruction. Please remove obstacles before restarting. To reset, turn off the
power supply to the fan motor, then restart.
2- Power surge protection: If the receiver detects a power consumption of the motor greater than 80W, the power supply will be
interrupted and operation will immediately stop. To reset, turn off the power supply to the fan
motor, then restart (after 5 seconds).