Cover CT -S200 EN USER’S GUIDE Preparing a Power Supply Turning Power On or Off Connecting Headphones (Sold Separately) Connecting a Pedal (Sold Separately) Selecting a Musical Instrument Tone Changing the Pitch in Semitone Steps (Transpose) Fine Tuning Pitch (Tuning) Using the SUSTAIN Button Saving and Loading Instrument Settings (MY SETUP) Playing a Built-in Song Playing in the Dance Music Mode Using a Dance Music Voice Playing with a Rhythm Backing Linking with a Smart Device (APP Functi
Included and Optional Accessories Use only accessories that are specified for use with this Digital Keyboard. Use of unauthorized accessories creates the risk of fire, electric shock, and personal injury. • You can get information about accessories that are sold separately for this product from the CASIO catalog available from your retailer, and from the CASIO website at the URL or QR code below. https://support.casio.
Playing with a Rhythm Backing Contents EN-23 Rhythm . . . . . . . . . . . . . . . . . . . . . . . . . . . . . . . . . .EN-23 General Guide EN-3 Getting Ready to Play EN-4 Playing a Rhythm . . . . . . . . . . . . . . . . . . . . . . . . . .EN-23 Using Recommended Rhythm Settings . . . . . . . . .EN-25 Changing the Rhythm Pattern . . . . . . . . . . . . . . . .EN-25 Preparing a Power Supply . . . . . . . . . . . . . . . . . . . EN-4 Inserting a Fill-in Phrase . . . . . . . . . . . . . . . . . . . .
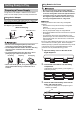
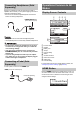
General Guide ■ Front Panel Dial ☞EN-7 3 buttons ☞EN-7 HOME button ☞EN-6 VOLUME buttons ☞EN-8 a (Start/Stop) button ☞EN-9, 15, 23 P(Power) button ☞EN-7 TEMPO button ☞EN-9, 16, 21, 24 SUSTAIN button ☞EN-11 MY SETUP button ☞EN-13 FUNCTION button ☞EN-32 ■ Back DC 9.5V terminal ☞EN-4 PEDAL jack ☞EN-6 PHONES/OUTPUT jack ☞EN-6, 31 AUDIO IN jack ☞EN-31 USB port ☞EN-30 Dance Music tone • The numbers to the right of the ☞ symbol are reference page numbers.
Using Batteries for Power Getting Ready to Play Preparing a Power Supply • Be sure to turn off power before loading batteries. • Use commercially available AA-size alkaline batteries or AA-size rechargeable nickel metal hydride batteries. • Low battery power can cause abnormal operation. If this happens, replace batteries with new ones. If you are using rechargeable batteries, charge them. Though either an AC adaptor or batteries can be used for power, use of AC adaptor power is normally recommended.
Getting Ready to Play ■ Configuring the Battery Type Setting ■ Battery Level Indicator 1. Press FUNCTION. A battery icon appears on the display as shown below to let you know when battery power is getting low. This displays the [FUNCTION] screen. 2. Use the U and I buttons to select “Battery”. Low Battery Power Battery icon (not flashing) • To go back to the previous screen, press the EXIT button. Battery Replacement Required Battery icon (flashing) 3.
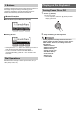
Operations Common to All Modes Connecting Headphones (Sold Separately) Plugging in headphones cuts off output from the built-in speakers, which means you can practice playing even late at night without disturbing others. • Be sure to turn down the Digital Keyboard volume level before connecting headphones. Display Screen Contents PHONES/OUTPUT jack (3.5mm stereo mini jack) Stereo mini plug • Headphones do not come with the Digital Keyboard.
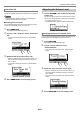
Playing on the Keyboard 3 Buttons Operations assigned to the three buttons along the bottom of the display change according to the setting you are configuring. Operations currently assigned to the three buttons are indicated by labels above the buttons. Turning Power On or Off 1. Press P (Power). This turns on power. • To turn off power, hold down P (Power) until the display goes blank. 3 Button Examples ■ Home Screen (Tone Selection Screen) ■ Setting Screen 2. Play something on the keyboard.
Playing on the Keyboard Auto Power Off While Auto Power Off is enabled, Digital Keyboard power will turn off automatically after about 30 minutes of non-operation. Adjusting the Volume Level 1. Use the VOLUME + and – buttons to adjust the volume level. This will change the volume level and cause the current volume level value to appear momentarily on the display. • The setting range is 0 to 10. • Holding down either button scrolls the setting value.
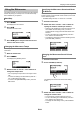
Playing on the Keyboard Specifying the Metronome Sound and Beats Per Measure Using the Metronome The metronome lets you play and practice along with a steady beat to help keep you on tempo. You can also set a tempo that is suitable for your practice. Start/Stop 1. Press HOME. This displays the home screen. 2. Press a. You can use the procedure below to configure a setting that sounds a chime on the first beat of each measure, and a click for the remaining beats.
Controlling the Sound of a Performance Listening to Demo Play You can use Demo Play to play built-in songs in sequence. 1. While holding down TEMPO, press a. This displays the [DEMO] screen and starts song number “1”. • The display shows the number and name of the current song. • For a list of song titles, see the “Song List” (page EN-43). • To return to the home screen, press the EXIT button.
Controlling the Sound of a Performance Using a Pedal A pedal can be used to change notes while playing. Under initial default settings, sustain is assigned to the pedal, so it can be used as a damper pedal. • A pedal unit does not come with the Digital Keyboard. Purchase one separately from your retailer. Using the SUSTAIN Button While sustain is enabled, notes are sustained longer when keyboard keys are released. 1. Press SUSTAIN. This momentarily displays “SUSTAIN ON”.
Controlling the Sound of a Performance Changing the Pitch in Semitone Steps (Transpose) Transpose lets you raise or lower the overall pitch of the Digital Keyboard in semitone steps. You can use this feature to raise or lower the Digital Keyboard’s key to make it easier to play a piece written in a difficult key, or to adjust to a key that better matches a vocalist, another musical instrument, etc. 1. Press FUNCTION. This displays the [FUNCTION] screen. 2. Use the U and I buttons to select “Transpose”.
Savable Settings Saving and Loading Instrument Settings (MY SETUP) You can use MY SETUP to save the setup (tone, rhythm, and other settings) of the Digital Keyboard. You can recall a saved setup when you need it to perform a particular song, etc. Saving to MY SETUP 1. Press MY SETUP. This displays the [MY SETUP] screen. 2. Press the SAVE button. This causes “Sure?” to appear on the display. The name of the main setting (TONE, RHYTHM, SONG, DANCE MUSIC) also appears.
Saving and Loading Instrument Settings (MY SETUP) Enabling MY SETUP Power On Recalling From MY SETUP Use the procedure below to enable MY SETUP power on, which causes the MY SETUP settings to be applied whenever the Digital Keyboard is turned on. 1. Press MY SETUP. This displays the [MY SETUP] screen. 2. Press the LOAD button. 1. Press FUNCTION. This causes “Sure?” to appear on the display. The name of the main setting (TONE, RHYTHM, SONG, DANCE MUSIC) also appears.
Skip Forward and Skip Back Playing a Built-in Song Use the operations in this section to perform skip forward and skip back operations. Songs With this Digital Keyboard, the term “song” is used to refer to a musical piece. You can listen to the built-in songs for your own enjoyment, or you can play along with them for practice. ■ Skip Forward While a song is playing, press the FF button to skip forward.
Playing a Built-in Song Changing a Song’s Tempo (Speed) Adjusting the Song Volume Level You can use the procedure below to change the tempo (speed) and slow down playback to practice difficult passages, etc. Use the procedure below to adjust the balance between the volume levels of song play and what you play on the keyboard. 1. While the [SONG] screen is displayed, select 1. Press FUNCTION. the song whose tempo you want to change and then press TEMPO. This displays the [TEMPO] screen.
Playing a Built-in Song Changing the Keyboard Tone While a Song is Playing 1. While a song is playing, press HOME. The selected tone number and instrument name will appear on the display. Practicing a Song Part You can turn off the right-hand part or the left-hand part of a song you are playing and practice along with the remaining part. Use this when you feel that a song is initially too difficult for you to play with both hands at the same time. 1. While a song is playing or stopped, press the 2.
Playing a Built-in Song Sounding a Pre-count Sounding a Count in Time with a Song 1. While the song stopped, press the COUNT button. You can configure count settings to sound a count in time with a song and to sound a pre-count before a song starts. Press the button a number of times until “PRE” appears on the display. Sounding a Count 1. While the song stopped, press the COUNT button. Press the button a number of times until “CNT” appears on the display. 2. Press a to start the song.
Playing in the Dance Music Mode Dance Music Mode In the Dance Music Mode, you can create dance music by combining and playing multiple types of pattern phrases, and by applying effects. Pattern phrases of each part can be combined, making it possible to enjoy dance music like a DJ. Entering the Dance Music Mode (page EN-20) changes the functions of the keyboard keys as shown below.
Playing in the Dance Music Mode 3. Rotate the dial to select a song. Melody/Voice Keyboard Functions • After you rotate the dial once to select an option, you also will be able to change the selection using the – and + buttons. • To return to the first Dance Music number, press the – and + buttons at the same time. • To go back to the previous screen, press the BACK button.
Playing in the Dance Music Mode 3. Rotate the dial to adjust the Dance Music Changing the Dance Music Tempo volume level. You can use the tempo setting operation to change the tempo of pattern play. • You can specify a volume value from 0 to 127. • After you rotate the dial once to select an option, you also will be able to change the selection using the – and + buttons. • To return the setting to its initial default, press the – and + buttons at the same time.
Playing in the Dance Music Mode Using the Recommended Tone Using Effects 1. In the Dance Music Mode, long-press Pressing an Effect Switch key during pattern play applies one of the effects described below to the entire song. FUNCTION. Keyboard Key Function This momentarily displays “RECOMMENDED” and assigns the tone recommended for the currently selected pattern.
Playing with a Rhythm Backing Building Performance Tension While pattern play is in progress, you can use the build-up function to apply dance music effects and build up tension. Function Name PITCH Description You can use the procedures in this section to select the rhythm you want, and then automatically play accompaniments to suit it simply by playing chords with your left hand. It’s like having a personal backup group along with you wherever you go.
Playing with a Rhythm Backing 4. Press a. This starts the rhythm and displays the beat. Changing the Volume Level of a Rhythm Use the procedure below to adjust the balance between the volume levels of keyboard play and the rhythm. 1. Press FUNCTION. This displays the [FUNCTION] screen. 5. To stop the rhythm, press a again. 2. Use the U and I buttons to select “Rhythm Volume”. • To go back to the previous screen, press the EXIT button.
Playing with a Rhythm Backing Changing the Keyboard Tone While a Rhythm is Playing Changing the Rhythm Pattern You can use the procedure below to add liveliness to your rhythm pattern by playing intro and ending patterns, fill-in patterns, and variations of basic rhythm patterns. Each Auto Accompaniment pattern has a basic “normal pattern” as well as a “variation pattern”. This lets you play a pattern that is different from the Normal Pattern. 1. While a rhythm is playing, press HOME.
Playing with a Rhythm Backing Inserting a Fill-in Phrase Fingering a Chord to Play a Rhythm Accompaniment A “fill-in” is a short phrase played where you want to change the mood of a piece. A fill-in pattern can be used to create a link between two melodies or as an accent. Playing a chord with your left hand automatically adds bass and harmony accompaniment parts to the currently selected rhythm. It is just like having your own personal back up group on call. 1.
Playing with a Rhythm Backing Selecting a Chord Fingering Mode You can select from among the six chord fingering modes below. • CASIO CHORD • FINGERED 1 • FINGERED 2 • FINGERED ON BASS • FINGERED ASSIST • FULL RANGE CHORD ■ CASIO CHORD With CASIO CHORD, you can use simplified fingerings to play the four types of chords described below. Accompaniment keyboard 1. Press FUNCTION. This displays the [FUNCTION] screen. 2. Use the U and I buttons to select “Chord Mode”.
Playing with a Rhythm Backing ■ FINGERED With this chord fingering mode, you play chords on the accompaniment keyboard using their normal chord fingerings. Note that some chords can also be formed using abbreviated fingerings of one or two keys. For information about the types of chords you can finger and their fingerings, see the “Fingering Guide” (page EN-45). Inserting an Intro or an Ending Use the procedure below to insert an intro or ending pattern of a few measures. 1.
■ Configuring [FUNCTION] Screen Settings Connecting with External Devices 1. Press FUNCTION. This displays the [FUNCTION] screen. 2. Use the U and I buttons to select “Intro/ Ending”. • To go back to the previous screen, press the EXIT button. Linking with a Smart Device (APP Function) 3. Rotate the dial to select “On”. • You can also use the – and + buttons to change the setting. Pressing the – button selects “Off”, while the + button selects “On”.
Connecting with External Devices ■ Linking the Digital Keyboard with a Smart Device 1. Referring to “Downloading the Smart Device App” (page EN-29), install the app on the smart device. • For the latest news about supported operating systems, visit the website at the URL or QR code below. https://support.casio.com/global/en/emi/manual/CT-S200/ 2. Use a commercially available USB cable to connect the smart device USB port to the Digital Keyboard USB port.
Connecting with External Devices • Once you are able to connect successfully, you can leave the USB cable connected when you turn off your computer and/or Digital Keyboard. • For detailed specifications and connections that apply to MIDI data communication by this Digital Keyboard, see the latest support information provided on the website at the URL or QR code below. https://support.casio.com/global/en/emi/manual/CT-S200/ • Turn off the external device and the Digital Keyboard before connecting them.
Configuring Function Settings Configuring Settings Use the procedure below to configure settings. 1. Press FUNCTION. This displays the [FUNCTION] screen. 2. Use the U and I buttons to select a setting item. • To go back to the previous screen, press the EXIT button. 3. Rotate the dial to change the setting. • After you rotate the dial once to select an option, you also will be able to change the selection using the – and + buttons. • To go back to the previous screen, press the BACK button. 4.
Configuring Function Settings Function Name Description Display Name Setting Options Power On Volume Specifies the power on volume level. Level PowerOnVolume 1 to 10 MY SETUP Power When enabled, automatically configures MY SETUP On settings when the Digital Keyboard is turned on. PowerOnMySetup Off, On Local Control Local Control Off, On When enabled, mutes notes when something is played on the Digital Keyboard. Auto Power Off Enables/disable Auto Power Off.
Configuring Function Settings Returning Settings to Their Initial Factory Defaults 1. Press FUNCTION. This displays the [FUNCTION] screen. 2. Use the U and I buttons to select “Initialize”. Checking Version Information 1. Press FUNCTION. This displays the [FUNCTION] screen. 2. Use the U and I buttons to select “Version”. This displays version information. • To go back to the previous screen, press the EXIT button. 3. Press the ENTER button. This causes “Sure?” to appear on the display. 3.
Reference Troubleshooting Symptom Required Action Included Accessories I can’t find included items during unpacking. Carefully check inside all of the packing materials. Power Requirements Power does not turn on. • Check the AC adaptor or make sure that the batteries are facing correctly (page EN-4). • Replace the batteries with new ones. Or use AC adaptor power (page EN-4). The Digital Keyboard suddenly turns off after outputting a loud sound. Replace the batteries with new ones.
Reference Symptom Required Action With certain volume levels and tones, the sound of notes played in one keyboard range will sound different from those played in another keyboard range. This is due to system limitations and does not indicate malfunction. With some tones, octaves do not change at the far ends of the keyboard. This is due to system limitations and does not indicate malfunction.
Reference Jacks USB Port Micro-B PEDAL jack Standard jack (6.3mm) (Pedal sustain, sostenuto, soft, start/stop) PHONES/OUTPUT jack Stereo mini jack (3.5mm) AUDIO IN jack Stereo mini jack (3.5mm) Input impedance: 10 kΩ, Input sensitivity: 200 mV AC adaptor terminal Power Requirements 9.
Reference AC Adaptor Handling Precautions Model: AD-E95100L 1. Read these instructions. 2. Keep these instructions on hand. 3. Heed all warnings. 4. Follow all instructions. 5. Do not use this product near water. 6. Clean only with a dry cloth. 7. Do not install near radiators, heat registers, stoves, or any other source of heat (including amplifiers). 8. Use only attachments and accessories specified by the manufacturer. 9. Refer all servicing to qualified service personnel.
Reference Tone List No. Tone Name PIANO 1 STEREO GRAND PIANO 2 GRAND PIANO 3 BRIGHT PIANO 4 MODERN PIANO 5 DANCE PIANO 6 MELLOW PIANO 7 STRINGS PIANO 8 HONKY-TONK 9 OCTAVE PIANO 10 BASS/PIANO 11 ELEC.GRAND PIANO 12 MODERN E.G.PIANO 13 HARPSICHORD 14 HARPSICHORD & STRINGS ELECTRIC PIANO 15 ELEC.PIANO 16 FM E.PIANO 17 60’S E.PIANO 18 CHORUS E.PIANO 1 19 CHORUS E.PIANO 2 20 MODERN E.PIANO 21 SOFT E.PIANO 22 SYNTH-STR.E.PIANO 23 CLEAN E.
Reference No. Tone Name 132 BRASS SECTION 3 133 MELLOW BRASS 134 HARD BRASS 135 BRASS SFZ 136 BRASS & STRINGS 137 SYNTH-BRASS 1 138 SYNTH-BRASS 2 139 ANALOG SYNTH-BRASS 1 140 ANALOG SYNTH-BRASS 2 REED/PIPE 141 ALTO SAX 1 142 ALTO SAX 2 143 HARD A.SAX 144 BREATHY A.
Reference No. 272 273 274 275 276 277 278 279 280 281 282 283 284 285 286 287 288 289 290 291 292 293 294 295 296 297 298 299 300 301 302 303 304 305 306 307 308 309 310 311 312 313 314 315 316 317 318 319 320 321 322 323 324 325 326 327 328 329 330 331 332 333 334 335 336 337 338 339 340 341 342 343 344 Tone Name GM E.
Reference Drum Assignment List Key Note No.
Reference Song List No. Title PIANO/CLASSICS 1 FÜR ELISE 2 VALSE op.64 no.1 “PETIT CHIEN” 3 TURKISH MARCH (MOZART) 4 TRÄUMEREI 5 ETUDE op.10 no.3 “CHANSON DE L’ADIEU” 6 LIEBESTRÄUME no.3 7 NOCTURNE op.9 no.2 (CHOPIN) 8 CANON (PACHELBEL) 9 MARY HAD A LITTLE LAMB 10 LE CYGNE FROM “LE CARNAVAL DES ANIMAUX” 11 AIR FROM “SUITE no.3” 12 SPRING FROM “THE FOUR SEASONS” 13 HUNGARIAN DANCES no.
Reference Rhythm List No.
Reference Fingering Guide Cadd9 ■ FINGERED 1, FINGERED 2 Chords Cmadd9 *4 C *4 C69 *3 *4 Cm Cm69 *3 Cdim *1 *2 *3 *4 Caug *3 C 5 Csus4 *3 Csus2 *4 ■ FINGERED ON BASS, FULL RANGE CHORD In addition to the chords that can be fingered with FINGERED 1 and FINGERED 2, the chords below also are recognized.
Reference Chord Example List *1 *2 C C /(D ) D (D )/E E M m dim aug sus4 sus2 7 m7 M7 m7 5 7 5 7sus4 add9 madd9 mM7 dim7 69 6 m6 *1 Root *2 Chord Type • Since the chord input range is limited, this model may not support some of the chords shown above.
Reference *1 *2 F /(G ) G (G )/A A (A )/B M m dim aug sus4 sus2 7 m7 M7 m7 5 7 5 7sus4 add9 madd9 mM7 dim7 69 6 m6 *1 Root *2 Chord Type • Since the chord input range is limited, this model may not support some of the chords shown above.
Control Change 0 1 5 6, 38 7 10 11 64 65 66 Key’s Ch’s After Touch Pitch Bender Note ON Note OFF Velocity True voice O O O O *2 O O O O O O O X O X X X X X X O *3 X O *3 X O O 9nH v = 1 - 127 X 9nH v = 0, 8nH v =** 0 - 127 0 - 127 *1 X X O 9nH v = 1 - 127 X 8nH v = 64 0 - 127 Mode 3 X Mode 3 X Default Messages Altered Mode Note Number 1 - 16 1 - 16 1 1 - 16 Recognized Default Changed Transmitted MIDI Implementation Chart Basic Channel Function Model: CT-S200 Bank select Modula
Mode 1 : OMNI ON, POLY Mode 3 : OMNI OFF, POLY Remarks O O X O O X X X Soft pedal Filter resonance Release time Attack time Brightness Portamento Control Reverb send level RPN LSB/MSB Mode 2 : OMNI ON, MONO Mode 4 : OMNI OFF, MONO *1: Depends on tone. *2: For details about RPN and system exclusive messages, see MIDI Implementation at https://support.casio.com/global/en/emi/manual/CT-S200/ *3: In accordance with pedal effect setting.
MA2001-B