USER’S GUIDE GUÍA DEL USUARIO Please keep all information for future reference. Guarde toda información para tener como referencia futura.
GUIDELINES LAID DOWN BY FCC RULES FOR USE OF THE UNIT IN THE U.S.A. (not applicable to other areas). NOTICE This equipment has been tested and found to comply with the limits for a Class B digital device, pursuant to Part 15 of the FCC Rules. These limits are designed to provide reasonable protection against harmful interference in a residential installation.
Safety Precautions Symbols Various symbols are used in this user’s guide and on the product itself to ensure that the product is used safely and correctly, and to prevent injury to the user and other persons as well as damage to property. Those symbols along with their meanings are shown below. Symbol Examples ’ This triangle symbol (/) means that the user should be careful. (The example at left indicates electrical shock caution.
Safety Precautions * DANGER Alkaline Batteries Perform the following steps immediately if fluid leaking from alkaline batteries ever gets into your eyes. 1. Do not rub your eyes! Rinse them with water. 2. Contact your physician immediately. Leaving alkaline battery fluid in your eyes can lead to loss of sight. + * WARNING Smoke, Strange Odor, Overheating Continued use of the product while it is emitting smoke, a strange odor, or heat creates the risk of fire and electric shock.
Do not incinerate the product. Never throw the product into fire. Doing so can cause it to explode, creating the risk of fire and personal injury. Water and Foreign Matter Water, other liquids, and foreign matter (such as pieces of metal) getting into the product create the risk of fire and electric shock. Take the following steps immediately. 1. Turn off power. 2. If you are using the AC adaptor for power, unplug it from the wall outlet. 3.
Safety Precautions * CAUTION AC Adaptor Misuse of the AC adaptor creates the risk of fire and electric shock. Always make sure you observe the following precautions. • Do not locate the electric cord near a stove or other sources of heat. • Never pull on the cord when unplugging from the electrical outlet. Always grasp the AC adaptor when unplugging. • Insert the AC adaptor into the wall outlet as far as it will go.
Display Screen • Never push on the display screen’s LCD panel or subject it to strong impact. Doing so can cause the LCD panel’s glass to crack, creating the risk of personal injury. • Should the LCD panel ever crack or break, never touch the liquid inside of the panel. LCD panel liquid can cause skin irritation. • Should LCD panel liquid ever get inside your mouth, immediately wash out your mouth with water and contact your physician.
Introduction Congratulations upon your selection of this CASIO musical instrument. This keyboard provides you with the following features and functions. ■ 100 tones Choose from among orchestral sounds, synthesized sounds, and more. ■ 100 rhythms 100 versatile rhythms help to add plenty of life to all your keyboard performances. ■ Auto Accompaniment Simply play a chord and the corresponding rhythm, bass and chord parts play automatically.
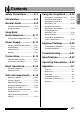
Contents Using the Song Bank ...... E-24 Playing Back a Song Bank Tune .......... E-24 Introduction ....................... E-6 Song Bank Mode Display ..................... E-25 General Guide ................... E-8 Adjusting the Tempo of a Song Bank Tune................................... E-26 Attachment of the Score Stand .............. E-9 Using the Display ................................. E-10 Song Bank Quick Reference.............. E-11 Playing Back a Song Bank Tune..........
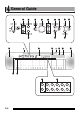
General Guide 1 2 3 5 6 7 8 4 bo bk bp bt bl bm bn bq br bs ck cl E-8 9 cm bo
1 POWER/MODE switch bn SONG BANK button 2 MAIN VOLUME buttons bo Speakers 3 TRANSPOSE/TUNE button bp Display 4 bq Song bank list ACCOMP VOLUME button 5 SYNCHRO/FILL-IN button br Rhythm list 6 START/STOP button bs Tone list 7 TEMPO buttons bt Chord name ● SONG BANK CONTROLLER ck Percussion instrument list 8MELODY ON/OFF button English General Guide cl [+]/[–] buttons • Negative values can be changed only by using [+] and [–] to increase and decrease the displayed value.
General Guide Using the Display 2 1 3 4 Od e T o J o y 9 8 7 6 5 • This is how the display appears while the Song Bank is in use. 1. An indicator appears next to the type of setting you are currently performing (TONE, RHYTHM, SONG BANK). 2. 3. 4. 5. 6. 7. 8. 9.
POWER/MODE PLAY/PAUSE MAIN VOLUME A selection of 50 Song Bank tunes comes built-in for your listening pleasure or play along fun. A simple operation cuts out the melody part of the tune, allowing you to play along on the keyboard. See “Using the Song Bank” on page E-24 for details on playing along with Song Bank tunes. SONG BANK 4. 2. Use the MAIN VOLUME buttons to lower the keyboard volume to a relatively low level.
Song Bank Quick Reference MELODY ON/OFF STOP 6. TONE PLAY/PAUSE Press the MELODY ON/OFF button to turn off the melody part and try playing along on the keyboard. Od e T o J o y 7. Press the MELODY ON/OFF button again to turn the melody part back on. 8. Press the STOP button to stop playback of the Song Bank tune. 9. Press the TONE button to exit the Song Bank Mode and return to the tone and rhythm selection screen.
Prepare a household power outlet or batteries. • Be sure to comply with the “Safety Precautions” provided in this manual. Incorrect use of this product creates the risk of electric shock and fire. • Always make sure that the Digital Keyboard is turned off before plugging in or unplugging the AC adaptor, or before loading or removing batteries. Using a Household Power Outlet Using Batteries You can use six AA-size batteries for power. • Use alkaline or zinc-carbon batteries.
Power Supply Important Battery Information ■ The following shows the approximate battery life. Zinc-carbon batteries ..........................6 hours* * The above value is standard battery life at normal temperature, with the keyboard volume at medium setting. Temperature extremes or playing at very loud volume settings can shorten battery life. ■ Any of the following symptoms indicate low battery power. Replace batteries as soon as possible whenever any of the following occurs.
Phones/Output Terminal Before connecting phones or other external equipment, be sure to first turn down the volume settings of the keyboard and the connected equipment. You can then adjust volume to the desired level after connections are complete. [Rear Panel] PHONES/OUTPUT Terminal Audio connection Stereo standard plug 1 White 2 Keyboard amp, guitar amp,etc. * Be sure to use a connecting cord that has standard plugs on the ends you connect to the keyboard and amplifier.
Basic Operations POWER/MODE TONE [+]/[-] Number buttons MAIN VOLUME This section provides information on performing basic keyboard operations. 2. Press the TONE button. Appears when TONE button is pressed Playing the Keyboard P i ano 1 To play the keyboard 1. Set the POWER/MODE switch to NORMAL. 2. Use the MAIN VOLUME buttons to lower the keyboard volume. • It’s always a good idea to set the keyboard volume at a relatively low level before playing.
Basic Operations Polyphony Layered Tones (Tone Numbers: 80 through 89) Example: 80 STR PIANO This tone layers a strings tone with a piano tone so they both sound when a keyboard key is pressed. Split Tones (Tone Numbers: 90 through 96) Example: 90 BASS/PIANO This tone splits the keyboard so one range is assigned a bass tone and another range is assigned a piano tone. BASS The term polyphony refers to the maximum number of notes you can play at the same time.
Auto Accompaniment RHYTHM [+]/[-] Number buttons This keyboard automatically plays bass and chord parts in accordance with the chords you finger. The bass and chord parts are played using sounds and tones that are automatically selected to select the rhythm you are using. All of this means that you get full, realistic accompaniments for the melody notes you play with your right hand, creating the mood of a one-person ensemble. 2. Press the RHYTHM button.
Auto Accompaniment English POWER/MODE START/STOP TEMPO Playing a Rhythm Use the following procedure to start and stop rhythm play. To play a rhythm 1. Set the POWER/MODE switch to NORMAL. 2. Press the START/STOP button to start play of the currently selected rhythm. 3. To stop rhythm play, press the START/ STOP button again. • All of the keyboard keys are melody keys while the POWER/MODE switch is set to NORMAL. To adjust the tempo 1. Use the TEMPO buttons (e / r) to adjust the tempo.
Auto Accompaniment Using Auto Accompaniment The following procedure describes how to use the keyboard’s Auto Accompaniment feature. Before starting, you should first select the rhythm you want to use and set the tempo of the rhythm to the value you want. CASIO CHORD Accompaniment Keyboard and Melody Keyboard Accompaniment keyboard Melody keyboard To use Auto Accompaniment 1. Set the POWER/MODE switch to CASIO CHORD or FINGERED. 2.
Auto Accompaniment English • It makes no difference whether you press black or white keys to the right of a major chord key when playing minor and seventh chords. FINGERED FINGERED provides you with a total of 15 different chord types. The following describes the FINGERED “Accompaniment keyboard” and “Melody keyboard”, and tells you how to play a C-root chord using FINGERED.
Auto Accompaniment POWER/MODE START/STOP SYNCHRO/FILL-IN Using a Fill-in Pattern Fill-in patterns let you momentarily change the rhythm pattern to add some interesting variation to your performances. To use synchro start 1. The following procedure describes how to use the Fill-in feature. Press the SYNCHRO/FILL-IN button to put the keyboard into synchro start standby. Flash To insert a fill-in 1. Press the START/STOP button to start rhythm play. 2.
English Auto Accompaniment ACCOMP VOLUME [+]/[-] Number buttons Adjusting the Accompaniment Volume You can adjust the volume of the accompaniment parts as a value in the range of 0 (minimum) to 9. 1. Press the ACCOMP VOLUME button. Current accompaniment volume setting A c cmp V o l 2. Use the number buttons or the [+]/[–] buttons to change the current volume setting value.
Using the Song Bank POWER/MODE [+]/[-] Number buttons SONG BANK ● A selection of 50 Song Bank tunes comes built-in for your listening enjoyment or play along fun. You can turn off the melody part to practice with the remaining part. Playing Back a Song Bank Tune To play back a Song Bank tune 1. Set the POWER/MODE switch to NORMAL, FINGERED, or CASIO CHORD. 2. Adjust the main volume and accomp volume. 3. Press the SONG BANK button to enter the Song Bank Mode.
Using the Song Bank MELODY ON/OFF PLAY/PAUSE STOP TONE 5. Press the PLAY/PAUSE button to start play of the tune. Appears when PLAY/PAUSE button is pressed A l o h a Oe English TEMPO [+]/[-] Number buttons • Each time you select a new Song Bank tune, the tone, tempo, and rhythm that is programmed for the tune are automatically selected. You can change a tune’s tone and tempo during playback, but you cannot change the rhythm.
Using the Song Bank Adjusting the Tempo of a Song Bank Tune To change the tempo of a Song Bank tune The tempo can be set within a range of 20 to 255 beats per minute. The tempo setting can be adjusted while the tune is stopped, playing back, or paused. 1. Use the TEMPO buttons [e / r] to adjust the tempo. e : Increases the tempo value. r : Decreases the tempo value. • Pressing both the [+] and [–] buttons at the same time selects “00 PIANO 1”.
Using the Song Bank English MELODY ON/OFF PLAY/PAUSE STOP TONE 3. Press the PLAY/PAUSE button to start play of the Song Bank Tune. • Only the accompaniment part is played, so you can play the melody part on the keyboard. A l o h a Oe 4. To end playback, press the STOP button. • The selected Song Bank tune continues to repeat until you stop playback by pressing the STOP button.
Using the Song Bank Playing Back All Song Bank Tunes in Succession 1. Use the TONE or RHYTHM button to change to any mode other than the Song Bank Mode. • Make sure a dot is not on the display next to the SONG BANK indicator. Indicator turns off. Gu t G t r 2. Press the PLAY/PAUSE button to start playback of the Song Bank tunes starting from tune 00. 3. To stop Song Bank tune playback, press the STOP button. • Pausing playback automatically cancels consecutive playback of all Song Bank tunes.
English Keyboard Settings TRANSPOSE/TUNE [+]/[-] Transposing the Keyboard Transpose lets you raise and lower the overall key of the keyboard in semitone units. If you want to play an accompaniment for a vocalist who sings in a key that’s different from the keyboard, for example, simply use transpose to change the key of the keyboard. To transpose the keyboard 1. Press the TRANSPOSE/TUNE button until the transpose screen appears on the display.
Keyboard Settings Tuning the Keyboard The tuning feature lets you fine tune the keyboard to match the tuning of another musical instrument. To tune the keyboard 1. Press the TRANSPOSE/TUNE button twice to display the tuning screen. Tune 2. Use [+] and [–] to change the tuning setting of the keyboard. Example: To lower the tuning by 20. Tune (-) • The keyboard can be tuned within a range of –50 cents to +50 cents. * 100 cents is equivalent to one semitone.
Problem No keyboard Sound Possible Cause Action See 1. Power supply problem. 1. Correctly attach the AC adaptor, make sure that batteries poles (+/–) are facing correctly, and check to make sure that batteries are not dead. Pages E-13, 14 2. Power is not turned on. 2. Set the POWER/MODE switch to the NORMAL position. Page E-16 3. Volume setting is too low. 3. Use the MAIN VOLUME buttons to increase volume. Page E-16 4. The POWER/MODE switch is in the CASIO CHORD or FINGERED position. 4.
Troubleshooting Problem Possible Cause Action See The key or tuning does not The tuning or transpose match when playing along with parameter is set to a value another instrument. other than 0 or 00. Change the transpose or Pages tuning parameter value to 0 or E-29, 30 00. Missing Song Bank tune Press the MELODY ON/OFF button to turn on the melody part. E-32 Melody part is turned off.
Model: CTK-240/CTK-245 Keyboard: 49 standard-size keys, 4 octaves Tones: 100 Polyphony: 12 notes maximum (6 for certain tones) English Specifications Auto Accompaniment Rhythm Patterns: 100 Tempo: Variable (236 steps, 2= 20 to 255) Chords: 2 fingering methods (CASIO CHORD, FINGERED) Rhythm Controller: START/STOP, SYNCHRO/FILL-IN Accomp Volume: 0 to 9 (10 steps) Song Bank Tunes: 50 Controllers: PLAY/PAUSE, STOP, MELODY ON/OFF Display Name display: TONE, RHYTHM, SONG BANK name/number,
Operating Precautions Be sure to read and observe the following operating precautions. ■ Location Avoid the following locations for this product. • Areas exposed to direct sunlight and high humidity • Areas subjected to temperature extremes • Near a radio, TV, video deck, or tuner The above devices will not cause malfunction of the product, but the product can cause interference in the audio or video of a nearby device.
● Any reproduction of the contents of this manual, either in part or its entirety, is prohibited. Except for your own, personal use, any other use of the contents of this manual without the consent of CASIO is prohibited under copyright laws.
Appendix / Apéndice Tone List / Lista de sonidos PIANO/ORGAN 00 PIANO1 01 PIANO2 02 HONKY-TONK 03 STUDIOPIANO 04 ELEC PIANO1 05 ELEC PIANO2 06 ELEC PIANO3 07 ELEC PIANO4 08 HARPSICHORD 09 CLAVELECTRO 10 ELEC ORGAN1 11 ELEC ORGAN2 12 ELEC ORGAN3 13 ELEC ORGAN4 14 CHURCH ORGAN 15 PIPE ORGAN 16 REED ORGAN 17 ACCORDION 18 BANDONEON 19 HARMONICA GUITAR/BASS/STRINGS 20 GUT GUITAR 21 ACOUS GUITAR 22 JAZZ GUITAR 23 ELEC GUITAR 24 MUTE GUITAR 25 DIST GUITAR 26 WOOD BASS 27 ELEC BASS 28 SLAP BASS 29 BANJO 30 VIOLIN 3
Appendix / Apéndice Rhythm List / Lista de ritmos POPS I 00 CLUB POP 01 VOCAL POP 02 RAP POP 03 FUNKY POP 1 04 SOUL BALLAD 05 POP BALLAD 06 LOVE BALLAD 07 FUNKY POP 2 08 EPIC BALLAD 09 LITE POP POPS II 10 16 BEAT SHUFFLE 11 16 BEAT POP 12 16 BEAT FUNK 13 8 BEAT POP 14 8 BEAT SOUL 15 8 BEAT SHUFFLE 16 DANCE POP 1 17 DANCE POP 2 18 POP FUSION 19 FOLKIE POP ROCK I 20 ROCK WALTZ 21 SLOW ROCK 1 22 SLOW ROCK 2 23 SOFT ROCK 1 24 SOFT ROCK 2 25 SOFT ROCK 3 26 POP ROCK 1 27 POP ROCK 2 28 50’S ROCK 29 60’S SOUL ROCK
Appendix / Apéndice Note Table / Tabla de notas (1) (2) (3) (1) (2) (3) (1) (2) (3) (1) (2) (3) (1) (2) (3) 00 01 02 03 04 05 06 07 08 09 12 12 6 6 12 12 6 6 12 12 A A A A A A A A A A 10 11 12 13 14 15 16 17 18 19 12 12 12 6 12 6 12 6 12 12 A A A A A A A A A A 20 21 22 23 24 25 26 27 28 29 12 12 12 12 12 12 12 12 12 12 A A A A A A B B B A 30 31 32 33 34 35 36 37 38 39 12 12 12 12 12 6 12 6 12 12 A B A A A A A A A A 40 41 42 43 44 45 46 47 48 49 12 12 6 12 6 12 6 12 6 6 A B A B
Appendix / Apéndice • See the illustration below for a description of range types (A through E). • Vea la ilustración siguiente para una descripción de los tipos de gama (A a E). Range Type Tipo de gama C-1 C0 A0 C1 A1 C2 A2 C3 C4 C5 A (Standard type) (Tipo estándar) B Low pitch instruments Instrumentos de altura tonal baja C (“55 PICCOLO”only) Solamente “55 PICCOLO” D (Sound Effect) (Efecto de sonido) E (SPLIT) (División) No scale for tones. Sin escala para los sonidos.
Appendix / Apéndice Fingered Chord Chart / Cuadros de acordes Fingered This table shows the left-hand fingerings (including inverted forms) for a number of often-used chords. Esta tabla muestra las digitaciones (incluyendo las formas invertidas) para varios de los acordes más a menudo usados. • Chords marked with asterisk (*) cannot be played in the Fingered Mode on this keyboard. • En este teclado, los acordes marcados con asterisco (*) no pueden ejecutarse en el modo Fingered.
Appendix / Apéndice Root A-6 Chord Type
Appendix / Apéndice Percussion Instrument List / Lista de instrumentos de percusión • PERCUSSION (tone 99) assigns 39 percussion sound to the keyboard as illustrated below. The sound assigned to each key are indicated above the keyboard. • PERCUSSION (sonido 99) asigna 39 sonidos de percusión al teclado como se ilustra debajo. Los sonidos asignados a cada tecla se indican sobre el teclado. * No sound is produced when the keys in this range are pressed.
Appendix / Apéndice Song List / Lista de canciones SONG BANK / BANCO DE CANCIONES 00 01 02 03 04 05 06 07 08 09 10 11 12 13 14 15 16 17 18 19 20 21 22 23 24 A-8 TWINKLE TWINKLE LITTLE STAR GRANDFATHER’S CLOCK WHEN THE SAINTS GO MARCHING IN WE WISH YOU A MERRY CHRISTMAS JINGLE BELLS SILENT NIGHT O CHRISTMAS TREE GREENSLEEVES AMAZING GRACE AULD LANG SYNE ACH DU LIEBER AUGUSTIN LONDON BRIDGE J’AI PERDU LE DO DE MA CLARINETTE SUR LE PONT D’AVIGNON I’VE BEEN WORKING ON THE RAILROAD LITTLE BROWN JUG LONG LONG
This recycle mark indicates that the packaging conforms to the environmental protection legislation in Germany. Esta marca de reciclaje indica que el empaquetado se ajusta a la legislación de protección ambiental en Alemania. CASIO COMPUTER CO.,LTD.