Printed in China AB0302-046021D 6-2, Hon-machi 1-chome Shibuya-ku, Tokyo 151-8543, Japan CASIO COMPUTER CO., LTD. Handheld Terminal Series User’s Guide Data Collection Terminal Data Collection Terminal • Be sure to read "Safety Precautions" inside this guide before trying to use your Handheld Terminal. After reading this guide, keep it in a safe place for future reference.
C-2 _irbqllqe !"#$_äìÉíççíÜ=pfdK=fåÅK !"#$%&'()*+, !"#$% BLUETOOTH is a registered trademark owned by Bluetooth SIG. Inc. and licensed to CASIO COMPUTER CO., LTD.
Safety Precautions Congratulations upon your selection of this CASIO Product. Be sure to read the following Safety Precautions before trying to use it for the first time. Keep this manual in a handy place for future reference. Markings and Symbols The following are the meanings of the markings and symbols used in these Safety Precautions to warn you against the possibility of personal injury and/or material damage or loss to you and others.
Danger! ■ Lithium-ion Battery Pack The Lithium-ion Battery Pack is available as an option. ● Never allow the battery pack to become wet. Water can create the danger of battery pack heat emission, explosion, and fire. ● Never use or leave the battery pack next to open flame, near a stove, or any other area exposed to high heat. Doing so creates the danger of battery pack heat emission, explosion, and fire. ● Never use the battery pack with any device other than this unit.
Warning! ■ Disassembly and Modification ● Never try to disassemble or modify the unit in any way. High voltage inside creates the danger of electrical shock. ■ Interior Parts and Components ● Never touch interior high-voltage parts or components. Doing so creates the danger of electrical shock. ■ Abnormal Conditions ● Should the unit become hot or start to emit smoke or a strange odor, immediately turn off the power and contact your original dealer or an authorized CASIO service provider.
Warning! ■ Interference with the Operation of Other Equipment (Using Wireless Communication) ● Keep your Handheld Terminal at least 22 centimeters (8' 1/10") away from anyone wearing a pacemaker. Radio waves emitted by the Handheld Terminal can affect the operation of a pacemaker. ● In order to protect someone wearing a pacemaker from the risk of unintentional interference, turn off the Handheld Terminal before boarding a crowded train or entering any other crowded area.
Warning! ■ Handling the Coin Type Lithium Battery ● Do not recharge coin type lithium battery. Doing so may cause it to leak fluid, overheat, explode or burst into flames. ● Do not put the coin type lithium battery in open flame, or apply solder directly to the coin type lithium battery. Doing so may cause it to leak fluid, overheat, explode or burst into flames. ● Do not use the coin type lithium battery with the positive and negative poles reversed.
Warning! ■ Optional Bridge Basic Cradle, Basic Cradle, Satellite Cradle and Cradle-type Battery Charger ● Power these cradles and Cradle-type battery charger only with a power outlet whose voltage matches that marked on the rating plate of each option. Do not plug these options into an extension shared by other appliances. Doing so creates the danger of fire and electrical shock. ● Avoid conditions that can cause damage or breaks in the power cord. Do not place heavy objects on the power cord.
Caution! ■ LCD Screen ● Never apply strong pressure to the screen or subject it to strong impact. Doing so can crack the LCD panel glass and create the danger of personal injury. ● Should the LCD panel glass ever break, never touch the liquid inside. Doing so can cause skin irritation and inflammation. • Should liquid from the LCD panel accidentally get into your mouth, immediately wash your mouth with water and then consult a physician.
Caution! ■ Handling Alkaline Batteries ● Store batteries someplace out of direct sunlight where the temperature and humidity are not high. Not doing so may cause the batteries to leak fluid, overheat or explode. Also, it may cause the life and performance of the batteries to decline. ● These batteries can be disposed of as regular garbage, however, if applicable, follow the regulations of the local government when disposing of these batteries. ● Immediately remove batteries when they have lost all power.
Caution! ■ Optional Bridge Basic Cradle, Basic Cradle, Satellite Cradle and Cradle-type Battery Charger ● Keep the power cord away from stoves and other sources of extreme heat. Heat can melt the insulation of the power cord and create the danger of fire and electrical shock. ● Never pull on the power cord when unplugging it. Doing so can damage the cord and create the danger of personal injury, fire and electrical shock. Always hold onto the plug when unplugging it from the wall outlet.
Introduction Make sure you carefully read the following information to ensure that your Handheld Terminal is able to perform at the level for which it is designed. Handling Precautions • Do not throw or drop the Handheld Terminal or otherwise subject it to strong impact, which can damage the LCD screen, interrupt program execution, corrupt memory contents, or otherwise interfere with proper operation. • Use only your finger or a blunt object to operate the stroke keys.
Product description/Intended use EU/EFTA member states intended for use Member states with restrictive use EU: Austria, Belgium, Denmark, Finland, France, Germany, Greece, Ireland, Italy, Luxembourg, The Netherlands, Portugal, Spain, Sweden, United Kingdom, Czech Republic, Hungary, Poland, Slovenia, Slovakia, Estonia, Latvia, Lithuania, Cyprus, Malta EFTA: Switzerland, Iceland, Lichtenstein, Norway NONE Manufacturer Brand CASIO COMPUTER CO.,LTD.
• The contents of this manual are subject to change without notice. • The term “Handheld Terminal” as used in this User’s Guide refers to the CASIO DT-930 Handheld Terminal unless otherwise noted. • CASIO COMPUTER CO., LTD. assumes no responsibility for any loss or claims by third parties which may arise from the use of this manual. • This manual does not cover programming and the uploading of data. See the separate manuals for details of these procedures. Contents Safety Precautions ......................
Using the Basic Cradle ....................................... E-42 General Guide ..................................................................... E-42 When You Are Using the Down-facing Reader Port Model .. E-44 Setting up the Basic Cradle ................................................. E-44 Serial Connection of Multiple Basic Cradles ........................ E-46 DIP Switch Settings ............................................................. E-46 DT-960IOE Basic Cradle Specifications ............
Unpacking When unpacking the Handheld Terminal (either DT-930M50E or DT-930M51E), check carefully that all of the items shown below are included. If anything is missing or damaged, contact your original dealer or your nearest CASIO Service Provider.
Available Models and Options Options Bridge Basic Cradle HA-E60IO Basic Cradle Satellite Cradle DT-960IOE DT-964IOE Cradle-type Battery Charger Lithium-ion Battery Pack DT-969CHGE DT-923LIB Cables Wall Mount Unit for Bridge Basic Cradle DT-930 M50E DT-930 M51E E-17
E-18 AC Adaptor for Bridge Basic Cradle AC Adaptor for Basic Cradle AD-S15050AE DT-9020 ADP-GS DT-9020ADP-US AC adaptor for Satellite Cradle AC adaptor for Cradle-type Battery Charger AD-S42120AE DT-9020 ADP-GS DT-9020ADP-US RS-232Ccable DT-782RSC Cross-cable for Basic Cradle 14Pin-25Pin (Male) RS-232Ccable DT-783RSC Cross-cable for Basic Cradle 14Pin-25Pin (female) RS-232Ccable DT-787AX Cross-cable for Basic Cradle 14Pin-9Pin (female) RS-232Ccable DT-881RSC Straight cable for Satelli
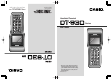
General Guide Left side Front Right side Back 1 1 8 2 9 6 3 4 4 10 5 12 7 11 7 Bottom 7 14 13 7 1 Reader port Emits a laser for bar code reading. 2 Read indicator Indicates the status of the read operation: green for a successful read, red when the read is no good. 3 LCD screen Displays various data when a program is being run. 4 Trigger keys Executes the bar code read operation. 5 Stroke keys A total of 26 keys are provided to turn power ON and OFF and for other operations.
Power Supply The Handheld Terminal has both operating power supply provided by either two AA (LR6)-size alkaline batteries or lithium-ion battery pack, and memory backup power supply provided by lithium battery. In this manual, the words "main battery" refer to both alkaline batteries and the lithium-ion battery pack, unless otherwise noted. Low main battery power is indicated when the low voltage message appears on the LCD screen.
Loading and Removing the AA (LR6)-size alkaline batteries Important! When you load the AA (LR6)-size alkaline batteries, make sure that their positive (+) and negative (–) ends are facing the correct directions. Loading the alkaline batteries 1 2 3 Slide the main battery compartment cover lock to the FREE position and remove the cover. Load two new AA (LR6)-size alkaline batteries into the main battery compartment, making sure that they face the directions shown in the figure.
Power Supply Loading and Removing the Lithium-ion Battery Pack Loading the Lithium-ion Battery Pack 1 2 3 Slide the main battery compartment cover lock to the FREE position and remove the cover. Load a lithium-ion battery pack into the main battery compartment in the direction shown in the figure. Load the battery while sliding it in with the ▲ mark on the lithium-ion battery pack aligned with the ▼ mark in the main battery compartment.
Replacing the Backup Lithium Battery When the backup lithium battery low voltage message appears on the LCD screen, immediately replace the backup battery (lithium). Use a CR2032 lithium battery as the replacement battery. Be sure to turn the Handheld Terminal OFF before you do this. [Caution] ■ For Important Data • When you remove the backup battery with the main battery removed or in a low-power state, data may be lost or may change. Data cannot be recovered once it is lost or corrupted.
Power Supply 3 4 5 Carefully wipe the backup battery (lithium battery) with a dry cloth before inserting it with the plus (+) side up as shown in the diagram. Push the lithium battery in the direction shown by the arrow to hook it. Close the backup battery cover and tighten the screws. Removing the battery 1 2 E-24 Open the backup battery cover and use a ballpoint pen or other sharp object to remove the backup battery (lithium battery). Close the backup battery cover and tighten the screws.
About the LCD Screen The LCD screen of the Handheld Terminal shows program settings, operational procedures, calculation results and other information.
Attaching the Wrist Strap The wrist strap protects the Handheld Terminal from being damaged as a result of it being dropped by mistake during movement. Follow the procedure below to attach the wrist strap. To attach the wrist strap 1 2 Pass the thin end of the wrist strap through the metal hand strap mount (two possible locations) on the bottom side of the Handheld Terminal. Double the strap back through its own loop, and pull it tight.
Keys and Their Functions Keys available on the Handheld Terminal and their functions are as follows. 1 2 1 2 3 1 5 3 4 4 6 7 5 6 7 Trigger keys Trigger a bar code read operation. Control keys CLR key: Cancels input. BS key: Backspaces and deletes one character. S key: Switches between the character input mode and the number input mode. lit on the LCD screen indicates the character input mode. When is not lit, the Handheld Terminal is in the number input mode.
Using the Bar Code Reader Performing a Bar Code Read Operation 1 Press the [PW] key to turn power on. Hold the Handheld Terminal close to the bar code and press the trigger key. Reader port Read indicator Trigger key Power key 2 The reader port emits a laser to read the bar code. The read indicator lights green when the read is successful. Maximum distance: Approx. 45 cm (forward-facing reader port model) and approx.
When reading a small bar code, decrease the distance between the Handheld Terminal and the bar code. For larger bar codes, position the Handheld Terminal so that the bar code fits into the laser beam. Warning! ■ Laser Beam ● Never look directly into the laser beam. Doing so can cause serious eye damage.
Using the Bar Code Reader Adjusting the Laser Beam Width The width of the laser beam emitted from the Handheld Terminal can be adjusted to match the width of the bar code that is being read. When you switch the laser beam width, you must set the beam’s reference point beforehand. 1 2 Turn the Handheld Terminal ON with the and keys held down to start up the system menu.
Beam Width Adjustment Bar Code For down-facing reader port model For forward-facing reader port model [Handling Precautions] • The Handheld Terminal is shipped with the laser beam width already adjusted. So, the laser beam width need not be adjusted. Adjustment is necessary only when the laser beam does not switch to the correct position when the beam width is switched. * Adjustment results are stored in memory.
Communications IR Communication Application software and input data can be transferred between two DT-930 units using the infrared ports on the bottom of the units. Position the two DT-930 units so they will not accidently move during communication. The orientation of the two units depends on the type of communication you plan to perform. • Conformed IrDA Version 1.
Bluetooth® Communication The Bluetooth® interface can be used to transfer data to and from a Bluetooth® compatible printer. Data can be transferred if the Handheld Terminal is located within three meters of the target device (and nothing is blocking the signal). Important! Observe the following precautions to help ensure that Bluetooth communication is successful. • Make sure the Handheld Terminal is visible from and within about 3 meters of the other Bluetooth® devices.
Specifications • General CPU: Memory: 32-bit RISC Type RAM : 4MB (User area 1.6 MB) FROM : 16MB (User area 12.5 MB) • Display Type: Capacity: Display contrast: Backlight: STN LCD with phase correction film 128 x 64 dots Manually adjustable LED • Laser Scanner Readable Symbologies: EAN, JAN, UPC, NW-7, CODE39, ITF, CODE93, CODE128, MSI, Industrial 2 of 5, IATA Maximum Non-contact Distance: Approx. 450 mm max. (DT-930M51E) Approx. 400 mm max.
• Power Supply Main: Backup: Battery life: Two AA (LR6)-size alkaline dry cells or one lithium-ion battery pack Alkaline Battery life: - Approx. 200 hours (using a new set of AA(LR6)-size alkaline batteries, at normal temperature, and in scanning bar code twice per 10 seconds) - Approx. 175 hours (using a new set of AA (LR6)-size alkaline batteries at normal temperature at a key standby/calculation/read operation ratio of 20:1:1) - Approx.
Using the Bridge Basic Cradle Top POWER LINE 35 4 Front POWER 1 Right side Back LINE 2 10 6 7 9 8 1 LED power indicator Indicates the charge status of the battery and whether the DT-930 is mounted. Off: Power OFF Lit Green: Power is ON and the DT-930 is correctly mounted. Lit Red: Power is ON and the DT-930 is not correctly mounted. 2 USB connection status Indicates that the USB connection is normal. Off: USB connection is not normal. Lit Green: USB connection is normal.
Setting up the Bridge Basic Cradle 1 2 3 4 5 Make sure that the Bridge Basic Cradle’s power switch is turned off and then plug the optional AC adaptor (AD-S15050AE) into the AC adaptor jack on the back of the Bridge Basic Cradle. Connect the power cord to the AC adaptor before connecting the power cord to the electrical outlet. Connect the USB cable (DT-380USB) to the USB port on the back of the Bridge Basic Cradle and then connect it to the personal computer.
Setting up the Bridge Basic Cradle Connecting without Using the AC Adaptor • It is possible to draw power from the personal computer in the bus power mode. This makes it possible to operate the Bridge Basic Cradle without using the AC adaptor. • Power is not supplied to the DT-930 when the USB connection is used to supply power. Replace the batteries to transfer data if the low voltage message is displayed on the DT930.
Mounting on a Wall 1 Remove the screws on the bottom of the desktop unit to remove it. Screws 2 Attach the wall mount unit and tighten the screws for the wall mount unit. Screws 3 Insert the screw provided into the location where the hole on the top of the wall mount unit is to be fixed. Do not screw the screw all the way in. Leave about 2 mm between the wall and the head of the screw.
Setting up the Bridge Basic Cradle 4 5 6 Hang the wall mount unit from the screw through the hole on its top. POWER LINE POWER LINE Insert the screw provided into the top part of the lower hole of the wall mount unit. Tighten both the upper and lower screws. Removing the Wall Mount Unit 1 2 Loosen both the upper and lower screws. Slide the wall mount unit up to remove it. Important! E-40 • Check the tightness of the screws after mounting the Bridge Basic Cradle to the wall.
HA-E60IO Bridge Basic Cradle specifications 1. Infrared Interface: Standard: Synchronization: Speed: Infrared interface Conforms to IrDA Ver 1.1 Asynchronous, frame synchronizing 4 Mbps (MAX) 2. USB Standard: Speed: Conforms to USB Ver 1.1 12 Mbps (MAX) 3. Power supply Power Source: Rated input: AC adaptor (AD-S15050AE) USB bus power When using the AC adaptor: 1.0 A (max.) When using USB bus power: 0.4 A (max.) 4. AC adaptor Model no.: Input: Output: AD-S15050AE AC 100 V to 240 V, 50/60 Hz, 0.
Using the Basic Cradle Basic Cradle (DT-960IOE) makes it possible to upload system data and file data between the Handheld Terminal and a personal computer. You can use optional 6-6 pin Modular Cables (DT-788RSC) to connect up to 16 Basic Cradles. Use the RS-232C cable (DT-782RSC/DT-783RSC/DT-787AX) for connecting the Cradle to a personal computer. The Basic Cradle can be located on a desk or table top, or mounted on a wall.
1 RS-232C Interface For connection of a PC and uploading/downloading of system data and file data. 2 RS-485 Interface For connection of multiple optional Basic Cradles. 3 4 AC adaptor jack Nose Guide 5 Terminal detection switch For connection of the dedicated AC adaptor to supply power. Remove this guide when you are using the down-facing reader port model. Detects whether or not the Handheld Terminal is mounted correctly on the Basic Cradle.
Using the Basic Cradle When You Are Using the Down-facing Reader Port Model When you are using a down-facing reader port model, remove the nose guide before use. To remove the nose guide, remove the two screws using a screwdriver. Setting up the Basic Cradle Use only the dedicated AC adaptor for Basic Cradle to connect to an electrical outlet. Be sure to connect the AC adaptor and then turn on the power on the Basic Cradle before performing any communication with the Handheld Terminal.
3 4 5 6 7 Plug the AC adaptor into an electrical outlet. To electrical outlet After making sure that the power switch of the Basic Cradle is in the OFF position, plug the other end of the AC adaptor into the AC terminal at the top of the Basic Cradle. After making sure that the power of the Basic Cradle and personal computer is OFF, remove the cover and connect one end of the optional RS-232C cable (DT-782RSC, DT-783RSC, DT-787AX) to the RS-232C connector at the top of the Basic Cradle.
Using the Basic Cradle Serial Connection of Multiple Basic Cradles You can use optional 6-6 pin Modular Cables (DT-788RSC) to connect up to 16 Basic Cradles in a serial configuration. This configuration makes it possible to exchange data between multiple Handheld Terminals and a personal computer. Connections First connect Basic Cradle RS485-1 and then the RS- 485-2 of the Basic Cradle that you want to connect to.
DT-960IOE Basic Cradle Specifications Infrared Interface: Standard: Control Protocol: Synchronization: Speed: Infrared CASIO original Half-duplex Asynchronous 2,400 to 115,200 bps RS-232C Control Protocol: Synchronization: Speed: Half-duplex Asynchronous 2,400 to 115,200 bps RS-485 Control Protocol: Synchronization: Speed: Half-duplex Asynchronous 2,400 to 115,200 bps Power Supply Power Source: AC adaptor (DT-9020ADP-GS or DT-9020ADP-US) Power Requirements: AC 230 V (DT-9020ADP-GS) AC 120 V (DT-9020AD
Using the Satellite Cradle Satellite Cradle (DT-964IOE) makes it possible to upload system data and file data between the Handheld Terminal and a personal computer. It can also be used as the charger for the lithium-ion battery pack. Use the RS-232C cable (DT-881RSC/DT-882RSC/DT-883RSC/DT-887AX/AXA) for connecting the Satellite Cradle to a personal computer. The Satellite Cradle can be located on a desk or table top, or mounted on a wall.
1 RS-232C Interface 2 RS-422 Interface 3 4 5 AC adaptor jack Nose Guide Terminal detection switch 6 System operation indicator 7 8 9 10 11 12 13 For connection to a PC and uploading/downloading of system data and file data. For connection of multiple Satellite Cradles. For connection of the AC adaptor to supply power. Remove this guide when you are using the down-facing reader port model. Detects whether or not the Handheld Terminal is mounted correctly on the Satellite Cradle.
Using the Satellite Cradle When You Are Using the Down-facing Reader Port Model When you are using a down-facing reader port model, remove the nose guide before use. To remove the nose guide, remove the two screws using a screwdriver. Setting up the Satellite Cradle Use only the dedicated AC adaptor for Satellite Cradle to connect to an electrical outlet. Be sure to connect the AC adaptor and turn on Satellite Cradle power before performing any communication with the Handheld Terminal.
3 4 5 6 7 Connect the power cord to the AC adaptor before connecting the power cord to the power outlet. To electrical outlet After making sure that the power switch of the Satellite Cradle is in the OFF position, plug the other end of the AC adaptor into the AC terminal at the top of the Satellite Cradle.
Using the Satellite Cradle Important! E-52 • High-sensitivity communications devices are used for the IrDA communications function. Avoid using units or equipment such as a cellular phone emits radio waves during communication. To ensure uninterrupted communication, keep the Satellite Cradle away from the equipment (at least 30 centimeters from a cellular phone). • “L” (for left) or “R” (for right) marking is imprinted on the back of each desktop guide and wall mount guide both accompanied with DT-930.
Charging the Battery Pack The following procedure can be used only when a lithium-ion battery pack is loaded in the Handheld Terminal. 1 2 Turn on the power of the Satellite Cradle, and confirm that its power indicator lights up red. Attach the Handheld Terminal to the Satellite Cradle, making sure that the charge terminals on the bottom of the Handheld Terminal come into contact with the charge terminals on the Satellite Cradle.
Using the Satellite Cradle Charging the Battery Pack (charging the lithium-ion battery pack separately) 1 2 Set the power switch of the Satellite Cradle to the ON position. The power indicator of the Satellite Cradle lights red. Load the battery pack in the spare battery compartment on the Satellite Cradle, making sure that the terminals on the side and rear of the battery pack come into close contact with the battery pack charge terminals.
Serial Connection of Multiple Satellite Cradles You can use optional 6-6 pin Modular Cables (DT-888RSC) to connect up to 7 Satellite Cradles in a serial configuration. This configuration makes it possible to exchange data between multiple Handheld Terminals and a personal computer via the cradles. Connections Connect C-OUT on the Satellite Cradle nearest the host computer to C-IN on the next Satellite Cradle that you next want to connect to.
Using the Satellite Cradle DIP Switch Settings The following table shows the various settings that are available with the DIP switches located on the back of the Satellite Cradle.
DT-964IOE Satellite Cradle Specifications Infrared Interface: Standard: Synchronization: Speed: Infrared Conforms to IrDA Ver. 1.2 Original Asynchronous 9,600/38,400/115,200bps RS-232C Control Protocol: Synchronization: Speed: Full-duplex Asynchronous 1,200 to 115,200bps RS-422 Control Protocol: Synchronization: Speed: Full-duplex Asynchronous 9,600/38,400/115,200bps Charger Charge Method: Charge Time: Fixed voltage (with current limiter) Approx.
Using the Cradle-type Battery Charger The Cradle-type Battery Charger (DT-969CHGE) makes it possible to separately charge battery pack installed in the Handheld Terminal and a spare battery pack (DT-923LIB) installed in the spare battery compartment on the charger. The Cradle-type Battery Charger can be located on a desk or table top, or mounted on a wall. When the Cradle-type Battery Charger is mounted on a wall, be sure to use the wall mount unit (supplied).
1 AC adaptor jack For connection of the AC adaptor to supply power 2 Nose Guide 3 Terminal detection switch Remove this guide when you are using the down-facing reader port model. Detects whether or not the Handheld Terminal is mounted correctly on the Cradle-type Battery Charger 4 Spare battery pack charge indicator ("CHG 2") 5 6 7 8 9 Indicates the charge status of a spare battery pack installed in the spare battery compartment.
Using the Cradle-type Battery Charger When You Are Using the Down-facing Reader Port Model When you are using a down-facing reader port model, remove the nose guide before use. To remove the nose guide, remove the two screws using a screwdriver. Setting up the Cradle-type Battery Charger Use only the AC adaptor specified for use with the Handheld Terminal to connect to an electrical outlet. Be sure to connect the AC adaptor and turn Handheld Terminal power on before attempting to charge battery pack.
3 4 5 Plug the AC adaptor into an electrical outlet. To electrical outlet After making sure that the power switch of the Cradle-type Battery Charger is at the OFF position, plug the other end of the AC adaptor into the AC adaptor jack at the rear side of the charger. Turn on the Cradle-type Battery Charger. The power indicator on the Cradle-type Battery Charger lights red.
Using the Cradle-type Battery Charger [Caution] ■ Ambient Temperature Ranges for the Battery Pack • Temperature ranges for battery pack use in the Handheld Terminal, charging, and storage are specified below. Temperatures outside these ranges create the danger of deterioration of battery pack performance and shortening of its service life, as well as fluid leakage and heat generation.
Charging the Battery Pack (charging the lithium-ion battery pack separately) 1 2 Set the power switch of the Cradle-type Battery Charger to the ON position. The power indicator of the Cradle-type Battery Charger lights red. Load a battery pack in the spare battery compartment on the charger, making sure that the terminals on the side and rear of the battery pack come into close contact with the battery pack charge terminals. The battery pack charge indicator ("CHG 2") lights red, and charging is started.
Using the Cradle-type Battery Charger [Caution] ■ Ambient Temperature Ranges for the Battery Pack • Temperature ranges for battery pack use in the Handheld Terminal, charging, and storage are specified below. Temperatures outside these ranges create the danger of deterioration of battery pack performance and shortening of its service life, as well as fluid leakage and heat generation.
DT-969CHGE Cradle-type Battery Charger Specifications Charger Charge Method: Charge Time: Fixed voltage (with current limiter) Approx. 6 hours Power Supply Power Source: AC adaptor (DT-9020ADP-GS or DT-9020ADP-US) Power Requirements: 230 VAC (DT-9020ADP-GS) 120 VAC (DT-9020ADP-US) Rated Input: DC 9.5 V, approx. 1,000 mA Dimensions and Weight Desktop: Approx. 110 (W) x 220 (D) x 100 (H) mm Approx. 420 g Wall Mounted (with wall mount unit attached): Approx. 110 (W) x 220 (D) x 110 (H) mm Approx.
Installing Cradles and Cradle-type Battery Charger The following installation methods describe how to install the Basic Cradle, Satellite Cradle and Cradle-type Battery charger either on a flat surface place or on a wall. To hang the cradles and charger on a wall The following installation method is described with the Satellite Cradle as its reference. 1 Attach the wall unit screw.
2 3 4 5 Remove the desktop guides (L, R). Attach the wall mount guides provided with the DT-930. Insert the wall mount guides into the slits, and then fix them in place by sliding them downwards. Remove the two screws (one each at the top and bottom) that secure the base to the Satellite Cradle. Pressing down on the four corners of the Satellite Cradle base, unhook the tabs, and remove the base from the unit.
Installing Cradles and Cradle-type Battery Charger 6 7 8 9 Position the base on the wall where you want to hang the Satellite Cradle, and use an awl or some other sharp object to mark the positions of the two wood screws. Slip a spacer over each of the wood screws and then drive the screws into the wall at the positions you marked in the previous step. Make sure that the spacers are oriented correctly. You will not be able to hook the Satellite Cradle onto the screws if the spacers are backwards.