E Digital Camera User’s Guide Thank you for purchasing this CASIO product. • Before using it, be sure to read the precautions contained in this User’s Guide. • Keep the User’s Guide in a safe place for future reference. • For the most up-to-date information about this product, visit the official EXILIM Website at http://www.exilim.
Accessories As you unpack your camera, check to make sure that all accessories shown below are included. If anything is missing, contact your original retailer. Rechargeable lithium ion battery (NP-120) USB-AC adaptor (AD-C53U) USB cable To attach the strap to the camera Attach strap here. 1 * The shape of the power cord plug varies according to country or geographic area.
Read this first! • The contents of this manual are subject to change without notice. • The contents of this manual have been checked at each step of the production process. Feel free to contact us if you notice anything that is questionable, erroneous, etc. • Any copying of the contents of this User’s Guide, either in part or its entirety, is forbidden. Except for your own personal use, any other use of the contents of this manual without the permission of CASIO COMPUTER CO., LTD.
Contents Accessories . . . . . . . . . . . . . . . . . . . . . . . . . . . . . . . . . . . . . . . . . . . . . . . . Read this first! . . . . . . . . . . . . . . . . . . . . . . . . . . . . . . . . . . . . . . . . . . . . . . General Guide . . . . . . . . . . . . . . . . . . . . . . . . . . . . . . . . . . . . . . . . . . . . . . Monitor Screen Contents . . . . . . . . . . . . . . . . . . . . . . . . . . . . . . . . . . . . . . ... ... ... ... 2 3 8 9 ❚ Configuring Monitor Screen Settings . . . . . . . .
❚❙ Recording Movie Images and Audio 47 To record a movie . . . . . . . . . . . . . . . . . . . . . . . . . . . . . . . . . . . . . . . . . . . . . 47 Shooting a Snapshot while Shooting a Movie . . . . . . . . . . . . . . . . . . . . . . . . 48 Recording Audio Only . . . . . . . . . . . . . . . . . . . . . . . . . . (Voice Recording) . . 49 ❚ To play back an audio recording . . . . . . . . . . . . . . . . . . . . . . . . . . . . . . . . . . . . . 50 ❚❙ Using BEST SHOT 51 What is BEST SHOT? . . . . . . .
❚❙ Other Playback Functions (PLAY) Using the PLAY Panel . . . . . . . . . . . . . . . . . . . . . . . . . . . . . . . . . . . . . . . . Playing a Slideshow on the Camera . . . . . . . . . . . . . . . . . . . . (Slideshow) Rotating an Image . . . . . . . . . . . . . . . . . . . . . . . . . . . . . . . . . . (Rotation) Selecting Images for Printing . . . . . . . . . . . . . . . . . . . . . (DPOF Printing) Protecting a File Against Deletion . . . . . . . . . . . . . . . . . . . . . . . .
❚❙ Other Settings (Set Up) 103 Turning off Eye-Fi Card Communication . . . . . . . . . . . . . . . . . . . . (Eye-Fi) Configuring Camera Sound Settings . . . . . . . . . . . . . . . . . . . . . (Sounds) Configuring a Startup Image . . . . . . . . . . . . . . . . . . . . . . . . . . . . (Startup) Specifying the File Name Serial Number Generation Rule . . . . . (File No.) Configuring World Time Settings . . . . . . . . . . . . . . . . . . . . . (World Time) Time Stamping Snapshots . . . . . . . . . . . . .
General Guide The numbers in parentheses indicate the pages where each item is explained.
Monitor Screen Contents The monitor screen uses various indicators, icons, and values to keep you informed of the camera’s status. • The sample screens in this section are intended to show you the locations of all the indicators and figures that can appear on the monitor screen in various modes. They do not represent screens that actually appear on the camera. .
. Shutter Button Half-pressed 1Recording mode (page 26) 2Flash (page 38) 3ISO sensitivity (page 66) 4Aperture value 2 5Shutter speed 3 6Focus frame (pages 27, 61) 4 5 1 6 NOTE • The aperture, shutter speed, and ISO sensitivity values will turn orange when you half-press the shutter button if Auto Exposure is not correct. .
. Movie Recording 12 8 7 1Recording mode (page 47) 2White balance setting (page 65) 3 3Remaining movie memory capacity (page 47) 4 4Movie recording time (page 47) 5 5Flash (page 38) 6Exposure compensation (page 64) 7Battery level indicator (page 19) 8Movie recording in progress (page 47) 6 .
Configuring Monitor Screen Settings You can turn display information on and off by pressing [8] (DISP). You can configure separate settings for the REC mode and PLAY mode. Information display on Displays information about image settings, etc. (REC mode only). Information display + Date/Time on In addition to information about snapshot settings, displays movie setting information and the date/time screen. • You can specify the date style you want to use (page 107).
Quick Start Basics What you can do with your CASIO camera Your CASIO camera is packed with a powerful selection of features and functions to make recording of digital images easier, including the following three main functions. Premium Auto Select Premium Auto recording and the camera automatically determines whether you are shooting a subject or scenery, and other conditions. Premium Auto delivers higher image quality than standard Auto. See page 26 for more information.
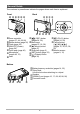
First, charge the battery prior to use. Note that the battery of a newly purchased camera is not charged. Perform the steps below to load the battery into the camera and charge it. • Your camera requires a special CASIO rechargeable lithium ion battery (NP-120) for power. Never try to use any other type of battery. To load the battery 1. Open the battery cover. 1 Slide the battery cover slider towards OPEN and then open it as indicated by the arrows in the illustration. 2 2. Load the battery.
To replace the battery 1. Open the battery cover and remove the current battery. Stopper With the monitor screen side of the camera facing upwards, slide the stopper in the direction indicated by the arrow in the illustration. After the battery pops out, pull it the rest of the way out of the camera. 2. Load a new battery. Charge the Battery You can use either of the two following methods to charge the camera’s battery. • USB-AC adaptor • USB connection to a computer .
3. Connect the USB cable to the camera. The back lamp should light red, indicating that charging has started. The back lamp will go out when charging is complete. It takes about 110 minutes to achieve a full charge. Charging may take longer depending on charging conditions. USB-AC adaptor [USB/AV] port Small connector USB cable (included with camera) Making sure that the mark on the USB cable connector is towards the lens side, connect the cable to the camera. Back Lamp Operation Lamp Status 4.
. To charge using a USB connection to a computer The battery loaded in the camera is charged whenever the camera is connected directly to a computer with the USB cable. • Depending on the setup of your computer, you may not be able to charge the camera’s battery over a USB connection. If this happens, use of the USB-AC adaptor that comes with the camera is recommended. 1. Turn off the camera. Check to make sure that the camera’s monitor screen is blank.
Back Lamp Operation Lamp Status Description Lit Red, (Lit/Flashing Amber) Charging Flashing Red Abnormal ambient temperature, charging taking abnormally long, or battery problem (page 119) Off, (Lit Green) Charging complete Back lamp • The information in parentheses in the above table shows the lamp status while the camera is turned on during charging. 3. After charging is complete, disconnect the USB cable from the camera and then from the computer.
Checking Remaining Battery Power As battery power is consumed, a battery indicator on the monitor screen indicates remaining power as shown below. Remaining Power High Battery Indicator Indicator Color Cyan Low * * * Amber * * Red * Red indicates battery power is low. Charge the battery as soon as possible. Recording is not possible when is indicated. Charge the battery immediately. • The level shown by the battery indicator may change when you switch between the REC mode and PLAY mode.
Configuring Basic Settings the First Time You Turn On the Camera The first time you load a battery into the camera, a screen appears for configuring the display language, date, and time settings. Failure to set the date and time correctly will cause the wrong date and time data to be recorded with images. IMPORTANT! • A screen for language selection will not appear in step 2 of the procedure below if you purchased a camera intended for the Japanese market.
If you make a mistake configuring display language, date, or time settings with the above procedure, refer to the following pages for information about how to correct the settings. – Display language: Page 107 – Date and time: Page 106 NOTE • Each country controls its local time offset and the use of summer time, and so they are subject to change.
To load a memory card 1. Press [ON/OFF] (Power) to turn off the camera and then open the battery cover. 1 Slide the battery cover slider towards OPEN and then open it as indicated by the arrows in the illustration. 2. 2 Load a memory card. Positioning the memory card so its front is facing upwards (towards the monitor screen side of the camera), slide it into the card slot all the way in until you hear it click securely into place. Front Front 3. Close the battery cover.
To replace the memory card Press the memory card and then release it. This will cause it to pop out of the memory card slot slightly. Pull the card out the rest of the way and then insert another one. • Never remove a card from the camera while the back lamp is flashing green. Doing so can cause the image save operation to fail and even damage the memory card. To format (initialize) a new memory card Before using a memory card for the first time with the camera, you must format it.
Turning the Camera On and Off To turn power on Pressing [ON/OFF] (Power) enters the REC mode so you can record images. Pressing [p] (PLAY) while in the REC mode enters the PLAY mode, which you can use to view snapshots and movies (pages 29, 67). • Pressing [r] (REC) while in the PLAY mode returns to the REC mode. • Take care to ensure that nothing is restricting or coming into contact with the lens as it extends. Holding the lens with your hand so it cannot extend creates the risk of malfunction.
Holding the Camera Correctly Your images will not come out clearly if you move the camera when you press the shutter button. When pressing the shutter button, be sure to hold the camera as shown in the illustration below, and keep it still by pressing your arms firmly against your sides as you shoot. Holding the camera still, carefully press the shutter button and take care to avoid all movement as the shutter releases and for a few moments after it releases.
To shoot a snapshot Selecting an Auto Recording Mode You can select one of two auto recording modes (Auto or Premium Auto) according to your digital imaging needs. R Auto This is the standard Auto recording mode. • It provides faster operation than Premium Auto recording. With Premium Auto recording, the camera automatically determines whether you are shooting a subject or scenery, and other conditions. Premium Auto recording delivers higher Ÿ Premium Auto image quality than standard Auto recording.
To shoot a snapshot 1. Point the camera at the subject. If you are using Premium Auto, text will appear in the lower right corner of the monitor screen describing the type of shot the camera has detected. • You can zoom the image, if you want. Zoom controller 2. w Wide Angle z Telephoto Half-press the shutter button to focus the image. Back lamp When focus is complete, the camera will beep, the back lamp will light green, and the focus frame will turn green.
3. Continuing to keep the camera still, press the shutter button the rest of the way down. This records the snapshot. Full-press Recording a Movie [0] (Movie) Press [0] (Movie) to start movie recording. Press [0] (Movie) again to stop movie recording. See page 47 for details. Snap (Image is recorded.) . If the image does not focus... If the focus frame stays red and the back lamp is flashing green, it means that the image is not in focus (because the subject is too close, etc.).
. Shooting with Premium Auto • In addition to shutter speed, aperture, and ISO sensitivity, the camera automatically executes the following operation as required when shooting with Premium Auto. – Auto Focus is normally performed until you half-press the shutter button. – Face Detection (page 41) • Shooting with Premium Auto can cause vibration and noise to occur due to lens operation. This does not indicate malfunction. • When Shooting with Premium Auto, the message “Processing Premium Auto. Please wait...
Deleting Snapshots and Movies If memory becomes full, you can delete snapshots and movies you no longer need in order to free up storage and record more images. • In either the REC mode or PLAY mode, you can delete files simply by pressing [ ] (Delete). IMPORTANT! • Remember that a file (image) delete operation cannot be undone. [ ] (Delete) • Deleting an audio snapshot (page 77) deletes both the snapshot and the audio file. • You cannot delete files while movie or audio recording is in progress.
To delete specific files 1. Press [ 2. Use [8] and [2] to select “Delete Files” and then press [SET]. ] (Delete). • This displays a file selection screen. 3. Use [8], [2], [4], and [6] to move the selection boundary to the file you want to delete, and then press [SET]. • This will select the check box of the currently selected file. 4. Repeat step 3 to select other files, if you want. After you are finished selecting files, press [ ] (Delete). 5.
Snapshot Shooting Precautions Operation • Never open the battery cover while the back lamp is flashing green. Doing so can result in the image you just shot being saved incorrectly, damage to other images stored in memory, malfunction of the camera, etc. • If unwanted light is shining directly onto the lens, shade the lens with your hand when shooting an image.
Snapshot Tutorial Using the Control Panel The Control Panel can be used to configure camera settings. 1. In the REC mode, press [SET]. This will select one of the Control Panel icons and display its settings.* [8] [2] [4] [6] Available settings Control Panel [SET] 1 2 3 4 5 6 7 8 9 * Items displayed in the control panel depend on the recording mode. 2. Use [8] and [2] to select the setting you want to change.
NOTE • No icon is displayed for any Control Panel option (page 9) that is set to its initial default (reset) setting. An icon will appear only if you change the setting of the corresponding Control Panel option. The following are the initial defaults for Control Panel options. – Flash: Auto Flash – Self-timer: Off – Face Detection: Off – Lighting: Off • You also can configure settings other than those listed above (page 55). Changing the Image Size (Size) .
Image Size Selection Tips Note that larger images have more pixels, so they take up more memory space. Large Number of Pixels More detail, but takes up more memory. Best when you plan to print large-size prints (such as poster size). Small Number of Pixels Less detail, but takes up less memory. Best when you want to send images by e-mail, etc. • For information about image size, image quality, and number of images that can be stored, see page 132. • For information about movie image size, see page 37.
. To select the snapshot image size 1. In the REC mode, press [SET]. 2. Use [8] and [2] to select the top Control Panel option (Snapshot Image Size). 3. Use [4] and [6] to select an image size and then press [SET]. Image Size (Pixels) Suggested Print Size and Application 16M (4608x3456) Poster Print 3:2 (4608x3072) Poster Print 16:9 (4608x2592) HDTV 10M (3648x2736) A3 Print 5M (2560x1920) A4 Print 3M (2048x1536) 3.
. Specifying Movie Image Quality Movie image quality is a standard that determines the detail, smoothness, and clarity of a movie during playback. Shooting with the high-quality (HD) setting will result in better image quality, but it also shortens the amount of time you can shoot. 1. In the REC mode, press [SET]. 2. Use [8] and [2] to select the second Control Panel option from the top (Movie Image Quality). 3. Use [4] and [6] to select the setting you want and then press [SET].
Using Flash (Flash) 1. In the REC mode, press [2] ( 2. Use [4] and [6] to select the flash setting you want and then press [SET]. ) once. • If there are no indicators on the monitor screen, you can cycle through the flash modes by pressing [2] ( ). You can turn display information on or off by pressing [8] (DISP) (page 12). 3. Flash [2] ( ) > Auto Flash Flash fires automatically in accordance with exposure (amount of light and brightness) conditions. ? Flash Off Flash does not fire.
NOTE • Take care so your fingers and the strap do not block the flash. • The desired effect may not be obtained when the subject is too far away or too close. • Flash charging time (page 135) depends on operating conditions (battery condition, ambient temperature, etc.). • Shooting with flash turned off when lighting is dim results in a slow shutter speed, which can cause image blur due to camera movement. Under such conditions, secure the camera with a tripod, etc.
Using the Self-timer (Self-timer) With the Self-timer, pressing the shutter button starts a timer. The shutter is released and the image is shot after a fixed amount of time. 1. In the REC mode, press [SET]. 2. Use [8] and [2] to select the fourth Control Panel option from the top (Self-timer). 3. Use [4] and [6] to select the setting you want and then press [SET].
Using Face Detection (Face Detection) When shooting people, the face detection feature detects the faces of up to ten individuals and adjusts focus and brightness accordingly. 1. In the REC mode, press [SET]. 2. Use [8] and [2] to select the fifth Control Panel option from the top (Face Detection). 3. Use [4] and [6] to select “G Face Detection: On” and then press [SET]. 4. Point the camera at the subject(s). The camera will detect human faces and display a frame around each one. 5.
Optimizing Image Brightness (Lighting) You can use this setting to optimize the balance between bright areas and dark areas when shooting images. 1. In the REC mode, press [SET]. 2. Use [8] and [2] to select the sixth Control Panel option from the top (Lighting). 3. Use [4] and [6] to select the setting you want and then press [SET]. Ï On Performs brightness correction. When this option is selected, it takes longer for the image to be stored after the shutter button is pressed.
. easy Mode Control Panel In the easy mode, the Control Panel provides you with access to four setting items: image size, flash, self-timer, and easy Mode. There is also a “MENU” option, which you can select to display a menu screen for configuring image quality (page 64) and Setup tab (page 103) settings. • In the easy mode, the Quality tab can be used to configure the “Movie Quality” and “Lighting” settings only.
4. Press [SET]. This will apply your setting(s) and display the easy Mode viewfinder screen, indicating the camera is ready to shoot. If you selected “MENU” in step 2, pressing [SET] will display the REC menu. See “Advanced Settings” (page 55) for details about configuring its settings. • Pressing [ ] (Delete) will exit the Control Panel.
NOTE • The higher the digital zoom factor, the coarser the recorded image. Note that the camera also has a function that lets you record using digital zoom without image deterioration (page 46). • Use of a tripod is recommended to protect against image blur due to camera movement when shooting with telephoto. • Performing a zoom operation changes the lens aperture. • Digital zoom only is available during movie recording.
• The image deterioration point depends on the image size (page 34). The smaller the image size, the higher the zoom factor you can use before reaching the image deterioration point. • Though digital zoom generally causes a deterioration of image quality, some digital zoom without image deterioration is possible with image sizes of “10M” and smaller. The range in which you can use digital zoom without image deterioration is indicated on the display. The deterioration point depends on the image size.
Recording Movie Images and Audio To record a movie 1. Configure the quality setting for the movie (page 37). The length of the movie you can record will depend on the quality setting you select. 2. In the REC mode, point the camera at the subject and then press [0] (Movie). Remaining recording time (page 133) [0] (Movie) This will start recording and display Y on the monitor screen. Movie recording includes monaural audio.
NOTE • Spending a long time using movie recording will cause the camera to become slightly warm to the touch. This is normal and does not indicate malfunction. • The camera also records audio. Note the following points when Microphone shooting a movie. – Take care that the microphone is not blocked by your fingers, etc. – Good recording results are not possible when the camera is too far away from what you are trying to record.
Recording Audio Only (Voice Recording) Voice Recording lets you record audio only, without a snapshot or movie. • For information about Voice Recording capacities, see page 133. 1. In the REC mode, press [SET]. 2. Use [8] and [2] to select the bottom Control Panel option (BS) and then press [SET] (page 33). 3. Use [8], [2], [4], and [6] to select the “Voice Recording” scene and then press [SET]. This causes ` to appear on the monitor screen. 4. Press the shutter button to start recording.
To play back an audio recording 1. In the PLAY mode, use [4] and [6] to display the Voice Recording file you want to play. ` is displayed in place of an image for a Voice Recording file. 2. Press [0] (Movie) to start playback. • You can also start playback by selecting the second PLAY Panel item from the top (Playback Start) and pressing [SET] (page 71).
Using BEST SHOT What is BEST SHOT? BEST SHOT provides you with a collection of sample “scenes” that show a variety of different types of shooting conditions. When you need to change the setup of the camera, simply find the scene that matches what you are trying to achieve, and the camera sets up for it automatically. This helps to minimize the chance of ruined images due to poor exposure and shutter speed settings.
4. Press [SET] to configure the camera with the settings for the currently selected scene. This returns to the REC mode. • The settings of the scene you selected remain in effect until you select a different scene. • To select a different BEST SHOT scene, repeat the above procedure from step 1. 5. Press the shutter button (if you are shooting a snapshot) or [0] (Movie) (if you are shooting a movie). .
. BEST SHOT Precautions • Some BEST SHOT scenes cannot be used while recording a movie. • For YouTube scene cannot be used while shooting a snapshot. • The Voice Recording scene cannot be used while shooting a snapshot or recording a movie. • Some scenes like Night Scene and Fireworks results in a slow shutter speed setting.
Recording a Self-portrait With this feature, you can shoot your own self-portrait simply by pointing the camera at your face. BEST SHOT has two self-portrait scenes from which to choose. • Self-portrait (1 person): Shoots when the face of at least one person, including you, is detected. • Self-portrait (2 people) : Shoots when the faces of at least two people, including you, are detected. 1. On the BEST SHOT scene menu, select “Self-portrait (1 person)” or “Self-portrait (2 people)”. 2.
Advanced Settings The following are menu operations you can use to configure various camera settings. • REC mode menu contents and operations are different from those in the PLAY mode. This section explains operations using the REC menu screen. See page 71 for information about PLAY menu screen operations. Using On-screen Menus . Example REC Menu Screen Operation [8] [2] [4] [6] 1. In the REC mode, press [SET]. 2.
NOTE • [ ] (Delete) provides a helpful way to navigate around tabs and menus. – Pressing [ ] (Delete) while a tab is selected will display the viewfinder screen. – Pressing [ ] (Delete) while menu item or setting is selected will “back step” in the following sequence: Settings * Menu items * Tab. . REC Menu Operations in This Manual REC menu operations are represented in this manual as shown below. The following operation is the same one described under “Example REC Menu Screen Operation” on page 55.
REC Mode Settings (REC) Selecting a Focus Mode (Focus) Procedure [r] (REC) * [SET] * MENU * REC Tab * Focus Settings Type of Shot Focus Mode Snapshot Movies Q Auto Focus General recording Automatic ´ Macro Close ups Automatic W Manual Focus When you want to focus manually Fixed focal point Manual Approximate Focus Range*1 Snapshot Approximately 5 cm to 9 (infinity) (2.0" to 9) (Wide Angle) Approximately 5 cm to 50 cm (2.0" to 19.
To focus with manual focus 1. On the monitor screen, compose the image so the subject you want to focus on is within the yellow boundary. 2. Watching the image on the monitor screen use [4] and [6] to adjust focus. • At this time the image that is within the boundary will enlarge and fill the monitor screen, which aids in focusing. If you do not perform any operation for two seconds while the enlarged image is displayed, the screen in step 1 will re-appear.
2. Keeping the shutter button half-pressed (which maintains the focus setting), move the camera to compose the image. 3. When you are ready to shoot the image, press the shutter button the rest of the way down. NOTE • Focus lock also locks exposure (AE). Changing the Focus Frame Shape (Focus Frame) Procedure [r] (REC) * [SET] * MENU * REC Tab * Focus Frame You can use this procedure to select from among five different shapes, including a heart shape, for the focus frame.
Using Continuous Shutter (CS) Procedure [r] (REC) * [SET] * MENU * REC Tab * CS While Continuous Shutter is turned on, images are continually recorded until memory becomes full, as long as you keep the shutter button depressed. Releasing the shutter button stops shooting. NOTE • With continuous shutter, exposure and focus for the first image are applied for successive images as well. • Continuous shutter cannot be used in combination with any of the following.
NOTE • ISO sensitivity, aperture, and shutter speed do not appear on the monitor screen when you half-press the shutter button while “Auto” is selected. These values will appear briefly, however, in the preview image that is displayed immediately after you shoot a snapshot. • If the flash fires, the Anti Shake icon S will remain on the display, even though Anti Shake does not function during flash photography. • The ISO sensitivity setting (page 66) must be “Auto” for Anti Shake to work.
Assigning Functions to the [4] and [6] Keys (L/R Key) Procedure [r] (REC) * [SET] * MENU * REC Tab * L/R Key You can assign one of the four functions listed below to the [4] and [6] keys. Setting [4]/[6] key operation EV Shift Adjusts the EV shift value (page 64). White Balance Changes the white balance setting (page 65). ISO Changes the ISO Sensitivity setting (page 66). Self-timer Sets the self-timer time (page 40). Off Cancels [4] and [6] key assignments.
Configuring Power On Default Settings (Memory) Procedure [r] (REC) * [SET] * MENU * REC Tab * Memory When you turn off the camera, it remembers the current settings of all enabled memory items and restores them when you turn it back on. Any memory item that is disabled will be returned to its initial default setting whenever you turn off the camera.
Image Quality Settings (Quality) Specifying Snapshot Image Quality (Quality (Snapshot)) Procedure [r] (REC) * [SET] * MENU * Quality Tab * T Quality (Snapshot) Fine Gives image quality priority. Normal Normal • The “Fine” setting helps to bring out details when shooting a finely detailed image of nature that includes dense tree branches or leaves, or an image of a complex pattern. • Memory capacity (the number of images you can record) will be affected by the quality settings you configure (page 132).
Controlling White Balance (White Balance) Procedure [r] (REC) * [SET] * MENU * Quality Tab * White Balance You can adjust white balance to match the source of light available where you are shooting and avoid the blue cast that results when shooting outdoors when it is cloudy, and the green cast that results when shooting under fluorescent lighting. Auto Configures the camera to adjust white balance automatically.
Specifying ISO Sensitivity (ISO) Procedure [r] (REC) * [SET] * MENU * Quality Tab * ISO ISO sensitivity is a measure of sensitivity to light. Auto Adjusts sensitivity automatically according to conditions. ISO 100 Lower sensitivity Slow shutter speed Less noise Fast shutter speed (Set for shooting in dimly lit areas.
Viewing Snapshots and Movies Viewing Snapshots See page 29 for the procedure for viewing snapshots. Viewing a Movie 1. Press [p] (PLAY) and then use [4] and [6] to display the movie you want to view. 2. Press [0] (Movie) to start playback. Movie icon: » Recording time Image quality Movie Playback Controls Fast forward/ fast reverse [4] [6] • Each press of either button increases the speed of the fast forward or fast reverse operation. • To return to normal playback speed, press [SET].
Zooming an On-screen Image 1. In the PLAY mode, use [4] and [6] to scroll through the images until the one you want is displayed. 2. Slide the zoom controller towards z ([) to zoom. You can use [8], [2], [4], and [6] to scroll the zoomed image on the monitor screen. Slide the zoom controller towards w to unzoom the image. – When monitor screen contents are turned on, a graphic in the lower right corner of the screen shows what part of the zoomed image is currently displayed.
Viewing Snapshots and Movies on a TV Screen 1. Use an optionally available AV cable (EMC-7A) to connect it to the TV. Yellow TV AV cable White Video Audio AUDIO IN jacks (white) [USB/AV] port VIDEO IN jack (yellow) Making sure that the mark on the AV cable connector is towards the lens side, connect the cable to the camera. • Make sure that you insert the cable connector into the USB/AV port until you feel it click securely into place.
IMPORTANT! • Audio is initially output by the camera at maximum volume. When you first start displaying images, set the TV volume control at a relatively low level and then adjust it as required. NOTE • Audio is monaural. • Certain TVs may cut off part of the images. • All icons and indicators that appear on the monitor screen also appear on the TV screen. You can use [8] (DISP) to change the display contents.
Other Playback Functions (PLAY) This section explains menu items that you can use to configure settings and perform other playback operations. Using the PLAY Panel Pressing [SET] in the PLAY mode will display the PLAY Panel. . Example PLAY Panel Operation 1. In the PLAY mode, press [SET]. The PLAY Panel will appear along the right side of the monitor screen. 2. 3. Use [8] and [2] to select the PLAY Panel item you want, and then press [SET].
à Menu Displays the PLAY menu. You can perform the following operations on the PLAY menu. Tabs 1Use [4] and [6] to select the tab where the menu item you want to configure is located. 2Use [8] and [2] to select the menu item you want, and then press [6]. 3Use [8] and [2] to change the setting of the selected menu item. 4Press [SET] to apply the setting. Selected menu item NOTE • Pressing [ ] (Delete) performs one of the following operations.
Playing a Slideshow on the Camera (Slideshow) 1. In the PLAY mode, press [SET]. 2. Use [8] and [2] to select the third PLAY Panel item from the bottom (Slideshow) and then press [SET] (page 71). Start Starts the slideshow. Time Time from the start to the end of the slideshow 1 to 5 minutes, 10 minutes, 15 minutes, 30 minutes, 60 minutes Interval Amount of time each image remains displayed Use [4] and [6] to select a value from 1 to 30 seconds, or “MAX”.
Rotating an Image (Rotation) 1. In the PLAY mode, display the snapshot you want to rotate. 2. Press [SET]. 3. Use [8] and [2] to select the second PLAY Panel item from the bottom (Rotation) and then press [SET] (page 71). 4. Use [8] and [2] to select “Rotation” and then press [SET]. Each press of [SET] will rotate the displayed image 90 degrees left. 5. When the displayed image is at the orientation you want, press [ ] (Delete).
Protecting a File Against Deletion (Protect) Procedure [p] (PLAY) * [SET] * MENU * PLAY Tab * Protect On Protects specific files. 1Use [4] and [6] to scroll through the files until the one you want to protect is displayed. 2Use [8] and [2] to select “On” and then press [SET]. An image that is protected is indicated by the › icon. 3To protect other files, repeat steps 1 and 2. To exit the protect operation, press [ ] (Delete). To unprotect a file, select “Off” instead of “On” in step 2 above.
Cropping a Snapshot (Trimming) Procedure [p] (PLAY) * Snapshot Screen * [SET] * MENU * PLAY Tab * Trimming You can crop a snapshot to trim parts you do not need, and save the result in a separate file. The original snapshot is also retained. Zoom factor Represents snapshot area Use the zoom controller to zoom the image to the size you want, use [8], [2], [4], and [6] to display the portion of the image you want to cut out, and then press [SET].
IMPORTANT! • Note that you cannot restore the original audio of an Audio Snapshot after you delete or re-record it. To play snapshot audio 1. In the PLAY mode, use [4] and [6] to scroll through the images until the Audio Snapshot you want is displayed. An audio snapshot is one that has a ˆ icon. 2. Press [0] (Movie) to start playback. Voice Recording Playback Controls Fast forward/fast reverse [4] [6] Play/pause [SET] Volume adjustment Press [2] and then press [8] [2].
Copying Files (Copy) Procedure [p] (PLAY) * [SET] * MENU * PLAY Tab * Copy Files can be copied from the camera’s built-in memory to a memory card or from a memory card to built-in memory. Built-in * Card Copies all files from built-in camera memory to a memory card. This option copies all the files in built-in camera memory. It cannot be used to copy a single file. Card * Built-in Copies a single file on the memory card to camera built-in camera memory.
Printing Printing Snapshots Professional Print Service You can take a memory card that contains the images you want to print to a professional print service and have them printed. Printing on a Home Printer Printing Images on a Printer with Memory Card Slot You can use a printer equipped with a memory card slot to print images directly from a memory card. For details, see the user documentation that comes with your printer.
Connecting Directly to a PictBridge Compatible Printer You can connect the camera directly to a printer that supports PictBridge and print images without going through a computer. . To set up the camera before connecting to a printer 1. Turn on the camera. Next, press [SET] and then display the REC menu (page 55) or the PLAY menu (page 71). 2. On the “Set Up” tab, select “USB” and then press [6]. 3. Use [8] and [2] to select “PTP (PictBridge)”, and then press [SET]. .
. To print 1. Turn on the printer and load paper. 2. Turn on the camera. This will display the print menu screen. 3. Use [8] and [2] to select “Paper Size”, and then press [6]. 4. Use [8] and [2] to select a paper size and then press [SET]. • The following are the available paper sizes. 3.5"x5", 5"x7", 4"x6", A4, 8.5"x11", By Printer • Selecting “By Printer” prints using a paper size selected on the printer. • See the documentation that comes with your printer for information about paper settings.
Using DPOF to Specify Images to be Printed and the Number of Copies . Digital Print Order Format (DPOF) DPOF is a standard that allows you to include image type, number of copy, and time stamp on/off information on the memory card with the images. After configuring settings, you can use the memory card to print on a home printer that supports DPOF or take the memory card to a professional print service. • Whether or not you will be able to use DPOF settings for printing depends on the printer you are using.
. Configuring the Same DPOF Settings for All the Images Procedure [p] (PLAY) * Snapshot Screen * [SET] * MENU * PLAY Tab * DPOF Printing * All images 1. Use [8] and [2] to specify the number of copies. You can specify a value up to 99. Specify 00 if you do not want to print the image. • If you want to include the date in the images, press [0] (Movie) so “On” is shown for date stamping. 2. Press [SET]. DPOF settings are not cleared automatically after printing is complete.
. Date Stamping You can use one of the following three methods to include the recording date in the printout of an image. Configuring camera settings Configure DPOF settings (page 82). You can turn date stamping on and off each time you print. You can configure settings so some images include the date stamp and some don’t. Configure the Camera’s Time Stamp setting (page 106). • The camera’s Time Stamp setting imprints the date into a snapshot when you shoot it, so the date is always included when you print.
Using the Camera with a Computer Things you can do using a computer... You can perform the operations described below while the camera is connected to a computer. Save images to a computer and view them there • Save images and view them manually (USB connection) (pages 87, 95). • Transfer images to a computer automatically over a wireless LAN for viewing (Eye-Fi) (page 98).
Using the Camera with a Windows Computer Install the required software in accordance with the version of Windows you are running and what you want to do. When you want to do this: Operating System Version Install this software: See page: Save images to a computer and view them there manually Windows 7, Windows Vista, Windows XP (SP3) Installation not required. 87 Play movies Windows 7, Windows Vista, Windows XP (SP3) Installation not required.
. Computer System Requirements for Software Computer system requirements are different for each of the applications. Information about computer system requirements can be found under “Computer System Requirements for Software (For Windows)” on page 122 of this manual. . Precautions for Windows Users • The software requires Administrator privileges to run. • Operation on a self-made computer is not supported. • Operation may not be possible under certain computer environments.
4. Turn off the camera and then use the USB cable that comes with the camera to connect it to your computer. • Connecting the camera to a computer with a USB cable starts charging of the camera’s battery (page 17). • Make sure that you insert the cable connector into the USB/AV port until you feel it click securely into place. Failure to insert the connector fully can result in poor communication or malfunction.
8. Right-click the “DCIM” folder. 9. On the shortcut menu that appears, click “Copy”. 10. Windows 7, Windows Vista users: Click “Start” and then “Documents”. Windows XP users: Click “Start” and then “My Documents”. • If you already have a “DCIM” folder in “Documents” (Windows 7, Windows Vista) or “My Documents” (Windows XP), the next step will overwrite it. If you want to keep the existing “DCIM” folder, you need to change its name or move it to a different location before performing the next step.
Never use your computer to modify, delete, move, or rename any image files that are in the camera’s built-in memory or on its memory card. Doing so can cause problems with the camera’s image management data, which will make it impossible to play back images on the camera and can drastically alter remaining memory capacity. Whenever you want to modify, delete, move, or rename an image, do so only on images that are stored on your computer.
. Movie Playback Precautions • Be sure to move the movie data to the hard disk of your computer before trying to play it. Proper movie playback may not be possible for data accessed over a network, from a memory card, etc. • Proper movie playback may not be possible on some computers. If you experience problems, try the following. – Try recording movies with a quality setting of “STD”. – Try upgrading Windows Media Player to the latest version.
. To upload a movie file to YouTube • Before you can use YouTube Uploader for CASIO, you need to go to the YouTube website (http://www.youtube.com/) and register as a user there. • Do not upload any video that is copyrighted (including neighboring copyrights) unless you yourself own the copyright or you have obtained the permission of the applicable copyright holder(s). • A single movie shoot with the “For YouTube” scene can have a maximum file size of 2048MB or a recording time of up to 15 minutes.
Transferring Images from Your Computer to Camera Memory If you want to transfer images from your computer to the camera, install Photo Transport on your computer. . To install Photo Transport Download the Photo Transport installer from the CASIO digital camera support page (http://www.casio-intl.com/support/). Double-click the installer and follow the installation instructions that appear on your computer screen.
. To transfer computer screen captures to the camera 1. Connect the camera to your computer (page 87). 2. On your computer, click the following: Start * All Programs * CASIO * Photo Transport. This starts up Photo Transport. 3. Display the screen whose screen capture you want to transfer. 4. Click the [Capture] button. 5. Draw a boundary around the area you want to capture. Move your mouse pointer to the upper left corner of the area you want to capture and then hold down the mouse button.
Using the Camera with a Macintosh Install the required software in accordance with what version of the Macintosh OS you are running and what you want to do. Operating When you want to do System this: Version Install this software: Save images to your Macintosh and view them there manually Installation not required. 95 Save images to your Macintosh OS X automatically/Manage images Use iPhoto, which comes bundled with some Macintosh products.
4. Turn off the camera and then use the USB cable that comes with the camera to connect it to your Macintosh. • Connecting the camera to a computer with a USB cable starts charging of the camera’s battery (page 17). • Make sure that you insert the cable connector into the USB/AV port until you feel it click securely into place. Failure to insert the connector fully can result in poor communication or malfunction.
8. After the copy operation is complete, drag the drive icon to Trash. 9. On the camera, press [ON/OFF] (Power) to turn off the camera. After checking to make sure that the back lamp is unlit or lit red, disconnect the USB cable. . To view copied images 1. Double-click the camera’s drive icon. 2. Double-click the “DCIM” folder to open it. 3. Double-click the folder that contains the images you want to view. 4. Double-click the image file you want to view.
Playing a Movie You can use QuickTime, which comes bundled with your operating system, to play back movies on a Macintosh. To play back a movie, first copy it to your Macintosh and then double-click the movie file. . Minimum Computer System Requirements for Movie Playback The minimum system requirements described below are necessary to play back movies recorded with this camera on a computer. Operating System : Mac OS X 10.3.
2. After configuring settings, load the Eye-Fi card into the camera and record. Images you record are sent by wireless LAN to your computer, etc. • For full details, see the user documentation that comes with the Eye-Fi card. • Before formatting a new Eye-Fi card to use it for the first time, copy the Eye-Fi Manager install files to your computer. Do this before formatting the card. IMPORTANT! • Recorded images are transferred over wireless LAN.
Files and Folders The camera creates a file and saves it each time you shoot a snapshot, record a movie, or perform any other operation that stores data. Files are grouped by storing them in folders. Each file and folder has its own unique name. • For details about how folders are organized in memory, see “Memory Folder Structure” (page 101). Name and Maximum Number Allowed Example Each folder can contain up to 9999 files named CIMG0001 through CIMG9999.
Memory Card Data The camera stores images you shoot in accordance with the Design Rule for Camera File System (DCF). . About DCF The following operations are supported for DCF-compliant images. Note, however, that CASIO makes no performance guarantees concerning these operations. • Transferring this camera’s DCF-compliant images to another manufacturer’s camera and view them. • Printing this camera’s DCF-compliant images on another manufacturer’s printer.
. Supported Image Files • Image files shot with this camera • DCF-compliant image files This camera may not be able to display an image, even if it is DCF-compliant. When displaying an image recorded on another camera, it may take a long time for the image to appear on this camera’s monitor screen. . Built-in Memory and Memory Card Data Handling Precautions • Whenever copying memory contents to your computer, you should copy the DCIM folder and all of its contents.
Other Settings (Set Up) This section explains menu items that you can use to configure settings and perform other operations in both the REC mode and PLAY mode. See the following for more information. – REC Menu (page 55) – PLAY Menu (page 71) Turning off Eye-Fi Card Communication (Eye-Fi) Procedure [SET] * MENU * Set Up Tab * Eye-Fi Select “Off” to disable Eye-Fi card communication (page 98).
Configuring a Startup Image (Startup) Procedure [SET] * MENU * Set Up Tab * Startup Display the image you want to use as your startup image and then select “On”. • The startup image does not appear when you turn on the camera by pressing [p] (PLAY) (page 109). • You can specify a snapshot you recorded as the startup image, or you can use the special startup image provided in the camera’s built-in memory. • If you select an audio snapshot as the startup image, the audio will not play at startup.
Configuring World Time Settings (World Time) Procedure [SET] * MENU * Set Up Tab * World Time You can use the World Time screen to view the current time in a zone that is different from your Home City when you go on a trip, etc. World Time displays the current time in 162 cities in 32 time zones around the globe. 1. Use [8] and [2] to select “Destination” and then press [6]. • To change the geographic area and city for the time where you normally use the camera, select “Home”. 2.
Time Stamping Snapshots (Timestamp) Procedure [SET] * MENU * Set Up Tab * Timestamp You can configure the camera to stamp the recording date only, or date and time in the lower right corner of each snapshot. • Once date and time information is stamped into a snapshot, it cannot be edited or deleted. Example: July, 10, 2012, 1:25 p.m.
Specifying the Date Style (Date Style) Procedure [SET] * MENU * Set Up Tab * Date Style You can select from among three different styles for the date. Example: July, 10, 2012 YY/MM/DD 12/7/10 DD/MM/YY 10/7/12 MM/DD/YY 7/10/12 Specifying the Display Language (Language) Procedure [SET] * MENU * Set Up Tab * Language . Specify the display language you want. 1 Select the tab on the right. 2 Select “Language”. 3 Select the language you want.
Configuring Sleep State Settings (Sleep) Procedure [SET] * MENU * Set Up Tab * Sleep This feature turns off the monitor screen and lights the back lamp (green) whenever no camera operation is performed for a preset period of time. Press any button to turn the monitor screen back on. Trigger Time Settings: 30 sec, 1 min, 2 min, Off (Sleep is disabled while “Off” is selected.) • Sleep is disabled under any of the following conditions.
Configuring [r] and [p] Settings (REC/PLAY) Procedure [SET] * MENU * Set Up Tab * REC/PLAY Power On Camera turns on whenever [r] (REC) or [p] (PLAY) is pressed. Power On/Off Camera turns on or off whenever [r] (REC) or [p] (PLAY) is pressed. Disable Camera does not turn on or off whenever [r] (REC) or [p] (PLAY) is pressed. • With “Power On/Off”, the camera turns off when you press [r] (REC) in the REC mode or [p] (PLAY) in the PLAY mode.
Configuring USB Protocol Settings (USB) Procedure [SET] * MENU * Set Up Tab * USB You can use the procedure below to select the USB communication protocol, which is used when exchanging data with a computer, printer, or other external device. Mass Storage Select this setting when connecting to a computer (pages 87, 95). With this setting, the computer sees the camera as an external storage device. Use this setting for normal transfer of images from the camera to a computer.
Formatting Built-in Memory or a Memory Card (Format) Procedure [SET] * MENU * Set Up Tab * Format If a memory card is loaded in the camera, this operation will format the memory card. It will format built-in memory if no memory card is loaded. • The format operation will delete all contents on the memory card or in built-in memory. It cannot be undone. Make sure you do not need any data currently on the card or in built-in memory before you format it.
Appendix Precautions during Use . Avoid Use While In Motion • Never use the camera to record or play back images while operating an automobile or other vehicle, or while walking. Looking at the monitor while in motion creates the risk of serious accident. . Directly Viewing the Sun or Bright Light • Never look at the sun or any other bright light through the cameras viewfinder. Doing so can damage your eyesight. . Flash • Never use the flash unit in areas where flammable or explosive gas may be present.
. Smoke, abnormal odor, overheating, and other abnormalities • Continued use of the camera while it is emitting smoke or strange odor, or while it is overheating creates the risk of fire and electric shock. Immediately perform the following steps whenever any of the above symptoms are present. 1. Turn off the camera. 2. Remove the battery from the camera, taking care to protect yourself against burn injury. 3. Contact your dealer or nearest CASIO authorized service center. .
. Locations To Be Avoided • Never leave the camera in any of the following types of locations. Doing so creates the risk of fire and electric shock. – Areas subject to large amounts of humidity or dust – Food preparation areas or other locations where oil smoke is present – Near heaters, on a heated carpet, in areas exposed to direct sunlight, in a closed vehicle parked in the sun, or other areas subject to very high temperatures • Never place the camera on an unstable surface, on a high shelf, etc.
• Should you ever notice leakage, strange odor, heat generation, discoloration, deformation, or any other abnormal condition while using, charging, or storing a battery, immediately remove it from the camera and keep it away from open flame. • Do not use or leave the battery under direct sunlight, in an automobile parked in the sun, or in any other area subject to high temperatures. Doing so can damage the battery, and cause deterioration of its performance and loss of service life.
. Data Error Precautions Your digital camera is manufactured using precision digital components. Any of the following creates the risk of corruption of data in camera memory.
. Caring for your camera • Never touch the lens or flash window with your fingers. Finger smudges, dirt, and other foreign matter on the lens or flash window can interfere with proper operation of the camera. Use a blower or other means to keep the lens and flash window free of dirt and dust, and wipe gently with a soft, dry cloth. • To clean the camera, wipe it with a soft, dry cloth. . Old Rechargeable Battery Handling Precautions • Insulate the positive and negative terminals with tape, etc.
. Other Precautions The camera becomes slightly warm during use. This is normal and does not indicate malfunction. . Copyrights Except for your own personal enjoyment, unauthorized use of use of snapshots or movies of images whose rights belong to others, without the permission of the right holder, is forbidden by copyright laws. In some cases, shooting of public performances, shows, exhibitions, etc. may be restricted entirely, even if it is for your own personal enjoyment.
Any and all unauthorized copying, distribution, and transfer for commercial purposes of the software provided by CASIO for this product are prohibited. This product’s YouTube upload functionality is included under license from YouTube, LLC. The presence of YouTube upload functionality in this product is not an endorsement or recommendation of the product by YouTube, LLC. Power Supply Charging . If the camera’s back lamp starts flashing red...
Battery Precautions . Precautions during Use • Operation provided by a battery under cold conditions is always less than operation under normal temperatures. This is due to the characteristics of the battery, not the camera. • Charge the battery in an area where the temperature is within the range of 10°C to 35°C (50°F to 95°F). Outside this temperature range charging can take longer than normal or even fail. • Do not tear or remove the battery outer label.
Using a Memory Card See page 21 for information about supported memory cards and how to load a memory card. . Using a Memory Card • SD memory cards, SDHC memory cards, and SDXC Write enabled memory cards have a write protect switch. Use the switch when you need to guard against accidentally deleting data. Note, however, if you write protect an SD memory card you must then turn write protection off Write disabled whenever you want to record to it, format it, or delete any of its images.
. Discarding or Transferring Ownership of a Memory Card or the Camera The format and delete functions of the camera do not actually delete files from the memory card. The original data remains on the card. Note that responsibility for the data on a memory card lies with you. The following procedures are recommended whenever you discard a memory card or the camera, or if you transfer ownership to another party.
Reset Initial Default Settings The tables in this section show the initial default settings on menus that appear in the REC mode and PLAY mode when you reset the camera (page 111). • A dash (–) indicates an item whose setting is not reset or an item for which there is no reset setting. IMPORTANT! • Depending on the recording mode, some of the items on the menu that appears may not be usable. .
“Set Up” Tab Eye-Fi On Date Style – Language – Sleep 1 min Sounds Startup: Sound 1 / Half Shutter: Sound 1 / Shutter: Sound 1 / Operation: Sound 1 / = Operation: ...//// / = Play: ...//// Auto Power Off 2 min REC/PLAY Off Ü Disabled Off Startup Off USB Mass Storage File No. Continue Video Out – World Time – Format – Timestamp Off Reset – Adjust – .
When things don’t go right... Troubleshooting Problem Possible Cause and Recommended Action Power Supply Power does not turn on. 1)The battery may not be loaded correctly (page 14). 2)The battery may be dead. Charge the battery (page 15). If the battery goes dead soon after being charged, it means the battery has reached the end of its life and needs to be replaced. Purchase a separately available CASIO NP-120 rechargeable lithium ion battery. The camera suddenly powers down.
Problem Possible Cause and Recommended Action The subject is out of focus in the recorded image. The image may not be focused properly. When composing the image, make sure the subject is located inside the focus frame. The flash does not fire. 1)If ? (Flash Off) is selected as the flash mode, change to another mode (page 38). 2)If the battery is dead, charge it (page 15).
Problem Possible Cause and Recommended Action A recorded image was not saved. 1)Camera power may have been turned off before the save operation was complete, which will result in the image not being saved. If the battery indicator shows , charge the battery as soon as possible (page 19). 2)You may have removed the memory card from the camera before the save operation was complete, which will result in the image not being saved. Do not remove the memory card before the save operation is complete.
Problem Possible Cause and Recommended Action Playback The color of the playback image is different from what appears on the monitor screen when shooting. Sunlight or light from another source may be shining directly into the lens when you are shooting. Position the camera so sunlight does not shine directly into the lens. Images are not displayed. This camera cannot display non-DCF images recorded onto a memory card using another digital camera.
Problem Possible Cause and Recommended Action Language selection 1)You did not configure initial settings after purchasing the screen appears camera or the camera may have been left with a dead when the camera is battery. Check the camera setup (pages 20, 107). turned on. 2)There may be a problem with the camera’s memory data. If this is the case, perform the reset operation to initialize the camera’s setup (page 111). After that, configure each setting.
Display Messages ALERT The camera’s protection function may have activated because camera temperature is too high. Turn off the camera and wait until it cools down before trying to use it again. Battery is low. Battery power is low. There is something wrong with the memory card. Turn off the camera, remove the memory card and then reload it into the camera. If this message re-appears when you turn the camera back on, format the memory card (page 111).
RETRY POWER ON The lens came into contact with an obstruction while moving. The camera will turn off automatically when this message appears. Remove the obstruction and turn power back on again. SYSTEM ERROR Your camera system is corrupted. Contact your retailer or a CASIO authorized service center. The LOCK switch of the SD, SDHC, or SDXC memory card loaded in the camera is in the The card is locked. locked position. You cannot store images to or delete images from a memory card that is locked.
Number of Snapshots/Movie Recording Time/ Voice Recording Time Snapshot Image Size (Pixels) 16M (4608x3456) 3:2 (4608x3072) 16:9 (4608x2592) 10M (3648x2736) 5M (2560x1920) 3M (2048x1536) VGA (640x480) Image Quality Approximate Image File Size Built-in Memory*1 Recording Capacity SD Memory Card*2 Recording Capacity Fine 5.57MB 8 2791 Normal 3.71MB 12 4191 Fine 4.92MB 9 3160 Normal 3.28MB 14 4740 Fine 4.10MB 11 3792 Normal 2.75MB 16 5654 Fine 3.38MB 13 4600 Normal 2.
Movies Image Quality (Pixels) Approximate Data Rate (Frame Rate) Built-in Memory*1 Recording Capacity SD Memory Card*2 Recording Capacity File Size of 1-minute Movie HD (1280x720) 30.2 Megabits/second (30 frames/second) 10 seconds*3 17 minutes 9 seconds 226.3 MB STD (640x480) 10.6 Megabits/second (30 frames/second) 31 seconds 50 minutes 56 seconds 79.
Specifications File Format Snapshots: JPEG (Exif Version 2.3); DCF 2.0 standard; DPOF compliant Movies: Motion JPEG AVI, IMA-ADPCM audio (monaural) Audio (Voice Recording): WAV (monaural) Recording Media Built-in Memory (Image Storage Area: 46.0MB) SD/SDHC/SDXC Recorded Image Sizes Snapshot: 16M (4608x3456), 3:2 (4608x3072), 16:9 (4608x2592), 10M (3648x2736), 5M (2560x1920), 3M (2048x1536), VGA (640x480) Movies: HD (1280x720), STD (640x480) Effective Pixels 16.
White Balance Auto, Daylight, Overcast, Shade, Day White Fluorescent, Daylight Fluorescent, Tungsten, Manual WB Sensitivity (Standard Output Sensitivity) Snapshots: Auto, ISO 100, ISO 200, ISO 400, ISO 800, ISO 1600 equivalent Movies: Auto Flash Modes Auto, Off, On, Red-eye reduction Flash Range Wide Angle: 0.4 m to 2.2 m (1.3' to 7.2') (ISO Sensitivity: Auto)* Telephoto: 1.0 m to 1.2 m (3.3' to 3.9') * Range is affected by optical zoom.
Approximate Battery Life All of the values provided below represent the approximate amount of time under normal temperature (23°C (73°F)) before the camera turns off. These values are not guaranteed. Low temperatures shorten battery life.
. Rechargeable lithium ion battery (NP-120) Rated Voltage 3.7 V Rated Capacitance 600 mAh Operating Temperature Requirements 0 to 40°C (32 to 104°F) Dimensions 35.5 (W) x 40.2 (H) x 5.0 (D) mm (1.40" (W) x 1.58" (H) x 0.20" (D)) Weight Approximately 14 g (0.49 oz) . USB-AC adaptor (AD-C53U) Input Power 100 to 240 V AC, 50/60 Hz, 100 mA Output Power 5.0 V DC, 650 mA Operating Temperature Requirements 5 to 35°C (41 to 95°F) Dimensions 53 (W) x 21 (H) x 45 (D) mm (2.1" (W) x 0.83" (H) x1.
CASIO COMPUTER CO., LTD.