
User Manual
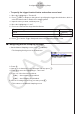
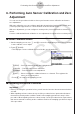

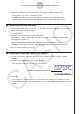
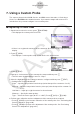
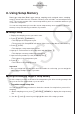
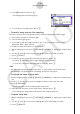
Table Of Contents
- 目录
- 介绍 — 请首先阅读这一部分!
- 第1章 基本操作
- 第2章 手动计算
- 第3章 列表功能
- 第4章 方程计算
- 第5章 绘图
- 第6章 统计图形与计算
- 第7章 财务计算
- 第8章 编程
- 第9章 数据表格
- 第10章 eActivity
- 第11章 存储器管理器
- 第12章 系统管理器
- 第13章 数据通信
- 第14章 几何
- 第15章 教学探索
- 第16章 3D图形函数
- 第17 章 Python(仅限fx-CG50)
- 第18章 分布(仅限fx-CG50)
- 附录
- 考试模式
- E-CON4 Application (English)
- 1. E-CON4 Mode Overview
- 2. Sampling Screen
- 3. Auto Sensor Detection (CLAB Only)
- 4. Selecting a Sensor
- 5. Configuring the Sampling Setup
- 6. Performing Auto Sensor Calibration and Zero Adjustment
- 7. Using a Custom Probe
- 8. Using Setup Memory
- 9. Starting a Sampling Operation
- 10. Using Sample Data Memory
- 11. Using the Graph Analysis Tools to Graph Data
- 12. Graph Analysis Tool Graph Screen Operations
- 13. Calling E-CON4 Functions from an eActivity

ε-23
Using a Custom Probe
7. Using a Custom Probe
The sensors shown in the CASIO, Vernier, and CMA sensor lists under “4. Selecting a
Sensor” are E-CON4 mode standard sensors. If you want to sample with a sensor not
included in a list, you must configure it as a custom probe.
k Registering a Custom Probe
1. On the sensor selection screen, press 4(CUSTOM).
• This displays the custom probe list screen.
• If there is no registered custom probe, the message “No Custom Probe” appears on the
display.
2. Press 1(NEW).
• This displays a custom probe setup screen like the one shown below.
3. Press 1(EDIT).
4. Input up to 18 characters for the custom probe name and then press w.
• This will cause the highlighting to move to “Slope”.
5. Move the highlighting to the setting you want to configure and then press 1(EDIT).
• Setting items are described below.
Slope ... Input the interpolation formula slope (value that specifies constant
a of ax+b)
Intercept ... Input the interpolation formula
y-intercept (value that specifies constant b of
ax+b)
Unit Name ... Input up to eight characters for the unit name.
Warm-up ... Specify the warm-up time.
Type ... Select the sensor type (“0-5V” or “±10V”). Press 4(0-5V) or 5(±10V).
6. Perform auto calibration and zero adjustment of the custom probe as required.
• Press 2(CALIB) to perform auto calibration of the custom probe. See “Performing Auto
Sensor Calibration” (
page ε-20).
• Press 3(ZERO) to perform zero adjustment of the custom probe. See “Performing
Sensor Zero Adjustment” (
page ε-21).