(without price) LABEL PRINTER KL-8200(ZX-579) OCT.
CONTENTS 1. SPECIFICATIONS --------------------------------------------------------------------------------- 1 2. MEASUREMENT ----------------------------------------------------------------------------------- 2 3. CLEANING THE PRINTER HEAD AND ROLLER ---------------------------------------- 2 4. RESET OPERATION ----------------------------------------------------------------------------- 3 5. BLOCK DIAGRAM -------------------------------------------------------------------------------- 4 6.
1. SPECIFICATIONS Model: KL-8200 Input Keyboard layout: Typewriter (QWERTY) Character Types . Alpha (English and other languages): 52 (A ~ Z, a ~ z), 99 (Á, ß, Ç, Z etc.
2. MEASUREMENT 1. DC POWER SOURCE MAX 50 mA TYP 20 mA MAX 25 µA DISPLAY POWER OFF BACK UP (OFF) PRINTING MAX 10 µA MAX 1000 mA TYP 850 mA 2. CHECK VOLTAGE OFF VOLTAGE 4.5 V ± 2.5 % LOW BATTERY VOLTAGE 2.5 V ± 2.5 % (Note: Test voltage: DC 12 V ± 2 %) 3. CLEANING THE PRINTER HEAD AND ROLLER A dirty printer head and roller can result in poor printing quality. If you have problems with print quality, use the following procedure to clean the printer head and roller.
4. RESET OPERATION Resetting initialize the memory You should reset the memory of the label printer before using it for the first time, after you have not used it for a long time, or if nothing happens when you turn power on. Important! Resetting label printer memory clears its memory of all input data. To reset the memory 1. Make sure that label printer power is off. 2. While holding down the PRINT and ESC key, press ON to turn power on. 3.
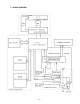
5.
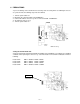
6. PRECAUTIONS To prevent damage of the thermal head caused by static electricity when assembling the chassis ass’y into the unit, the following steps must be followed; 1. 2. 3. 4. 5. Turn the power switch off. Discharge the capacitor C302 on the PCBZ570-3. Connect the FPC of chassis ass’y into a connector CN301 of PCBZ570-3. Assemble the chassis ass’y. Turn the power switch on.
7.
8. DIAGNOSTIC PROGRAM Note: Make the reset operation after RAM check, because the RAM check break the data stored in RAM. Check item Operation (BOOT) Press ON while pressing keys, SPACE + PP + Z RAM CHECK (1 RAM) Display 0:ALL 2:LCD 4:SW 6:COM 1:RAM 3:KEY 5:PR1 7:PR2 Note 8:CP 9:VP Beep With the beep the display becomes clear. 1 (After a few seconds) RAM ROM LCD CHECK (2 LCD) KEY CHECK (3 KEY) Main menu Whenever returning to the main menu there will be a beep sound.
Check item RANK CHECK (4 SW) Operation Display 4 RANK TAPE PRINT CHECK-1 (5 PR1) 5 PRINT CHECK-2 (6 COM) 6 PRINT CHECK-2 (7 PR2) 7 CP CHECK (8 CP) VP CHECK (9 VP) 18 NOW PRINTING DATA1 Check the rank of the thermal head employed in the unit. (RANK = A ~ D) To return to the main menu, press any key. Refer to the following figure-1. When finished printing it will return to the main menu. To return to the main menu, press any key.
9. ERROR MESSAGES Message Cause and Recommended Action SAME NAME ALREADY USED! Name being assigned to a preset format is already used. Use a different name. DATA ITEM NOT FOUND! No match for characters specified for a search operation. Change to other characters or use sequential search. TOO MANY LINES! Too many lines to be printed. Reduce the number of lines or use a wider tape. TOO MANY LINES TO FRAME! Too many lines for printing with a frame. Reduce the number of lines or use a wider tape.
10. SCHEMATIC DIAGRAMS 10-1.
10-2.
10-3.
10-4.
11. PARTS LIST N Item Code No.
N Item Code No.
12.
MA1200661A