Welcome... To the happy family of satisfied CASIO electronic musical instrument owners! To get the most out of the many features and functions of the keyboard, be sure to carefully read this manual and keep it o hand for future reference. Important! When using batteries, be sure to replace them or shift to one of the alternate power sources whenever you notice any of the following symptoms.
Introduction Congratulations upon your selection of this CASIO musical instrument. This keyboard provides you with the following features and functions, 7200 tones * An entire orchestra of 168 preset musical instrument sounds, synthesized sounds, drum sounds and more at your fingertips! You can even store sounds you create yourself for instant recall when you need them. 3100 rhythms * 100 versatile rhythms help to add plenty of life to all your keyboard performances.
* Small metal objects (including hairpins, sewing neediest and coins} » Flammable objects In the event a foreign object should happen to get inside the instrument, please take the following actions: 1. Turn power off. 2. Unplug the AC adapter from the wall cutlet. 3.1f there are any batteries loaded in the keyboard, remove them. * Do not touch the batteries directly with your hands when removing them. They may be hot or battery fluid may be leaking from them. 4.
Liquid Crystal Display (LCD) Precautions * Avoid subjecting the keyboard's LCD to strong impact, which can crack or break the LCD's glass creating the danger of personal injury. + Should the LCD glass ever crack or break, do not allow the liquid inside the LCD to come anti contact with your skin, which can cause inflammation and reddening, *Should the LCD liquid get into you mouth, immediately wash out your mouth with water and then consult a physician.
Using an Intro Pattern Ta insert an intro Using a Fill-in Pattern To insert a fill-in Using & Rhythm Variation To insert the variation rhythm pattern Using a Fill-in Pattern with a Variation Rhythm. " E-16 To insert a fill-in into a rhythm variation Synchrony Starting Accompaniment with Rhythm Play To use synchrony sta Finishing with an Ending Pattern.. To finish with an ending pattern Using Free Session To use Roe Session .
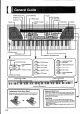
General Guide DOWER indicator we my pe VOLUME slider e Display POWER Duh Or s (e RHYTHM button P (e TEMPO buttons e TONE button pou TONE it Speaker wey [~ AC COMP VOLUME * p DEMO bunion == Speaker button oo e Trademark— _——E PITCH BEND wheel MODE switch mww=lt v b MEMORY TRACK/DRUM PAD INTRO button TR START TOR =5 reversion C ere SYNCHRONIZING button (fi—— SYNTH button MIXER bunion = {{Z" = Free SESSION bunion .
Rear Panel MIDI OUT tartaric MIDI IN terminate ASSIGNABLE JACK terminal PHONETICIAN jack s DG 12V Jack CURSOR hut tans Number bunions @ For input of numbers to change displayed settings. buttons: @ Negative values can be changed only by using to increment and decrement the displayed vain. [ENTER bunion About the Display A bar nappers to indicate the function Tone number/Tone name [Octave Symbol] (reverb, synthesizer, mixer, memory} The tone number/tone name area is also {High) currently in use.
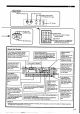
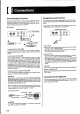
Connections Phones/Output Terminal Before connecting phones or other external equipment, be sure to first turn down the volume settings of the keyboard and the connected equipment. You can then adjust volume to the desired level after connections are complete.
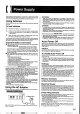
Power Supply This keyboard can be powered by current from a standard household wall outlet (using the specified AC adapter) or by batteries. Always make sure you turn the keyboard off whenever you are not using it. Using batteries Always make sure you turn off the keyboard before loading or replacing batteries. To load batteries 7. Remove the battery compartment cover. 2 -+ Load six D-size batteries anti the battery compartment. * Make sure that the positive and negative () ends are facing correctly. 3.
REVERB -I Nuremberg buttons. —1 POWER = ” e qrrannmnrrnamT b MADE L volume MEMORY TRACK/DRUM PAD This section provides information on performing basic keyboard operations, To play the keyboard 1. Press the POWER button to turn the keyboard on. Set the MODE switch to NORMAL. 2, 3. Use the VOLUME slider to set the volume to a relatively low level. 4. Play something on the keyboard. Selecting a Tone This keyboard comes with 200 built-in Tories. Use the following procedure to select the tone you want to use.
Using Reverb Reverb creates ambiance effects by causing the sound to linger and reverberate, To use reverb Use the REVERB button to select the type of reverb you want to use. Each press of REVERB selects cycles through the available settings. The current setting is indicated by the bar on the keyboard’s display. HALL This setting creates a concert hall effect. STAGE 'With this setting, you get the acoustics of a small club, ROOM ‘This setting adds the acoustics of a studio to the sound.
Display 1 Display 2 RHYTHM == Number buttons fantasia Display § Display 7 Display 8 Display 6 Display 9 This keyboard automatically plays bass and chord parts in accordance with the chords you finger. The bass and chord parts are played using sounds and tones that are automatically selected o select the rhythm you are using. All of this means that you get full, realistic accompaniments for the melody notes you play that) {our right hand, creating the mood of an one-person ensemble.
Adjusting the Tempo You can adjust the tempo of rhythm play within a range of 40 to 255 beats per minute. The tempo setting is used for Auto Accompaniment chord play, Free Session, and Memory operations, To adjust the tempo 1.
CASIO CHORD This method of chord play makes it possible for anyone to easily play chords, regardless of previous musical knowledge and experience. The following describes the CASIO CHORD “Accompaniment keyboard” and “Melody keyboard”, and tells you how to play CASIO Chords. CASIO CHORD Accompaniment Keyboard and Melody Keyboard i Melody playbook -] O e NOTES The accompaniment keyboard can be used for playing chords only.
FULL RANGE CHORD This accompaniment method provides a total of 38 different chord types: the 15 chord types available with FINGERED plus 23 additional types. The keyboard interprets any input of three or more keys that matches a FULL RANGE CHORD pattern to be a chord. Any other input {that is not a FULL RANGE CHORD pattern) is interpreted as melody play.
Display 2 Display 4 SYNCHRONIZING AC COMP VOLUME FREE SESSION INTRO Nm;xbar buttons Display 8 Display 6 Display 7 MODE NORMAL FILL-[ FILLING SHORTSTOP eyt Using a Fill-in Pattern Fill-in patterns let you momentarily change the rhythm pattern to add some interesting variation to your performances. The following procedure describes how to use the Fill-in feature. . To insert a fill-in 1. Press the START/STOP Hutton to start rhythm play. 2.
Using Free Session This keyboard comes per-programmed with a collection of “Free Sessions”, which are Auto Accompaniments that automatically match chord progressions, tones, and tempos to the currently selected rhythm with the touch of a button. Starting a Free Session causes the entire keyboard to become a melody keyboard for play along with the repeating chord progression of the Free Session, To use Free Session 1.
Display 1 Display 2 MIXER —l 1P YIW] CURSOR vy number buttons. e Display 6 Display 7 1 Display 8 belief-d What you can do with the Mixer This keyboard lets you play multiple different musical instrument parts at the same time during auto-accompaniment play, memory playback, receipt of data through the MIDI terminal, ete, The Mixer assigns each part to a separate channel {1 through 16) and lets you control the channel an/off, volume, and pan pot parameters of each channel.
L Y 4. Use the buttons to select on, off, or solo. Example: To turn the channel off, Display 1,2,8, 7,8 B ofF (harmed = 0511000 B ,i.' Uy Bottom bar disappears when oft * Pres the [ 4] to rectum to the channel selection screen. Tress the MIXER button to exit the Channel Edit Mode. NOTES The MID! data display shows only the data for the channels lactose with the Mixer.
Display 2 How parameters work The following are the parameters whose settings can be changed in the Parameter Edit Mode. M Program Change Number {000 to 199) This parameter contrails the tone assigned 1o the channel, g6 1 Frog, Mo, NOTES Only tone numbers 160 (DAM SET) through 167 (DRUM SET 8) can be selected for Channel 10, Display 2 M Volume (000 to 127} This is the parameter that controls the volume of the selected channel.
Synthesizer Mode The Synthesizer Mode of this keyboard provides the tools for creating your own original tones. Simply select one of the builtin tones and change its parameters to create your own original sound. You can even store your sounds in memory and select it using the same procedure as that used to select 2 preset tone, Synthesizer Mode Functions The following describes how to use each of the functions available in the Synthesizer Mode.
Release Rate This parameter controls the speed of a tone’s release {the period From the point when you release a key to the point that the tone stops sounding). Use this parameter to make fine adjustments to the tone characteristics of the amp envelope you are using.
Display 1 Display 2 [P VIF] CURSOR =y = TONE SYNTH -l Display Display 6 Display 7 Number buttons 1 Creating a User Tone Use the following procedure to select a preset tone and change its parameters to create a user tone, 1. First, select the preset tone you want to use as a basis for your user tone. e DI00IY 2,6,7,8 EE =019 Cheshire et 8. 2060 e [T 2. Press the SYNTH button, * This enters the Synthesizer Mode with the first parameter (PCM Set) recalled on the display.
Parameters and Their Settings The following describes the function and provides the setting range of each parameter. W PCM Set This parameter switches the digitally sampled waveform, ft can be set in a range of 0 10 173, ac6 Cr. Rad MR Amp Envelope Set This parameter controls tone characteristics. It can be retina range of 0 to 137, 052 Bre. Set. B Attack Rate This parameter controls the speed of the attack. The greater the ‘value, the quicker the attack This parameter can be set in a range 1te127.
Display 1 Display 2 SYNTH —! (A3 VPP CURSOR x T YT Display 6 Display 7 (/1] 2. Otter making parameter settings to create the user tame, press the SYNTH button. This causes the message “Save?” ta appear on the dis Pom Set 0-173 o | os2 play. 2 | Amp Envelope St 0. 137 000 | o088 S| Attack Fats Rive 27| 008 Display 2 4 | Headcase Rate 1120 019 Cliche Envelope Set abort the save operation without saving anything, s kol press [p], which causes the message “Cancel?” to appear 3 o on the display.
Display 2 P H/¥] CURSOR =y == TONI HIW] CURS( E b {111 2. i you want to assign a name to the user tone, press [1 o8 * This causes the first character of the tone name to flash, which indicates that you can input letters. A 71 Display 2 * If you do not want to assign a name, skip steps 5 through 7. 6. Use and [] buttons to select the first character of the name. Display A|B|IC|D|E|F|GIHII|J Ulviwixiylzirl¥li1° | "lalblcidie|flglh iljlkl!Iiminjolplglr s 1/]0 1123145671819 Cockatiel 2@ 7.
Memory Function Display 2 Display 8 Display 6 Display 7 MEMORY TRACK/DRUM PAD This keyboard fetch you record up to two separate sangs in memory for later playback. There are two methods you can use to record a song; real-time recording where you record the notes as you play them on the keyboard, and step recording where you input chords and notes one-by-one. Tracks Keyboard memory records and plays back much like a standard tape retarder.
Display 1 Display 2 STARTUP SYNCHRONIZING MODE | TIME MEMORY r FREE SESSION Display 8 Display 6 Display 7 TR0 — | L NORMALIZATION MEMORY TRACK/DRUM PAD IW] ENTER Use the and buttons to select a song number. Song number (0 or 1) Display 1,2, 6,7, 8 v | Bec, Mo, Huff , B, 2pi00-1 The above sang number screen remains on the display for about five seconds. If it disappears before you have a chance to celesta song number, use the MEMORY button again to re-display it. 3.
Memory Data Storage ¢ Whenever you make a new recording, anything previously stored in memory s replaced. * Memory contents are retained as long as the keyboard is being supplied with electrical power. Unplugging the AC adapter when batteries are not loaded or when loaded batteries are dead cuts off the keyboard's electrical power supply, clearing all data stored in memory.
Display 1 Display 2 Display 3 START/STOP =t 3= SYNCHRONIZING H Number buttons INTRO any [ MEMORY oot » Errs Dis's Dy 7 Daisy (SO0 | = s every mac Recording Chords with Step Recording ‘With step recording you can record a chord progression chord by-chord. You can then use the chord progression as an Auto Accompaniment, or you can later add individual notes to other 6. Play a chord. » Use the chord play method that is specified by the current MODE switch setting (Fingered, CASIO Chord, etc.).
Track 1 Contents After Step Recording In addition to chords, the following data is also recorded to Track 1 during step recording. This dale is applied whenever Track 1 is played back. * Rhythm number * INTRO button, SYNCHRONIZING button, NORMAL/ FILL-IN button, button operations Specifying Chords in the Normal Mode ‘When the MODE switch is set to NORMAL during step recording, you can specify chords using a method that is different from CASIO Chord and Fingered fingerings.
Display 1 Display 2 Number buttons START/STOP r [ MEMORY Display 8 Display 6 Display 7 Recording Multiple Tracks Track 1 of the keyboard’s memory records Auto Accompaniment and keyboard play. In addition, there are five other melody tracks that you can use to record melody parts only. You can record different tones to the melody tracks and build a full ensemble of instruments for your recordings.
To record to Tracks 2 through 6 using step recording ‘This procedure describes how t input notes one-by-one, specifying each note’s pitch and length. 1. Use the MEMORY button 10 enter retard standby, and then use the and butters to select a song number T e 2. Use the MEMORY TRACK buttons to select the track you want to record to (2 through 6}, Example: Select Track 2. Display Press the STEP button to start retarding. Display 1 mace L = Change the tone number if you want.
Display 1 Display Display 3 START ATOP —I MEMORY: {41 CURSOR Display Display Display Display 9 Correcting Mistakes White Step Recording Memory data can be thought of as & musical score that progresses from left to right, with the input point normally at the far right of the recorded data. The procedure described here lets you move the input point to the left in order to make changes in data you have already input.
Editing Memory Contents After you record to keyboard memory, you can recall individual notes and parameter settings (such as tone number) and make any changes you want. This means you can correct misplayed notes, make changes in tone selections, etc. To edit memory contents 1. Use the MEMORY button to enter playback standby; and then use and to select a song number Song number Playback standby R 2. Press the STEP button. Display 1,2,6,7,8 o agE FoM e o5 e Recorded track Unrecorded track 3.
j o Display 2 Display 3 SYNCHRONIZING INTRO =t Display & Display 5 Display 6 Display 7 Display 8 NORMALIZATION {411y H0¥] CURSOR VAR FILL-IM —] r ~MEMORY 1 Number buttons STEP 1+t MEMORY TRACK/DRUM PAD b= [} ENTER Editing Techniques and Display Contents ‘The following describes the editing techniques you can use to change the various parameters stored in memory. MR To change the key pressure (velocity) of a note Use the keyboard keys, number buttons or and to adjust the key pressure.
Deleting Individual Data stems from Memory The following procedure (which is similar to the editing procedure described on page E-35) can be used to delete recorded data items one-by-one from memory. To delete individual data items from memory 1. Use the MEMORY button to enter playback standby, and then use and to select a song number Display 1,2,6,7,8 fretsaw Press the STEP button to enter edit standby. Display 1,26, 7,8 o0 Paragraph el t‘%_ 3001081 Re carded track Unrecorded track 3.
Display 2 Display 3 Display 4 r— TONE Number buttes Display Display & Display 7 Display 9 ‘This section describes how to use layer (to play two tones with single key) and split (to assign different tones to either end of the keyboard), and how to make touch response, transpose, and tuning settings. Using Layer Layer lets you assign two different tones (3 main tone and a layered tone) to the keyboard, both of which play whenever you press a key.
Using Split With split you can assign two different tones {a main tone and a split tone) to either end of the keyboard, which lets you play one tone with your left hand and anther tone with your right hand, For example, you could select STRINGS as the main (high range) tone and PIZZICATO as the split (ow range) tone, putting an entire string ensemble at your fingertips. Split also lets you specify the split point, which is the location on the keyboard where the changeover between the two tones recurs.
Display 4 SEMITRANSPARENT! LAYER 1 4U/[p 191 CURSOR r TONE Displays Display Display 7 SPLIT b (34 TOUCH RESPONSE To split the keyboard and then layer tones 7. Press the TONE bunion and then input the tone number of the main tone, Display 2 TONE Brazos 2. Press the SPLIT button and then input the number of the split tone, D{fpla'y 2,4,8,7,8 = G5 Tizz. Shr 7 (8., ripping After specifying the split tone, press the SPLIT button to split the keyboard.
NOTES * Touch response not only affects the keyboard's internal sound source, it also is output as MID! data, + Memory playback, accompaniment, and external MiD! note data does not affect the touch response setting. Transposing the Keyboard Transpose lets you raise and lower the overall key of the keyboard in semitone units, If you want to play an accompaniment for a vocalist who sings in a key that's different from the keyboard, for example, simply use transpose to change the key of the keyboard.
What is MIDI? The letters MID] stand for Musical Instrument Digital Interface, which is the name of a worldwide standard for digital signals and connectors that makes it possible to exchange musical data between musical instruments and computers {machines) produced by different manufacturers, MIDI compatible equipment «an exchange keyboard key press, key release, tone change, and other data as messages. .
CONTROL CHANGE This message adds effects such as vibrato and volume changes applied during keyboard play. CONTROL CHANGE data i clues a control number (to identify the effect type) and a control value (to specify the on/off status and depth of the effect. ‘The following Is a list of data that can be send o received Sing CONTROL CHANGE.
Display 2 Display 4 MODE TRANSPOSE TUNE/MID! Display 8 START STOP Changing MIDI Settings This keyboard lets you change a number of MIDI parameters, including GM MODE ON/OFF, PITCH BEND, and others. Parameters are divided into two groups: Group 1 parameters {accessed by pressing the TRANSPOSE/TUNE/ MIDI button twice), and Group 2 parameters (accessed by pressing the TRANSPOSE/ TUNE/MIDI button three times). To change MIDI parameters 1.
“I©OFF; Turns MIST IN CHORD JUDGE off, " oFF T W LOCAL CONTROL ON/OFF (Default: On) on: Turns LOCAL CONTROL on, which sends data generated Dy the keyboard or drum pads simultaneously to the keyboard's local sound source and as a MIDI message from the MID! QUT terminal, Display 2 on calliope OFF: Turns LOCAL CONTROL off, which sends data penetrated by the keyboard or drum pads as a MIDI message from the MIDI OUT terminal, but not o the keyboards local sound source.
SEMITRANSPARENT j Display 2 i {4 VI¥] CURSOR Dumping Internal Data This keyboard stores a variety of internal data, including data recorded to memory and synthesizer data. This data can be sent and received in bulk as MIDI exclusive data through the MID] terminals. This capability makes it possible for you to use 2 computer or other MIDI machine #s an external storage device for your data.