English English MULTI PJ CAMERA/ Multifunctional Camera System YC-430 User’s Guide z Before using this product, be sure to read the Safety Precautions and ensure that you always use the product correctly. z The Multi PJ Camera System is used in combination with a projector. See the user documentation that comes with the projector for safety precautions and for details about its operation.
Safety Precautions Thank you for selecting this CASIO product. Be sure to read these “Safety Precautions” before trying to use it. After reading this User’s Guide, keep it in a safe place for future reference. About safety symbols Various symbols are used in this User’s Guide and on the product itself to ensure safe operation, and to protect you and others against the risk of injury and against material damage. The meaning of each of the symbols is explained below.
Safety Precautions ● AC adaptor Misuse of the AC adaptor creates the risk of fire and electric shock. Make sure that you always observe the following precautions. • Use only the AC adaptor that is specified for the stand and cradle. • Never try to use the supplied AC adaptor to power any other type of device. • Make sure that you use a power source with the same voltage as that specified for the AC adaptor. • Do not overload a power outlet.
Safety Precautions • Never expose the battery to heat or throw it into fire. • Take care that the battery is oriented correctly when you charge it. • Never carry or store the battery together with conductive objects (necklaces, pencil lead, etc.) • Never try to take the battery apart or modify it, never pierce it or subject it to strong impact (by hitting it with a hammer or stepping on it), and never apply solder to the battery.
Safety Precautions ● Location Do not leave the stand and camera in any of the following locations. Such locations create the risk of fire and electric shock.
Operating Precautions PJ Camera and PJ Camera Stand Note that the PJ Camera and the PJ Camera Stand are shipped from the factory as a set, and are intended for sale and use as a set. Proper operation in any other configuration is not guaranteed. PJ Document Stage z z Never write on the document stage and take care to guard against scratching or otherwise damaging it. Writing or other marks on the document stage can interfere with projection in the Document Camera Mode and scanning in the Scanner Mode.
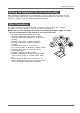
Operating Precautions Helpful Operation Hints z z z z z If the Adjust Camera Position dialog box appears, adjust the position of the PJ Camera so the cross mark on the document stage is within the yellow frame. When the cross is within the yellow frame, the system will take over and adjust camera position automatically. Never touch the PJ Camera or PJ Camera Stand while the automatic camera position adjustment operation is being performed.
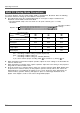
Operating Precautions Multi PJ Startup Mode Precautions PJ Camera Software has two startup modes: Multi PJ and Business Document. Note the following precautions whenever starting up in the Multi PJ startup mode. z The table below shows the recommended setup for each type of subject recorded in the Document Camera Mode and Scanner Mode. * The initial default setup is the one shown for “A4 (210 × 297mm) (8.3 × 11.7inch) Document”.
Operating Precautions Packing the Equipment into the Carrying Bag When packing the equipment into the carrying bag, it is best to remove the PJ Camera from the PJ Camera Stand and pack the camera in the special pocket provided for it. This helps to ensure that the PJ Camera is protected against impact during transport. Other Precautions The camera and stand are made of precision components. Failure to observe the following precautions can result in inability to correctly save data and malfunction.
Operating Precautions ● Avoid using the system under the following conditions. Such conditions create the risk of malfunction of and damage to system components. • Never place heavy objects on any of the system components. • Never insert or allow foreign objects to drop into system components. • Never place a vase or any other container of water on top of system components. ● Clean with a soft, dry cloth.
Contents Contents Safety Precautions ............................................................................................. E-2 Operating Precautions ....................................................................................... E-6 Multi PJ Camera System Features .................................................................. E-12 Multi PJ Camera System User Documentation ............................................... E-13 Unpacking .....................................................
Multi PJ Camera System Features The Multi PJ Camera System is a presentation tool that lets you record images of document, whiteboard contents, and even objects for projection and storage on your computer. Real-time projection of documents and objects Simply place a document onto the PJ Camera Stand and the PJ Camera automatically records it and projects a clear, high-resolution image.
Multi PJ Camera System User Documentation The Multi PJ Camera System comes with the following user documentation. User Documentation Title Description Startup Mode* MULTI PJ CAMERA/ Multifunctional Camera System YC-430 User’s Guide (This Manual) This manual explains basic operation of the Multi PJ Camera System.
Unpacking As you unpack this product, check to make sure that all of the items listed below are present. PJ Digital Camera Rechargeable Lithium Battery (NP-40) USB Cradle PJ Camera Stand Camera Bracket AC Adaptor (AD-A50150S) and AC Power Cord The shape of the plug depends on your geographical area.
Using the CASIO CD-ROM This section explains how to install the PJ Camera Software from the CASIO CD-ROM that comes bundled with this product. It also tells you how to view the contents of the PDF file user documentation that is also included on the CD-ROM. PJ Camera Software You should install PJ Camera Software on your computer before trying to connect the PJ Camera Stand and the projector to it. z Minimum Computer System Requirements PJ Camera Software is designed to run under Windows only.
Using the CASIO CD-ROM User Documentation (PDF) To read the contents of the PDF format user documentation files, you need to have Adobe® Reader® installed on your computer. If your computer does not already have Adobe Reader installed, please install it. You can download a copy of Adobe Reader for free from the following website: URL http://www.adobe.com/ Viewing PDF Format User Documentation Perform the procedure under “To install PJ Camera Software” on page E-15.
Multi PJ Camera System The following shows the basic configuration of the Multi PJ Camera System. PJ Camera Computer Projector RGB Cable USB Cable PJ Camera Stand PJ Camera Software PJ Camera The PJ Camera is a versatile digital camera that you can use to record the image of paper documents or of objects, which can then be projected with the projector. PJ Camera operations are controlled mainly using PJ Camera Software.
General Guide (PJ Camera Stand) The PJ Camera Stand can be folded into a compact configuration for transport or storage. The following shows the PJ Camera Stand in its unfolded configuration, with the PJ Camera mounted. 2 1 5 3 6 7 8 9 bk bl 4 z For information about unfolding and refolding the PJ Camera Stand, and about mounting the PJ Camera onto the stand, see “Setting Up the PJ Camera Stand” (page E-22).
General Guide (PJ Camera Stand) 1 PJ Camera 2 Camera holder Attach the PJ Camera to the PJ Camera Stand here. Strap holder Insert the PJ Camera strap into the holder. [CAMERA RELEASE] Slide the release when removing the PJ Camera from the stand. View from above * You must install the camera bracket on the PJ Camera before you can attach it to the camera holder. See page E-24 for more information. 3 Arm Unfold the arm to configure the PJ Camera Stand for operation.
Setting Up the Multi PJ Camera System This section explains how to set up the Multi PJ Camera System for operation. Setting Up the PJ Camera First, load the battery into the camera and then charge the battery 1. Open the battery cover. While pressing lightly on the cover, slide it in the direction indicated by the arrow to open. 2. Load the battery into the camera. 3. Close the battery cover. 4. Plug the USB cradle into a household power outlet.
Setting Up the Multi PJ Camera System Configuring Display Language, Date, and Time Settings [ON/OFF] (Power) [ ] [ ] [ ] [ ] [SET] [BS] The settings on this page are required the first time you turn on the camera after purchasing it. 1. Press [ON/OFF] to turn on the camera. 2. Use [S], [T], [W], and [X] to select the language you want and then press [SET]. 3. 4. 5. 6. Use [S], [T], [W], and [X] to select the area where you will use the camera and then press [SET].
Setting Up the Multi PJ Camera System Setting Up the PJ Camera Stand Unfolding the PJ Camera Stand The PJ Camera Stand can be folded into a compact configuration for transport or storage. Use the following procedure to unfold the stand for use. 1. With the folded PJ Camera Stand placed on a flat, stable surface, raise the arm unit until it is at a right angle to the stage unit. z This will cause the arm unit to lock securely into place.
Setting Up the Multi PJ Camera System 2. Open the side panels of the document stage. 3. Unfold the camera holder from the arm unit. z Open the upper section of the arm unit until it snaps securely into place. z The camera holder should be parallel with the document stage.
Setting Up the Multi PJ Camera System Mounting the PJ Camera onto the PJ Camera Stand 1. Make sure the PJ Camera is turned off. 2. Attach the camera bracket to the bottom of the PJ Camera. 3. Attach the PJ Camera to the PJ Camera Stand camera holder. z Use a coin or some similar object to securely tighten the camera bracket screw. z Make sure the lens side of the camera is facing downwards, towards the document stage.
Setting Up the Multi PJ Camera System Connecting the AC Adaptor to the PJ Camera Stand Use only the AC adaptor that comes bundled with the Multi PJ Camera System to power it. z When the AC adaptor is connected to the PJ Camera Stand, the battery of the PJ Camera mounted on the stand charges while the camera is turned off. Charging is indicated when the [CHARGE] indicator is lit. z Be sure to use the AC adaptor to power the PJ Camera Stand.
Setting Up the Multi PJ Camera System Folding Up the PJ Camera Stand Perform the steps below to fold up the PJ Camera Stand for transport or storage. Note that you can fold up the PJ Camera Stand without removing the PJ Camera. 1. Make sure the PJ Camera is turned off, and that the stand light is off. Disconnect the USB cable and AC adaptor from the PJ Camera Stand. z Folding up the PJ Camera Stand while the lens of the PJ camera is extended can damage the camera. 2. 3.
Setting Up the Multi PJ Camera System Connecting Multi PJ Camera System Components z Make sure that PJ Camera Software is installed on your computer before trying to perform the following procedure. After you install PJ Camera Software on the computer, connect the PJ Camera Stand, computer, and projector as shown below. Projector Computer RGB Cable A-B USB Cable z z Normally, it is a good idea to have all of the components turned off when connecting or disconnecting them.
Setting Up the Multi PJ Camera System z Certain CASIO products (XJ-S36/XJ-S46 Data Projector, etc.) can be connected directly to a PJ Camera Stand with the PJ Camera installed. See the user documentation that comes with each product when connecting one of them to the YC-430. Testing the Multi PJ Camera System After installing PJ Camera Software and connecting all of the components, you can perform the following steps to test the Multi PJ Camera System for proper operation. 1. Start up the computer.
Setting Up the Multi PJ Camera System 6. Place the document you want to project onto the PJ Camera Stand’s document stage. z When placing a landscape orientation document onto the document stand, the top of the page should face towards the arm. z Take care to make sure that the entire document is within the area of the document stage. z For more information, see “Precautions when Using the PJ Camera Software” in the PJ Camera Software User’s Guide, which is on the CASIO CD-ROM.
Setting Up the Multi PJ Camera System 7. Replace the document on the document stage with the next one you want to project. z The currently projected image is replaced by the new image. Current document camera image New document camera image z A copy of each image you project is stored automatically in a folder on your computer’s hard disk, where it remains until you quit PJ Camera Software.
PJ Camera Software Overview and Basic Operations This section provides an overview of PJ Camera Software functions and operations. z Before performing the operations described here, use the procedures under “Setting Up the Multi PJ Camera System”. z The explanations here assume that the “Multi PJ” (which is the initial default setting) is selected for the PJ Camera Software startup mode. For more information about the startup mode, see “PJ Camera Software Startup Modes” below.
PJ Camera Software Overview and Basic Operations Selecting the Startup Mode You can select the startup mode on the Startup Mode dialog box that appears when you start up PJ Camera Software. Select the button next to the startup mode you want to use by clicking it. { Clicking the [OK] button starts up PJ Camera Software in the startup mode that is currently selected on the dialog box. z To change the startup mode after PJ Camera Software is already running, display the operation bar.
PJ Camera Software Overview and Basic Operations PJ Camera Software Modes and Windows Using PJ Camera Software Modes PJ Camera Software has five modes, which are described below. Mode Name Description Document Camera Mode Use this mode to record the image of a paper document or object placed on the PJ Camera Stand with the PJ Camera, and project the resulting image. Scanner Mode With this mode, you can place a document on the PJ Camera Stand and record its image with the PJ Camera.
PJ Camera Software Overview and Basic Operations Using the PJ Camera Software Window The PJ Camera Software window remains on your computer screen in the Scanner Mode, PC Image Mode, and Camera Image Mode. The following shows the PC Image Mode window, and indicates the window components that are included in all PJ Camera Software windows, regardless of mode. Toolbar Menu bar Preview list area Playlist toolbar Playlist area The following explains the main functions of PJ Camera Software window components.
PJ Camera Software Overview and Basic Operations Exiting PJ Camera Software Perform either of the following operations to exit PJ Camera Software. z z On the PJ Camera Software menu bar, select [File] and then [Exit]. On the PJ Camera Software toolbar, click . Quitting PJ Camera Software also will turn off PJ Camera power automatically.
PJ Camera Software Overview and Basic Operations Scanning a Document Using Auto Scanning 1. Display the operation bar, and then select [Scanner] on the [File] menu or click on the toolbar. z If the dialog box for adjusting camera position appears, point the PJ Camera downwards at the document stage, and make sure there is no document on the stage. z Entering the Scanner Mode displays a scanner window, like the one shown nearby.
PJ Camera Software Overview and Basic Operations 6. When you are finished auto scanning, click the [Stop] button on the scanner window. z This causes the [Stop] button to change back to a [Start] button, and stops auto scanning. 7. To quit scanning, display the operation bar and then select [Exit] on the [File] menu. z This exits PJ Camera Software and turns off the PJ Camera.
PJ Camera Software Overview and Basic Operations Projecting Image Files Stored in PJ Camera Memory (Camera Image Mode) The Camera Image Mode lets you use PJ Camera Software to control direct projection of images recorded with the PJ Camera and stored on the memory card loaded in the PJ Camera (or in PJ Camera built-in memory).
PJ Camera Software Overview and Basic Operations Using Projection Area Capture and Board Area Capture Projection Area Capture and Board Area Capture can be performed in all modes except for the Document Camera Mode and the Scanner Mode. z Projection Area Capture Projection Area Capture extracts text and graphics that are handwritten within the projection image area on the whiteboard.
PJ Camera Software Overview and Basic Operations 2. 3. 4. Point the PJ Camera at the whiteboard. Recording area Point the camera at the whiteboard so it is at an angle that is within the allowable range. While watching the PJ Camera’s monitor screen, use the camera’s zoom buttons to compose the image. After the image is composed the way you want, click the [Shutter] button on the Projection Area Capture dialog box.
PJ Camera Software Overview and Basic Operations Performing a Board Area Capture Operation Use the following procedure in the PC Image Mode, Camera Image Mode, or Presentation Mode while an image is being projected onto a whiteboard. 1. Display the operation bar, and then click [Camera] on the [File] menu or click toolbar. on the z This displays the Board Area Capture dialog box. 2. 3. Point the PJ Camera at the whiteboard.
PJ Camera Overview The PJ Camera can also be used as a stand-alone digital camera. This section provides an overview of PJ Camera operations. See the Camera User’s Guide on the CASIO CD-ROM for details about PJ Camera operations. z Before using the PJ Camera for the first time, be sure to read “Setting Up the PJ Camera” (page E-20). Also you will need to charge the PJ Camera’s battery and configure certain settings before using the PJ Camera.
PJ Camera Overview Formatting a Memory Card Before you can use a memory card with your camera, you must format it. z Formatting a memory card that already has snapshots or other files on it, will delete its contents. Normally you do not need to format a memory card again. However, if storing to a card has slowed down or if you notice any other abnormality, re-format the card. z Be sure to perform the following procedure on the camera to format the memory card. 1. Press [ON/OFF] to turn on the camera.
PJ Camera Overview Shooting a Snapshot Auto icon [ 62 10 ] (REC) N Operation Lamp Shutter Button AF ISO AWB -0.3EV 15:37 Focus Frame Monitor Screen 1. Press [ ] to turn on the camera. This enters the REC mode and displays “ ” (Auto icon) on the monitor screen. 2. Point the camera at the subject. 3. While taking care to keep the camera still, half-press the shutter button.
PJ Camera Overview How do I half-press the shutter button? The shutter button is designed to stop about half way down when you press it lightly. Stopping at this point is called a “half-press”. When you half-press the shutter button, the camera automatically adjusts exposure and focuses on the subject it is currently pointed at. Mastering how much pressure is required for a half-press and a full-press of the shutter button is an important technique for good-looking images.
PJ Camera Overview Shooting a Movie Movie Icon Remaining Recording Time [ ] (REC) Shutter Button Recording Time Movie Recording Screen [BS] 1. Press [ 2. Press [BS] (BEST SHOT). 3. Use [S], [T], [W], and [X] to select the “ “ 4. ] to enter the REC mode. ” (Movie) scene and then press [SET]. ” (movie icon) remains on the monitor screen. Press the shutter button to start shooting the movie. z Audio is also recorded during movie recording. 5. Press the shutter button again to stop recording.
PJ Camera Overview Viewing a Movie The film-like frame that appears on the monitor screen indicates that this is an image from a movie. “ ” Movie icon [ ] (PLAY) [SET] [W][X] 1. Press [ 2. Use [W] and [X] to select the movie you want to play. ] to enter the PLAY mode. When scrolling through images, a movie is displayed on the monitor screen by showing its first frame. 3. Press [SET] to start playback.
PJ Camera Overview Deleting a File You can use the following procedure to delete files you have transferred to your computer’s hard disk, images you have printed, or files you simply no longer need. This frees up memory for recording more images. [ ] (PLAY) [S] [SET] [W][X] [T] ( ) 1. Press [ 2. Press [T] ( 3. Use [W] and [X] to select the snapshot or movie you want to delete. 4. Press [S] to select “Delete”. 5. Press [SET]. ]. ). z To cancel the delete operation, select “Cancel”.
Troubleshooting The following explains what you should do when you experience problems with using the Multi PJ Camera System. z For information about the messages that appear on the PJ Camera monitor screen and other troubleshooting procedures, see the “Reference” section of the Camera User’s Guide. z You can find more troubleshooting information in the FAQ of PJ Camera Software help. Problem Nothing works. Cause and Required Action The USB cable, AC adaptor, and/or power cord is not connected correctly.
Product Specifications (PJ Camera Stand) * For PJ Camera specifications, see the PJ Camera User’s Guide on the CASIO CD-ROM. Power Requirements: 100V to 240V AC, 50/60Hz Rated Voltage: 5.0V Power Consumption: 5.2W Connection Terminal: USB (USB 2.0 Full-Speed compatible) Approximate Weight: 1.7kg (3.75 lbs) × 1 Approximate Dimensions: 168(W) × 44(H) × 296(D) mm (excluding projections) (6.6 × 1.7 × 11.7 inches) During Use: 327(W) × 404(H) × 264(D) mm (12.9 × 15.9 × 10.