
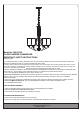
Installation Guide


2
1
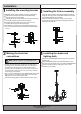
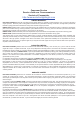
Installing the mounting bracket
2
3
Carefully unpack and lay all parts on a clean, level surface.
4
Installation
Making the electrical
connections
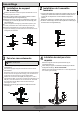
Installing the shade and
lighting bulb
Installing the fixture assembly
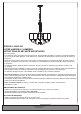
For Customer Assistance:
www.evolutionlightingllc.com
Made In China
Install the mounting bracket (A) to the junction box (not
included) with two junction box screws (AA).
Thread the screw collar (D) onto the preassembled tube on
the mounting bracket (A) and secure with the preassembled
hex nut.
Open the first chain link and remove the preassembled
chain (E) from the screw collar (D).
Make the connections to a 120V AC 60Hz circuit.
NOTE:
D
A
AA
Attach the chain (E) through the canopy nut (C) and the
canopy (B), open the quick link of the chain (E) and hook it
onto the screw collar (D).
C
B
E
D
Secure the canopy (B) to the ceiling with the canopy nut (C).
BB
C
F
B
G
H
Open the quick link of the chain (E) and adjust the chain (E)
length by removing links at a point best suited for the location
and required distance from the ceiling.
Attach the shades (G) onto the socket assembly (H) , and
then secure by the socket rings (F). DO NOT OVERTIGHTEN.
Uses five standard bulbs up to 60 watts or CFL or LED
equivalent (not included).
Remove the pre-assembled socket rings (F) from the socket
assembly (H).
Connect the white wires from the fixture to the white wire of
the supply circuit. Connect the black wires from the fixture to
the black wire of the supply circuit. Wrap the bare copper
grounding wire from the fixture around the green screw on the
mounting bracket, then connect it to the grounding conductor
of the supply circuit together.
Use U.L./C.S.A. listed wire connectors (BB) suitable for the size,
type and number of conductors. Secure the wire connectors
(BB) with U.L./C.S.A. listed electrical tape.
A
B
C
D
Unscrew the canopy nut (C), detach the mounting bracket (A),
canopy (B), canopy nut (C) and screw collar (D).