Introduction Important • Always follow the sections that are marked with “ Warning!!!”. • No part of this manual may be reproduced or transmitted without the prior written permission of CatEye Co., Ltd. • The contents and illustrations in this manual are subject to change without notice. • If you have any questions or concerns about this manual, please contact CatEye at www.cateye.com.
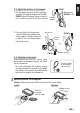
Contents Introduction.........................................1 About the manuals...............................1 Contents...............................................2 Proper use of the CatEye V3n..............3 Automatic recognition of the speed sensor ID................................4 Description of computer and its parts.. 5 Computer..........................................5 Accessories......................................5 Screen display......................................
Proper use of the CatEye V3n ENG Observe the following instructions for safe usage. The meaning of icons in this manual: Warning!!! : Sections marked with these icons are critical for safe use of the device. Be sure to follow these instructions. Caution : Important cautionary notes on the use and operation of the V3n. * Helpful tips are highlighted with asteriks. Warning!!! : • Pace maker users should never use this device. • Do not concentrate on the data while riding. Always be sure to ride safely.
Automatic recognition of the speed sensor ID The speed sensor has its own ID, and the computer measures in synchronization with the ID. Two speed-sensor IDs can be registered to one computer, which can automatically identify two speed sensors once their IDs are registered in advance. As a tire circumference is set to the speed sensor ID, wheel selection by manual operation is no longer required, which was necessary with conventional units.
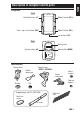
Description of computer and its parts ENG Computer Front Back-light button (LT) Mode-1 button (M1/+) Start / stop / enter button (SSE) Mode-2 button (M2/-) Lap button (LAP) Back Battery cover All clear button (AC) Menu button (MENU) Accessories Bracket band Bracket rubber pad Bracket Speed sensor (SPEED / CADENCE) Sensor rubber pad Wheel magnet Cadence magnet Dial * Supplied only with CC-TR310TW Heart rate sensor Nylon ties (x5) HR strap Continue ENG-5
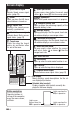
Screen display : Speed sensor signal Indicate Speed sensor signal status. (page 19) : Speed pace arrow The pace arrows show whether the current speed is faster ( ) or slower ( ) than the average speed. : Alarm Lights up when the HR alarm sound feature is turned on. : Speed unit Flashes while speed measurement is in progress. : Sensor icon Displays the speed sensor currently synchronized. : Heart rate sensor signal Indicate Heart Rate sensor signal status.
How to install the unit on your bicycle pending on how the bracket fits into the bracket band. Caution: Tighten the dial on the bracket band by hand only. Over-tightening can damage the screw threads. When attaching the FlexTight™ bracket to the stem * Attach the bracket with its open end facing to the right. Bracket band Bracket rubber pad Stem Dial Bracket When attaching the FlexTight™ bracket to the handlebar * Attach the bracket with its open end facing to the right.
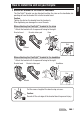
2 Mount the speed sensor and magnet Cadence magnet Speed sensor Wheel magnet 2-1. Temporarily secure the speed sensor 1. Loosen the sensor screw on the speed sensor using a Phillips screwdriver to check that the sensor arm moves. * Do not completely remove the sensor screw. 2. Attach the sensor rubber pad to the speed sensor, locate the speed sensor on the left chain stay as shown in the figure above, and temporarily secure it with the nylon ties.
1. Tilt the speed sensor so that the distance between the cadence magnet and the CADENCE side of the speed sensor is about 3 Cadence mm, and firmly secure it with the nylon ties. magnet 2. Turn and adjust the sensor arm so that the distance between the wheel magnet and the sensor arm is about 3 mm, and firmly tighten the sensor screw. Speed sensor CADENCE side Sensor arm 3 mm Sensor screw (or) Wheel magnet 3 mm 2-4.
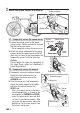
Heart rate sensor Heart rate is measured when the heart rate sensor is worn on the chest. Heart rate sensor HR strap Before wearing the heart rate sensor Warning!!! : This product must NOT be used by those who have a pacemaker. • To avoid measurement errors, it is recommended to moisten the electrode pads with water. • If your skin is ultra-sensitive, the electrode pad may be moistened with water and worn on a thin undershirt. • Chest hair may interfere with the measurement.
Preparing the computer ENG Computer's basic items must be set up before using it. Removing the insulation sheet Close When using the unit for the first time after purchasing, open the battery cover and remove the insulation sheet. * After you remove the insulation sheet, replace the battery cover in place. Insulation sheet Open operation 1 Formatting The formatting operation is performed at initial purchase, or to reset all to default. Caution: All data are reset to the default and deleted.
setting 2 Date/Clock Set the current date and time. 1. Select the date display format. Select the date display format from “YY/MM/DD”, “MM/ DD/YY”, and “DD/MM/YY” using the M1/+ and M2/- buttons, and confirm with the SSE button. Switch the display: M1/+ M2/- (or) Confirm: SSE YY/MM/DD 2. Enter the “Year”, “Month” and “Day”. Enter the “Year”, “Month” and “Day” in the display order selected in Step 1 using the M1/+ and M2/- buttons, and confirm with the SSE button. Enter the last 2 digits of the year.
ENG circumference input 3 Tire Enter the tire circumference of the bicycle wheel in millimeter. 1. Enter the last 2 digits of the tire circumference. Enter using the M1/+ and M2/- buttons, and move digits using the SSE button. Then, enter the first 2 digits in the same way. Setting range: 0100 – 3999 mm Increase/decrease: M1/+ M2/- (or) Move digits: SSE 2. After completed, press the MENU button to proceed to “Selecting speed unit” below.
speed unit 4 Selecting Select the speed unit from “km” and “mile”. 1. Select the speed unit. km ↔ mile: M1/+ M2/- (or) 2. After selecting, press the MENU button. The measurement screen appears and the computer set-up is completed. To the measurement screen: MENU (Back) test 5 Operation Test the functioning of the speed sensor (SPEED, CADENCE) and the heart rate sensor.
Speed and cadence are not displayed Check items Remedy Is the Speed and Cadence If icon is off, the computer cannot receive any sensor icon on ? data. Press the M1/+ or M2/- button to cancel the transmission sleep mode (page 19). Check if the distance between In reference to “How to install the unit on your bicye a c h s e n s o r z o n e o f t h e cle” (page 7), appropriately adjust the positions speed sensor and the magnet of the corresponding magnet with the sensor zone. is too large.
Formatting/Restarting operation There are two different computer set-up operations; formatting and restarting operations. Follow the appropriate one depending on the situation. Formatting The formatting operation is performed at initial purchase, or to delete all measurement data and reset all to default. * The sensor ID is not deleted. Restarting The restarting operation is performed after you replace batteries, or when an error is displayed.
Basic operation of the computer The measurement screen displays 4 different types of data, which are switched by pressing the M1/+ and M2/- buttons. The display data are as follows. Upper display data Displays the data related to the speed. Middle display data Displays the data related to the heart rate. Displays the data related to the cadence.
Starting/Stopping the measurement The speed unit (km/h or mph) flashes during measurement. Initially, the auto-mode function which starts or stops measurement automatically in sync with the bicycle motion is ON. Auto measurement is switched to manual measurement and vice versa by ON/OFF operation in the auto-mode. * For setting the auto-mode, refer to the menu screen “Setting the auto-mode” (page 35).
To reset the measurement data (excluding the total time, total distance, date, and clock) and the lap data, simultaneously press the SSE button and the M1/+ or M2/- button on the measurement screen. * Resetting the measurement data saves the data automatically on a file (page 26). * The screen will freeze for about 2 seconds after resetting and button operation is disabled; however, all measurements are operating normally. * The countdown distance (C.D.DST→) returns to the value you set.
Measurement screen Upper and middle display data 1 Current speed Displays the current speed. Updated every second. 1 2 Heart rate Displays the heart rate in real time. Updated every second. 2 3 M1/+ 3 Cadence Displays the number of pedal rotations per minute. Updated every second. 4 Average speed (*1) Displays the average speed after the start of measurement. 4 5 Average heart rate (*2) Displays the average heart rate after the start of measurement.
Lower display data M2/- Trip distance Displays the trip distance from the start of measurement. M2/Countdown distance (page 24) Displays the countdown distance to the target distance. M2/0 q M2/- 0 Lap number (page 22) Displays the number of current lap. q Average lap speed in real time Displays the average lap speed of the current lap in real time. w M2/- w Lap timer (Real time lap) Displays the elapsed time of the current lap in real time. M2/- (2 sec.
Pace function 2 types of pace arrow icons for the current speed and the heart rate are displayed on the screen. These arrow icons indicate whether the current speed (heart rate) is above or below the average speed (average heart rate). Current speed Appears when the current value is above the average. Appears when the current value is below the average. No When the current value is equal to the average, or arrows zero.
The recorded lap data is saved to a file when you perform the resetting operation (page 19), and can be viewed on the menu screen “File view” (page 26). * Pressing the LAP button while the total number of laps reaches 99 displays the lap data, but “--” appears in place of the lap number indicating further recording is impossible. * One lap per file is used even when there is no lap data. Therefore, the total number of laps is the sum of the total number of laps in all files and the number of files.
Countdown distance The countdown distance feature displays the countdown distance to a predetermined target trip distance, and notifies when it reaches zero. When it reaches the target trip distance, the computer switches any measurement data display to the countdown display, and notifies it by flashing the dot display and an alarm sound. Example of how the countdown distance is used 1.
Changing the computer configuration Measurement screen MENU (Back) M1/+ MENU (Back) Menu top screen File view Viewing and deleting files Setting the clock/date Changing the clock/date Setting the tire circumference Selecting the sensor 1 or 2, and changing SSE the tire circumference (page 31) Searching the sensor ID Synchronizing the heart rate and speed/ cadence sensor ID Setting the measurement unit Total distance manual entry Setting the auto-mode Setting the countdown distance Setting so
M2/- M1/+ File view The lap and measurement data are saved into a file automatically each time a ride is reset (Resetting Operation page 19) With the file view, you can view or delete the file saved. Measurement data to be recorded in a file The computer can record up to 14 files. The latest file is recorded always as F-01, and the oldest one is deleted automatically when 14 files are saved. Date of creation: New F-01 Old F-02 F-03 F-14 The measurement data to be saved in a file are as follows.
M1/+ Switching the file number: M2/- ENG 2. Select the file number using the M1/+ and M2/- buttons, and confirm using the SSE button. File number Number of laps used in a file (or) 3. Scroll through the data saved in each file by pressing the SSE button. The display items are as follows.
Viewing the lap data View the lap data in a file saved in the computer. 1. Select the file number you want to view from the menu screen “File view” (page 26). 2. Press the LAP button to view the lap data contained in the file selected. The average and maximum values are displayed alternately as follows. Press the LAP button again to return from the lap data.
ENG Deleting files Delete the file saved in the computer. The computer deletes and overwrites an old file automatically; however, you can also delete the specified file manually. 1. Switch to the menu screen “File view” (page 26). 2. Simultaneously press the SSE button and the M1/+ or M2/- button to switch to the deleting screen.
M2/- M1/+ Setting the clock/date Set the “Clock display format”, “Hour”, “Minute”, “Date display format”, “Year”, “Month” and “Day”. * Press and hold the M1/+ or M2/- button to increase/decrease the number quickly. 1. Press the MENU button in the measurement screen to switch to the menu top screen. Switch to the CLOCK.DATE screen using the M1/+ and M2/- buttons, and confirm with the SSE button. MENU Menu top: (Back) M1/+ Changing the menu: M2/- (or) Confirm: SSE 2. Select the clock display format.
M2/- M1/+ ENG 6. Pressing the MENU button returns to the menu top screen (CLOCK.DATE screen), and confirm the change(s). Pressing it again returns to the measurement screen. To the menu top/measurement screen: MENU (Back) Setting the tire circumference Set the tire circumference to SP1 (Speed sensor 1) and SP2 (Speed sensor 2) synchronized according to “Searching the sensor ID” (page 32). * For the tire circumference, see “Tire circumference” (page 13).
M2/- M1/+ * When you use a computer for a single bicycle, set the tire circumference to ID:1 (Sensor 1) only. When you use a computer commonly for two bicycles, set the tire circumference of the second bicycle to ID:2 (Sensor 2). * Changing to the measurement screen displays the sensor icon selected ( or ).
ENG 3. Press the SSE button to start checking the ID. Start searching: SSE While the value on the screen is changing, press the RESET button on the sensor to be checked. Speed sensor RESET Heart rate sensor RESET When the heart rate or speed (cadence) is displayed with “ID-OK” on the screen, synchronization is completed. * The computer enters the search mode for 5 minutes after starting the ID synch. Press the SSE button in the search mode to cancel the ID synch, and “ID-SKIP” is displayed.
M2/- M1/+ Setting the measurement unit Change the unit (km or mile). 1. Press the MENU button in the measurement screen to switch to the menu top screen. Switch to the UNIT screen using the M1/+ and M2/- buttons, and confirm with the SSE button. MENU Menu top: (Back) M1/+ Changing the menu: M2/- (or) Current speed unit Confirm: SSE 2. Select the speed unit using the M1/+ and M2/- buttons. km ↔ mile: M1/+ M2/- (or) 3.
M2/- M1/+ ENG 2. Enter the total distance using the M1/+ and M2/- buttons, and move digits using the SSE button. * The total distance is displayed in a 6-digit integer number, beginning with 4 digit display and including small letters sequentially shifting to the right. Last 4 digits are displayed. Setting range: 0 – 999999 km [mile] Increase/decrease: M1/+ M2/- (or) Move digits:SSE 3. Pressing the MENU button returns to the menu top screen (ODO INPUT screen), and confirm the change(s).
M2/- M1/+ Setting the countdown distance Enter the target trip distance for the countdown distance (page 24). * Press and hold the M1/+ or M2/- button to increase/decrease the number quickly. 1. Press the MENU button in the measurement screen to switch to the menu top screen. Switch to the C.D.DST→ screen using the M1/+ and M2/- buttons, and confirm with the SSE button. Menu top: Changing the menu: Current setting MENU (Back) M1/+ M2/- (or) Confirm: SSE 2.
M2/- M1/+ ENG Setting sound Switch on/off of the target zone alarm sound and button operation sound. 1. Press the MENU button in the measurement screen to switch to the menu top screen. Switch to the SOUND screen using the M1/+ and M2/buttons, and confirm with the SSE button. MENU Menu top: (Back) M1/+ Changing the menu: M2/- (or) Confirm: SSE 2. Switch between the HR out of zone alarm and button operation using the SSE button. HR zone alarm HR.ALARM ↔ BUTTON: SSE Button operation sound 3.
1. Press the MENU button in the measurement screen to switch to the menu top screen. Switch to the HR.ZONE screen using the M1/+ and M2/buttons, and confirm with the SSE button. MENU Menu top: (Back) M1/+ Changing the menu: M2/- Current setting (or) Confirm: SSE 2. Select the HR target zone. Select one from OFF, 1, 2, 3, or 4 using the M1/+ and M2/- buttons. When using the HR target zone, select from 1 to 4, confirm using the SSE button, and then proceed to Step 3.
Heart rate training general fitness 1 Improving Bicycling is one of the best activities to improve your general fitness. To improve your overall fitness through bicycling, set a target heart rate zone from between 30% and 70% of your maximum HR, depending on your physical strength. For best results, exercise consistently in this zone for periods of at least 20-30 minutes, 3 or more times a week.
for competition 2 Training Measure your resting heart rate just after waking in the morning and your maximum heart rate (perhaps during competition). Then set your target zone according to your goal: A) For recovery, endurance training, and weight loss : 60% - 70% (aerobic exercise) B) For quality endurance and tempo training : 70% - 80% (aerobic exercise) C) For increasing TT and race ability, and VO2 max : 85% + (anaerobic exercise) D) For anaerobic capacity and sprinting : 92.
sounds an alarm and notifies the rider by flashing . The heart rate zone is selected from 4 predetermined zones. For a training aiming at a heart rate of 140 to 160 bpm, select HR.ZONE:3 as shown below. Then, the computer sounds an alarm when the heart rate falls below 139 bpm, or rises above 161 bpm. Once the target zone is set to ON, the relevant data are recorded and the time in the zone, time above the zone, and time below the zone and their percentages can be viewed in the file view (page 26).
Trouble shooting If a malfunction occurs, check the following before contacting CatEye or your retailer for repair or service. Trouble on display Trouble Display motion becomes slower. Flashes on the screen. “STOP!” lights up. No displays appear. Meaningless display appears. Cannot measure the trip speed (cadence) ENG-42 Check Items Is the surrounding temperature low (below zero degree Celsius or 32 degrees Fahrenheit)? The remaining battery capacity for the computer is low.
The heart rate is sometimes zero and sometimes measured. Moving the main unit away from your body will prevent measurement of the heart rate. Check Items Have you checked the sensor ID? Is the computer ID Synch’ed with somebody else’s sensor? Is the Heart rate sensor icon off ? Remedy Check the speed sensor ID (page 32) for HR (heart rate sensor). If the Heart rate sensor icon is off , the computer cannot receive the Heart rate data. Press the M1/+ or M2/- button once to turn on the icon.
Trouble on operation Trouble Check Items Pressing the LT but- Check whether lights up ton does not turn on on the computer screen. a light. The remaining battery capacity for the computer is low. No measurement starts even while riding. The heart rate sensor (speed sensor) ID check failed. Lap data cannot be stored. Abnormal values appear. In menu mode, cannot change settings. Measurement data cannot be stored on the file view. ENG-44 Remedy Replace it with a new battery (CR2032).
Replacing battery Warning!!! : Safely dispose of the old batteries, and do not place them within reach of children. If a battery is swallowed, consult a doctor immediately. * When any battery for the computer, heart rate sensor, or speed sensor is depleted, we recommend replacing all batteries at the same time. * The battery life shown in this manual is not definitive and it varies depending on the use environment. * The battery cover sealing is critical to maintain the waterproof feature.
Maintenance Perform the daily care according to the following instructions. • Regularly check that the positions of the magnets and sensors are correct, and they are secured firmly. • When the computer, heart rate sensor, and speed sensor are dirty, wash them with water or wipe them with a soft cloth dampened with diluted neutral detergent, then wipe with dry cloth. Do not use solvents such as benzine or rubbing alcohol as they may damage the surfaces.
Specifications Current speed 0.0 (4.0) − 150.0 km/h [0.0 (3.0) − 93.0 mph] For 27-inch tire size 0.0 − 150.0 km/h [0.0 − 93.0 mph] 0.0 (4.0) − 150.0 km/h [0.0 (3.0) − 93.0 mph] 0 (30) − 240 bpm 0 − 240 bpm 0 (30) − 240 bpm 0 (20) − 199 rpm 0 − 199 rpm 0 (20) − 199 rpm ‘00.01.01 − ‘99.12.
コンピュータ裏面のバッテリーカバーに記載の7桁の数字をご記入ください。 Veuillez indiquer le numéro à 7 chiffres indiqué sur le couvercle de la pile de l’unité principale. Geben Sie bitte die siebenstellige Nummer an, die auf der Batterieabdeckung der Haupteinheit steht. Vul de 7-cijferige nummers in die op de batterijendeksel van de computer staan. Por favor, complete el número de 7 dígitos mostrado en la tapa de las pilas de la unidad principal). Inserire il codice di 7 cifre indicato sul coperchio del vano batterie dell’unità principale.
2
Registration CATEYE Web Site (http://www.cateye.com) For warranty service you must register your product. Please register your V3n as soon as possible. CATEYE provides you technical support and new product information as much as possible. Please register on-line through our web site, or send the registration card below directly to our Customer Service. For registration, please fill in the product's serial number (the 7-digits number marked on on the battery cover of computer).