FF851 freestanding combination fridge freezer Manual for Installation, Use and Maintenance Passionate about style 1 Customer Care Department • The Group Ltd. • Harby Road • Langar • Nottinghamshire • NG13 9HY T : 01949 862 012 F : 01949 862 003 E : service@cda.eu W : www.cda.
Important The CDA Group Ltd cannot be held responsible for injuries or losses caused by incorrect use or installation of this product. Please note that CDA reserve the right to invalidate the guarantee supplied with this product following incorrect installation or misuse of the appliance. Under no circumstances should any external covers be removed for servicing or maintenance except by suitably qualified personnel.
Before first use of the fridge You must allow the fridge to settle for at least twenty four hours prior to switching the power on. It is recommended that you clean the interior of the appliance prior to first use, using a solution of bicarbonate of soda and warm water and then thoroughly drying the interior. The fridge may have an odour to it at first use. This will disappear as the appliance cools.
Setting the temperature Both compartment temperatures are regulated by the same thermostat dial, which is found to the right of the control panel at the top of the door frame when the fridge door is open. The thermostat can be moved between 1 (least cold) and 5 (coldest). Thermostat settings: 1-2 For short term storage of food 3-4 For long term storage of food 5 For freezing fresh food. Once the food has been frozen, the thermostat should then be turned back to the required setting between 1 and 4.
Control panel The control panel for the fridge has three lights (Fig. 1). fig. 1 A. Orange Fast Freeze light This light is illuminated when the fast freeze function is on. B. Green Power light This light is illuminated when the power supply to appliance is on. C. Red Temperature Warning light This light is illuminated when the freezer compartment temperature is too warm.
Defrosting the fridge The fridge is self-defrosting. Any water created will run out of the fridge through the channel at the back of the fridge. It is important to keep the channel clear at all times. The defrosted water is collected in the evaporating tray at the back of the appliance. Defrosting the freezer Do not use heaters or defrosting sprays in this appliance. • Never use any metallic or sharp objects to remove the ice as this could damage the lining.
Care and cleaning Always disconnect the appliance from the power before any cleaning or maintenance. • The refrigerator and freezer sections should be cleaned using a solution of bicarbonate of soda and lukewarm water. • Do not use abrasive products or detergents. After washing, rinse and dry thoroughly. • Clean the shelves and balconies separately by hand using soap and water. Do not put them in the dishwasher.
Troubleshooting If you have any problems with your appliance, you should check the troubleshooting prior to calling CDA Customer Care to prevent unnecessary service calls and potential cost. If the appliance is not working • Check there is power to the appliance: • The green light on the control panel is lit • The house fuses are intact and the fuse in the plug has not blown. • The thermostat is not set to 0 • The plug socket is functioning fine.
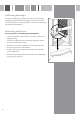
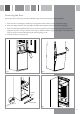
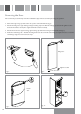
Reversing the Door We recommend you seek the help of another individual to support the doors whilst performing this operation. 1. Remove the two screws fixing the central hinge to the appliance and the central cover caps on the left side (fig. 3). 2. Remove the fridge and freezer doors by pulling both away from the appliance, along with the central hinge (fig. 4) 3. Remove the kick plate by pulling forwards. Remove the lower hinge fixing screws and the lower hinge.
Reversing the Door We recommend you seek the help of another individual to support the doors whilst performing this operation. 5. Unscrew the upper hinge pin and screw it into position of the left hand side (fig. 7). 6. Relocate the fridge door upper bushing and upper bushing caps to the alternate side (fig. 8). Remove the right door catch and locate the left door catch (this is supplied with the instruction manual). 7.
Electrical information Warning! this appliance must be earthed. The mains lead of this appliance has been fitted with a BS 1363A 13 amp fused plug. To change a fuse in this type of plug, follow the steps below: 1. Remove the fuse cover and fuse 2. Fit replacement 13A fuse, ASTA approved to BS 1362 type, into the fuse cover. 3. Replace fuse cover. Important: do not use the appliance without the fuse cover in position.
To contact our Customer Care Department, or for Service, please contact us on the details below. Passionate about style 12 Customer Care Department • The Group Ltd. • Harby Road • Langar • Nottinghamshire • NG13 9HY T : 01949 862 012 F : 01949 862 003 E : service@cda.eu W : www.cda.