ENGLISH INSTRUCTION MANUAL MODEL 44856 / 44857
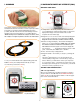
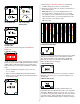
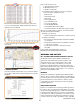
reTrace™ Deluxe Interface 6 7 Turn the unit on by pressing and holding the POWER key for 3 seconds. Powering outdoors with a clear view of the sky will ensure good quality GPS reception. If this is the first time you are turning on your reTrace™ Deluxe, the Compass window will appear. 8 1 3 2 4 5 10 9 1. Scroll Key 2. Change Settings Key 3. Power Key Start Up Page 4. Set Key 5. Satellite Signal Strength Icon 6. Data Log Icon 7. Clock/Time of Day 8. Battery Status Icon 9.
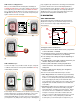
I. COMPASS II. WAYPOINTS/POINTS OF INTEREST (POIs) Waypoint Page icons 4 5 1 2 The Compass window is the default window when reTrace is activated for the first time. Use it like a normal compass by holding in the palm of your hand as level (parallel) with the ground as possible. (This will ensure the most accurate reading.) The arrow will always point to true North giving you your relative direction. *NOTE: You may need to calibrate the compass.
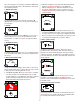
Step 2. Choose a Waypoint Icon Page, toggle through and select the saved waypoint number, then look at the direction of the arrow and the displayed distance. Once you are satisfied with the number, press and hold your CHANGE SETTING key for 3 seconds to pull up your Select Icon screen (A). Using your SCROLL and your CHANGE SETTINGS keys, toggle through the different icons until you find the one you like (B). Press the SET key once to record the change then press again to return to the main screen (C).
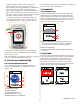
From the Altitude and Temperature screen, press the SCROLL key to get to the next screen – the Barometer. geographical position and the conditions around you at a specific instant in time. This snapshot includes your GPS coordinates, the time, the temperature, your altitude and barometric pressure. This data is recorded and saved to memory. Once uploaded to the computer through the reTrace™ Deluxe software, the data points are strung together and this makes up your data log.
4. Press SCROLL or CHANGE SETTINGS to toggle through the GMT settings until you find your setting number. 5. Press the SET key to make your selection. This will return you to the setting window. NOTE: GMT does not account for Daylight Savings. If you are in the US and it is summer, add 1 hour to your setting. For example, if you are located on the west coast, your GMT setting would be -8:00. To account for daylight savings, add 1:00 to show the correct setting of -7:00.
if the unit of measure is set to M and you travel past 1000 meters, the unit will automatically switch to Km (Kilometers). It will do the same with feet and miles. 2. Manually set altitude: To manually set the altitude benchmark, press the CHANGE SETTING key once to highlight the Manual setting (finger) icon. Press the POWER key to open the manual setting window. Using your SCROLL key or the CHANGE SETTINGS keys, enter the height you would like for your benchmark. e.
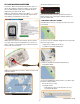
VII. DATA MAPPING SOFTWARE This prompt will appear. Select “yes”. Your reTrace Deluxe works with special software to give you a robust online experience. Using the software, you can upload all of your POIs and data of all your recorded trails which are displayed on up-to-date Google® maps. ™ Step 1. To download the software. Go to www.celestron.com and navigate to your product. Follow this path: New Products> reTraceDeluxe.
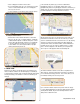
– Select a Waypoint number for this location In the calendar, any data logs you have recorded will be highlighted in orange. To see the data, double click on the highlighted day and each log will appear under the calendar. If you double click one of the logs that appear, the information for that log will be displayed on the map and in the chart area. – An icon will appear at this spot. To change the icon, right click on it and a window with all 27 icons will appear.
Here you will see that you can: A. Change the device settings B. Backup the Track Log C. Update your firmware A. Changing the device settings: It’s as easy as selecting each of the choices available. They are: – Distance Units – – – – – – – Below the map and detail area is the chart area. Select a tab to choose your temperature, altitude and barometric pressure readings for the recorded trail.
unit while operating a motor vehicle. If used in a motor vehicle, it must not be used by the operator of the motor vehicle. If it is used in a motor vehicle, it must be mounted in a manner such that it does not distract the operator, does not interfere with the operator’s field of view, and does not block or interfere with the air bags or other safety mechanisms of the motor vehicle.