
Installation Guide


6
POST REQUIREMENTS
Below are recommended post dimensions.
Steel Posts (Note: All pipe is schedule 40)
It is recommended to use #10 x 2.5” long self-tapping screws to attach line brackets.
**All concrete depths must be below frost line for your area. If frost line unknown, contact your local
Extension Office or Codes Department.
Note: In sandy soils or colder climates we recommend longer post lengths. Post depth will always increase
strength.
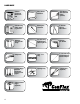
This manual will guide you through 7 Easy Steps which are outlined below. When the installation is
complete you will have a beautiful, low maintenance, animal-safe fence. Each step is very important, but
THE MOST IMPORTANT STEP is Building End, Gate & Corner Brace Assemblies. The 7 steps are as
follows:
Step 1: Fence Layout (page 7-9)
Step 2: Building End, Gate & Corner Brace Assemblies (page 10-12)
Step 3: Line Post Installation (page 13)
Step 4: Identify Top Line (page 14)
Step 5: Attaching Brackets (page 15-17)
Step 6: Installing the Rail (page 17-22)
Step 7: Installing Barrel Tensioners (page 23)
Plus, in the back of this manual are tips on the following:
Splicing Techniques (page 24)
Cross Fencing Options (page 20)
Fence Layout Template (Graph Paper) (page 25)
7 EASY INSTALLATION STEPS
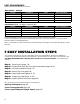
Post Type Post Diameter Length Depth of Embedment**
Line Min 2-3/8’’ 7’ - 8’ Min. 24’’ - 38’’
Corner 4’’ 8’ Min. 36’’
Gate and/or End 4’’ 8’ Min. 36’’
Horizontal/Diag. Brace Post 2-3/8’’ 7-1/2’-10 N/A
Wood Posts - Treated
*Measured at smallest end.
Post Type Post Diameter* Length Depth of Embedment**
Line 4’’ - 6’’ 7’ - 8’ Min. 24’’ - 38’’
Corner 6’’ - 8’’ 8’ Min. 36’’
Gate and/or End 6’’ - 8’’ 8’ Min. 36’’
Horizontal/Diag Brace Post 4’’ 7-1/2’-10 N/A