
Installation Guide


18
1013
FOR ANY QUESTIONS OR COMMENTS, PLEASE CONTACT CENTAUR HTP FENCING
2802 E. Avalon Ave. Muscle Shoals AL, 35661 Phone (256) 248-2403 or toll free 1-800-348-7787
Fax: (256) 248-2418 web: www.centaurhtp.com
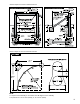
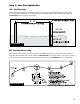
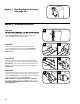
Step One:
as a guide and mark the center point for pilot hole locations as
shown in Illustration A. Using a 3/8” drill bit, drill pilot
holes for all Termination Bracket locations.
Step Two:
Measure back approximately 3” on the rail and slide
rail into Termination Bracket as shown in Illustration B.
Then, using the bracket, bend the rail over as shown in
Illustration C.
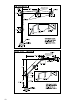
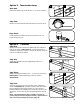
Step Three:
Slide the supplied loop over the bent rail, making sure the
gap in the loop is on the same side of the bend as shown in
Illustration D. Then, attach the Termination Bracket to the
the post and slide the rail through the bracket as shown in
Illustration E.
Step Four:
Next, slide the ring over (1) so that it goes in between the bend
on the rail and then slide rail into the slot, over the ring (2) as
shown in Illustration F. Last, tension the rail from the opposite
end to take up slack as shown in Illustration G.
NOTE: Do NOT overtighten the lag screw. Termination
with slight pressure.
A
B
D
F
C
3”
E
G
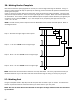
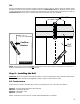
Option 2: Termination Bracket
Option 1: One-Way Barrel Tensioner
(see page 23)
GAP
1
2