
Use and Care Manual


18
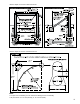
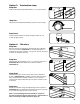
Step One:
Pilot holes must be drilled rst. To do this, use a fence bracket
as a guide and mark the center point for pilot hole locations as
shown in Illustration A. Using a 3/8” drill bit, drill pilot
holes for all Termination Bracket locations.
Step Two:
Measure back approximately 2-1/2” - 4” on the rail as
shown in Illustration B and then bend the rail back as
shown in Illustration C.
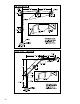
Step Three:
Insert the bent piece of rail into the slot on the Termination
Bracket as shown in Illustration D. Make sure the short side
of the bent rail is farthest from the mounting hole in the
bracket. Once the rail is inserted, slide the provided
bent pin into place as shown in the illustration.
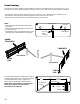
Step Four:
Attach the Termination Bracket using the supplied lag screw (A)
and washer (B) as shown in Illustration E. Once the bracket is
attached to the post, tension the rail from the opposite end to
take up slack.
NOTE: Do NOT overtighten the lag screw. Termination
Bracket should t snug to post, but still be able to move
with slight pressure.
A
C
B
D
2-
1/2
” - 4”
E
F
Option 2: Termination Bracket