
Supplementary Document

Page 2 of 3
Pre-Installation: Please read CertainTeed Ceiling’s Pre-Installation Instructions
before you begin these installation instructions.
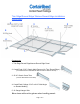
1. Installing Wall Molding
• To install Wall Molding, choose a height at least three inches below joists,
existing ceilings, ducts, pipes, or wiring, to ensure clearance and
maneuverability required to install the panels.
• Mark the desired height for the finished surface of the ceiling on all four
walls.
• Attach Wall Molding using appropriate fasteners.
2. Install Hangers
• Mark lines for each of the main runners.
• Pull a string line along the path that the first main runner will take. Attach
the line directly below the wall molding.
• Hangers are placed every 48” along the main runners.
3. Install the First Main Runner
• Install the first section of main runner, with cut edge sitting on the wall
angle.
• Attach the main runner to wire.
4. Install Border Cross Tees
• Establish the location of the first border cross tee.
• To cut the cross tee, place one end on top of the wall molding and against
the wall, cut the cross tee directly at the mid point of the main runner
(where it crosses the string line you set up).
• Spin the cut cross tee around and install the factory end into the main
runner. Place the cut end of the cross tee on top of the wall molding.
• Clamp the cross tee where it sits on the wall molding, so that it does not
fall or move.
• Repeat the process for the rest of the border tees.
• Install the remaining sections of Main Runner in the first line to reach the
other wall. Be sure to check the level.
• Install the remaining cross tees.
5. Square the Grid System
• Install the first section of next main runner.
• Install two 4’ cross tees in line with the border tees.
• Check to see if the system is square by measuring diagonally across the
openings between the main runner and the cross tees. The
measurements should be equal if the system is square.
• Install 2’ cross tees as needed.
• Repeat Steps 3-5 until the ceiling grid system is completed for the room