
User Manual


5
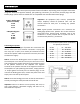
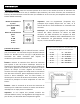
Subwoofer Features
1. LFE IN: Mono “low frequency effects” connection. Use
this input if receiver preamp/processor has a dedicated
LFE or subwoofer OUT. Refer to the owner’s manual
provided by your receiver/preamp/processor
manufacturer. (see figure 1, back cover for hook-up)
2. LINE IN: Stereo input to subwoofer. Connect to “LINE-
OUT”, “MAIN-OUT or PREAMP-OUT”, of your
receiver/preamp/processor using a dual RCA patchcord
(not supplied). Refer to the owner’s manual provided
by your receiver/ preamp/processor manufacturer.
3. VOLUME CONTROL: Controls volume level of
subwoofer. Used to balance the output of the
subwoofer with the main speaker output.
4. LOW-PASS FREQ: The crossover control allows you to
adjust the upper limit of the subwoofer’s frequency
response from 50 to 130 Hz. The subwoofer’s response
will begin rolling off above the set frequency. Set the LOW-PASS FREQ to the low frequency limit listed in
the main speaker manual and consult the A/V receiver manual to determine if there are any
recommendations (as some may already feature a built-in crossover).* (NOTE: LOW-PASS FREQ control
does not function when the LFE input is used.)
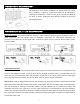
5. PHASE: This switch allows you to compensate for having the subwoofer in a different location than the
main speakers. This control allows the signal to be phase adjusted 180 degrees so the output of the
subwoofer will match the phase of the main speakers. Engage the PHASE switch to “180”. At the listening
position, listen to the midbass output. If it sounds weak, set PHASE back to “0”. Listen serveral times in
each switched position to ensure the setting.
6. STANDBY LED: Indicator of automatic standby state. The LED will be ‘GREEN’ when the audio signal is
present and the subwoofer is on. The LED will be ‘RED’ when the subwoofer is in standby condition (no
audio signal present after approximately 30 minutes.
7. VOLTAGE SELECTION: User-switchable voltage selection for use with 110-120V/220-240V AC. To select a
different voltage, use a flat head screwdriver to reposition the switch to the desired voltage and change
the fuse to the appropriate rating. WARNING: Severe damage may result from improperly selected
voltage. Make sure you know the voltage requirement of the country you are in before attempting to
connect this subwoofer to AC power.
8. POWER: Two-position power switch. In the “ON” mode, the subwoofer’s amplifier is automatically
activated if an audio signal is present and will automatically become inactive when there is no audio signal
present after approximately 30 minutes. In the “OFF” mode, power is shut off to the amplifier.
9. POWER CORD RECEPTACLE: Connect IEC cord to this receptacle (supplied with the SL subwoofer). If the
cord supplied does not fit an available AC outlet, purchase the correct AC cord from your audio dealer or
an electrical supply store. REPLACEABLE FUSE: Protects system from overload, replace with fuse rating as
indicated on amplifier panel at fuse location. The fuse holder is located at the AC receptacle.