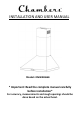
INSTALLATION AND USER MANUAL Model: MVW206SS * Important: Read the complete manual carefully before installation* For accuracy, measurements and rough openings should be done based on the actual hood.
CONTENTS INTRODUCTION.......................................................................3 SAFETY INFORMATION............................................................3 TOOLS & PARTS.......................................................................5 INSTALLATION.........................................................................6 OPERATION.............................................................................12 MAINTENANCE.................................................................
INTRODUCTION Thank you for choosing this cooker hood. This instruction manual is designed to provide you with all required instructions related to the installation, use, maintenance, and warranty of the appliance. Please read this instruction manual carefully before installation and operating your range hood. This range hood is made from high quality materials and has a streamlined design.
7. Ducted fans must always be vented to the outdoors. 8. To reduce the risk of fire, use only metal ductwork. 9. This unit must be grounded. TO REDUCE THE RISK OF A RANGE TOP GREASE FIRE: 1. Never leave surface units unattended at high settings. Boil overs cause smoking and greasy spillovers that may ignite. Heat oils slowly on low or medium settings. 2. Always turn hood ON when cooking at high heat or when flambéing food (i.e. Crepes Suzette, Cherries Jubilee, Peppercorn Beef Flambé’). 3.
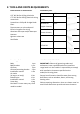
2. TOOLS AND PARTS REQUIREMENTS Electrical drill or ratchet driver Installation parts 1/2” drill bit for drilling pilot holes 1 ¼” drill bit for drilling electrical wiring access hole.
3. INSTALLATION (Before You Start...) 1. Read this manual carefully and completely. 2. Chambers® range hoods conform to ETL/CSA standards. Check your local building codes for any additional requirements. 3. The appliance has been manufactured as Class I, therefore a ground connection is necessary. A 110/120V power cord with plug is provided. The range hood must be installed so that the plug is easily accessible. 4.
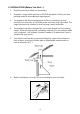
. The cooker hood should be placed at a distance of 2-3ft (Fig C.) above the cooking surface for best effect. Check your building code for min and max installation heights. 4. INSTALLATION (EXTERIOR VENTILATION): When the range hood is in operation, the negative pressure in the room must not exceed 4 Pa (4×10⁻⁵ Bar) 1. Drill 3 x 8mm holes to accommodate the bracket. Screw and tighten the bracket onto the wall with the screws and screw plugs provided.
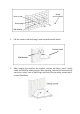
Screw (4mm x 30mm) Holes on wall Screw plug Wall bracket 2. Lift the cooker hood and hang it onto the wall bracket hooks. Cooker hood Wall bracket 3. After hanging the hood on the bracket, remove the filters, mark 2 holes inside the hood for safety screws. After marking, remove the hood and drill two holes.
4. Fix the one-way-valve to the air outlet of the cooker hood. Then, attach the exhaust pipe to the one-way-valve as shown below. Exhaust pipe Cooker hood 5. CHIMNEY INSTALLATION 1. Place the upper chimney into the lower chimney. 2. Use 2 pcs ST4x8mm screws to attach lower and upper chimney together. Before attaching the bracket to the chimney, decide the location of lower chimney bracket fixing holes for fixing the lower chimney bracket in the later steps. 3. Do not over tighten the screws 4.
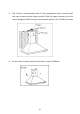
5. Drill 2 holes to accommodate plate II. Screw and tighten plate II onto the wall with two screws and wall plugs provided. Slide the upper chimney up to the correct height and affix the upper chimney with plate II via 2 x ST4x8mm screws. 6.
6. INSTALLATION (RECIRCULATING) If you do not have exterior access, an exhaust pipe is not required. A recirculating kit can be used to clean the air and trap odors. 1. To install the activated carbon filter, the grease filters should be removed first. Press down the locking tab to remove the filters. 2. Attach the activated carbon filter to the air intake and turn it in clockwise direction. Repeat the same on the other side. NOTE: * Make sure the filter is securely locked.
7. OPERATION Electronic Control On/Off button Low Speed button It’s used for Ventilation on the kitchen. It is suitable for simmering and cooking which do not make much steam. Medium Speed button Airflow speed is ideally for ventilation in standard cooking operation. High Speed button When high density of smoke or steam produced, press high-speed button for highest effective ventilation.
8. MAINTENANCE Before cleaning, switch the unit off and disconnect the electrical supply. I. Regular Cleaning Use a soft cloth moistened with hand-warm mildly soapy water or household cleaning detergent. Never use metal pads, chemical, abrasive material or stiff brush to clean the unit. II. Monthly Cleaning for Grease Filter ESSENTIAL: Cleaning the filters every month can prevent risk of fire. The filters collect grease, smoke and dust.
9. TROUBLESHOOTING Fault Cause Solution Light on, but fan The fan blade is jammed. does not work The motor is damaged. personnel only. Both light and Light bulb is burnt out. Replace the bulb. fan do not work Power cord is loose. Plug in to the power supply again. The fan blade is damaged. Turn off unit. Repair by qualified service Turn off unit. Repair by qualified service personnel only. Serious Vibration The fan motor is not fixed Turn off unit.
10. ENVIRONMENTAL PROTECTION Waste electrical products should not be disposed of with household waste. Please recycle where facilities exist. Check with your Local Authority or retailer for recycling advice. By ensuring this product is disposed of correctly, you will help prevent potential negative consequences for the environment and human health, which could otherwise be caused by inappropriate waste handling of this product.
11. LIMITED WARRANTY This warranty applies only to the original purchaser and may not be transferred. This warranty is applicable within North America only, to hoods installed for normal, noncommercial use in PRIVATE SINGLE FAMILY HOUSEHOLDS. Chambers® warrants this product to be free from defects in material or workmanship for a period of ONE YEAR from the date of original purchase.
• Service calls to instruct how to use the appliance • Expenses for travel and transportation if your appliance is in a remote area where service by an authorized Chambers® servicer is not available. The cost of repair or replacement under these exclusions shall be borne by the customer and agreed to before a servicer is dispatched. CHAMBERS® SHALL NOT BE LIABLE FOR INCIDENTAL, CONSEQUENTIAL OR SPECIAL DAMAGES ARISING OUT OD OR IN CONNECTION WITH PRODUCT USE OR PERFORMANCE.