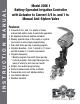
instruction manual Model 2006 I Battery Operated Irrigation Controller with Actuator to Convert 3/4 in. and 1 in. Manual Anti-Siphon Valve Features • Converts 3/4 in. and 1 in.
Table of contents INTRODUCTION… …………………………………………………………… 3 1. Box contents…………………………………………………………… 3 2. Parts identification……………………………………………………… 3 3. Battery installation and removal… ……………………………………… 4 3.1 Battery installation… ……………………………………………… 4 3.2 Battery removal… ………………………………………………… 4 4. Choosing the proper adapter… ………………………………………… 4 5. Collar assembly………………………………………………………… 6 6. Adapter/seat washer installation………………………………………… 7 7. Installation of valve adapter with controller… …………………………… 8 8.
introduction Thank you for purchasing DIG’s battery operated controller to convert a 3/4 in. or 1 in. plastic or brass manual anti-siphon valve to automatic operation. Please take the time to read through the enclosed instructions before installation. If you have any questions, please call our customer service line at 1-800-344-2281. The battery operated controller model 2006I converts a 3/4 in. or 1 in. plastic or brass manual anti-siphon valve to automatic operation.
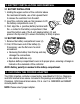
3. BATTERY INSTALLATION AND REMOVAL 3.1 Battery Installation 1. Holding the upper section of the controller above the mechanical handle, use a firm upward twist to release the controller from the skirt. 2. Invert the controller and use firm pressure to lift the battery compartment cover (1). 3.
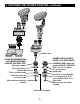
4. choosing the proper adapter...continued Actuator stem As factory assembled for 3/4 in. brass valves only Assembly for all plastic valves & 1 in. brass valves Champion, Rain bird & Orbit 3/4 in. brass adapter 3/4 in. brass washer Retainer clip 3/4 in. seat washer body Champion & Orbit adapter for 1 in. brass & Rainjet, Rain bird & OrbiT 3/4 in. & 1 in. plastic 1 in. brass washer Retainer clip 1 in. 3/4 in. seat washer body 1 in. Seat washer for 3/4 in. and 1 in. plastic valves & 1 in.
5. COLLAR ASSEMBLY 1. Hold the collar by the round shaped sides (see Figures 1 and 2). 2. Invert the controller assembly and use firm pressure to insert the lower side of the collar into the controller’s center nub (see Figure 3). 3. Lower the collar and snap it to the groove at the lower part of the Controller assembly (see Figure 4). 4. Insert the controller assembly with the collar on the to of the solenoid and make sure the wire fits through the larger slot (see Figure 5).
6. adapter/seat washer installation The actuator is factory setup to fit 3/4 in. brass manual anti-siphon valves. To install the actuator on 1 in. brass anti-siphon valves and all other manual plastic valves, the 3/4 in. seat washer and adapters must be removed and replaced with the 1 in. adapter and seat washer Figure A which are included in this box. 1. Turn the actuator so that the seat washer and the 3/4 in. threaded adapter facing up. 2.
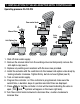
7. installation of valve adapter with Controller Operating pressure: 25-125 PSI Flow control knob A B C Manual Stem Valve Body Anti-Siphon Cap 1. Shut off main water supply. 2. Remove the manual stem from the existing valve and temporarily remove the anti-siphon cap (see A). 3. Replace any existing worn washers with the new ones provided. 4. Install the actuator with the controller into the manual anti-siphon valve body by turning actuator clockwise.
. Push and verify that the valve closes. (The manual disappear.) and symbols will 8. Irrigation PROGRAMMING The controller is programmed with the aid of 4 buttons. Programming mode: Use to accept and/or select the desired programming mode. Data Increment (increase): Use to raise the value of the selected program feature (e.g. increase the minute and hour). Data Decrement (decrease): Use to lower the value of the selected program feature (e.g. decrease the minute and hour).
1. Press until the main screen appears. and the hour digits start blinking. Set the current hour with the aid of 2. Press and . (Note the AM or PM designation) and the minute digits start blinking. Set the current minute with the 3. Press aid of and . * For 24-hour clock display (military time): Once the hour/minute digits are not blinking or stop blinking, press concurrently and and the time will switch from AM/PM to military time.
0:10. To set the duration for 10 minutes, press to skip the hour digits, the minute digit is blinking. Press or until the minute digit reaches 10 minutes. Second, schedule the days of the week 1. Press the main button and a Icon appears opposite the word DAYS with OFF blinking. 2. Press and a flashing appears under Monday in the upper section of the display. Using position the flashing marker under Tuesday.
the minute digit, which will start blinking. Press or and set to 30 minutes. To set the third start time, repeat the steps for START III, setting the start time at 7:00 PM. Up to 4 start times can be programmed by repeating the steps above. Press to exit. until the 3. To cancel one of the start times, select the start time by pressing desired start time is reached. The hour digit flashes automatically. Press or until the word OFF appears, which is between 11:00 PM and 12:00 AM. 8.
will appear with 12:00 AM blinking. Press the and change the hour to 10:00 AM. Press to access the minute digit, which will start blinking. Press or and set to 30 minutes. Press again to set the start day (MONDAY) and a flashing will appear. Press or to move the flashing under MONDAY. Press to exit. 3. To get out of cyclical mode press with 3 DAYS is blinking. Press the to return to current time screen. until appears opposite the word DAYS until OFF appears on the display.
Canceling Operation: Press again and the display. and symbols will disappear from the NOTE: If the irrigation duration is set at zero (0:00) in automatic mode, irrigation will not occur and will appear on the display. 8.6 suspend irrigation (Rain Off) This option is used to temporarily suspend irrigation controller operation, for example, while it is raining. Programmed schedules remain in the controller memory but are not implemented until the suspension is cancelled.
9.2 Missing Definition in Irrigation Program will appear if irrigation duration is set at zero (0:00) (see Note: in Section 8.5). In this case, the valve cannot be opened for automatic or manual operation via the controller. 9.3 Programming Error In the cyclical program (see section 8.4) if the irrigation duration programmed is equal to or longer than the irrigation cycle, the word will appear. To cancel the error, press or to increase the irrigation cycle. 10. HELPFUL HINTS AND ADDITIONAL INFORMATION 1.
11. MAINTENANCE If the controller is not going to be use for an extended period of time, remove batteries and replace cover securely. After an extended time without batteries the controller will need to be reprogrammed. KEEP BATTERY COMPARTMENT SECURELY CLOSED AT ALL TIMES. Remove controller and store indoors when temperature drops below 32° F (0° C) for a prolonged period of time. Be sure to shut off water supply before removal. 12.
PROBLEM: Water discharges from anti-siphon cap. CAUSE: Heads are above valve. SOLUTION: Raise valve or use angle valve. CAUSE: Anti-siphon float is missing or damaged. SOLUTION: Check or replace float. PROBLEM: Valve does not close completely. CAUSE: Static pressure is above 125 PSI. SOLUTION: Install a mainline pressure regulator. PROBLEM: Valve does not open. CAUSE: Actuator ports are blocked.
To Order Replacement or Spare Parts: Please Order Online at www.digcorp.com/rparts We at DIG Corporation understand that most dealers do not carry spare parts. For your convenience, if you need one of these parts, please order online at www.digcorp.com/rparts. Controller & Solenoid Collar Solenoid Adapter Flow control knob External bleed screw Actuator As factory assembled for 3/4 in. brass valves only Assembly for all plastic valves & 1 in. brass valves Champion, Rain bird & Orbit 3/4 in.
WARRANTY DIG CORPORATION warrants these products to be free from defects in material and workmanship under normal use for a period of three years from date of purchase. This warranty does not cover damage resulting from accident, misuse, neglect, modification or improper installation. This warranty shall extend only to the original purchaser of the product for use by the purchaser. This warranty shall not cover batteries or any malfunction of the product due to battery failure.
TECHNICAL ASSISTANCE Should you encounter any problem(s) with this product or if you do not understand its many features, please refer to this instruction manual first. If further assistance is required, DIG offers the following customer support: Technical Service USA • DIG’s Technical Service Team is available to answer questions in English and Spanish from 8:00 AM to 5:00 PM (PST) Monday-Friday (except holidays) at 800-344-2281. • Questions in English and Spanish can be e-mailed to questions@digcorp.