
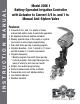
Instruction manual


6. ADAPTER/SEAT WASHER INSTALLATION
7
The actuator is factory setup to fit 3/4 in.
brass manual anti-siphon valves. To install the
actuator on 1 in. brass anti-siphon valves and
all other manual plastic valves, the 3/4 in. seat
washer and adapters must be removed and
replaced with the 1 in. adapter and seat washer
which are included in this box.
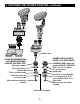
1. Turn the actuator so that the seat washer and
the 3/4 in. threaded adapter facing up.
2. Using pliers, remove the seat washer screw by
turning counter clockwise and pull off the 3/4
in. seat washer assembly (see Figure A).
3. Push the 3/4 in. threaded adapter down (see
Figure B).
4. Place your thumb on one side of the retainer
clip and with a pair of pliers grip the other side
of the retainer clip and pull outwards then
upwards, removing it from the base of the
3/4 in. adapter threaded. Next, pull off the
3/4 in. threaded adapter from the actuator stem
(see Figure C).
5. Install the 1 in. threaded adapter by pushing
it onto the actuator stem and making sure the
notch on the adapter lines up with the notch on
the stem of the actuator (see Figure D).
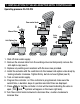
6. Spread the retainer clip with your thumbs and
push the retainer into the adapter until it clicks
(see Figure E).
7. Install the 1 in. seat washer assembly making
sure the plastic is on top and the rubber is
facing down. Insert the seat washer screw into
the bottom of the actuator stem and tighten
with pliers by turning clockwise (see Figure E).
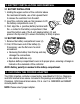
NOTE: Do not over-tighten.
Figure E
Figure B
Figure C
Figure D
Figure A