
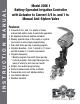
Instruction manual


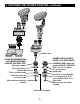


9. Push and verify that the valve closes. (The manual and symbols will
disappear.)
8. IRRIGATION PROGRAMMING
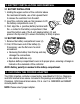
The controller is programmed with the aid of 4 buttons.
Programming mode: Use to accept and/or select the desired programming mode.
Data Increment (increase): Use to raise the value of the selected program feature
(e.g. increase the minute and hour).
Data Decrement (decrease): Use to lower the value of the selected program feature
(e.g. decrease the minute and hour).
Flash button: used to select the parameter to be changed (e.g. hour, minute,
etc.) To implement the change, the selected parameter must be flashing.
If no changes are implemented, the Controller display will always revert to
the main screen (clock).
NOTE: Display digits will stop flashing after 10 seconds. If the last parameter
stops flashing before programming is complete press to continue the
process.
NOTE: After programming the controller, test the controller via the manual
program button (see section 8.5).
8.1 PROGRAMMING METHOD
There are two options for setting irrigation frequency: Weekly Schedule Mode (see
8.3) where watering occurs on specific days of the week (up to four start times per
day in this mode) or Cyclical Mode (see 8.4), where watering occurs at a pre-set
interval (one start time per day in this mode). You must select one mode or the
other, not both.
8.2 SETTING CURRENT TIME & DAY OF THE WEEK
To enable the irrigation controller to operate the irrigation system at the required
times, the current time and day of the week must be set as shown:
Setting the Clock
To enable the controller to operate the irrigation system at the desired intervals or
times, the current time and day of the week must be set as shown:
9