
ATS Installation Manual


RELIANCE CONTROLS ARL SERIES AUTOMATIC TRANSFER SWITCH
FUSE INFORMATION
16
Remove the voltmeter and reconnect the wires that were
installed in terminals 11 and 12, in the correct order. Test F1.
Test Fuse F1:
Disconnect the wires that are connected to terminals 1, 2, and 3
on the 12-position terminal block. With utility power on, verify
the fact that all circuits connected to the ARL are energized.
Connect the negative lead of a 24VDC power supply to terminal
3.
FOR NO MORE THAN 1 SECOND, press the positive lead of the
24VDC power supply to terminal 1.
If the solenoid clicks and the mechanism transfers, fuse F1 is
functional. If not replace fuse.
Disconnect the 24VDC power supply and reconnect the wires
that were installed in terminals 1, 2, and 3, in the correct order.
Test F6.
Test Fuse F6:
Disconnect the wires that are connected to terminals 1, 2,
and 3 on the 12-position terminal block. With generator power
on, verify the fact that all circuits connected to the ARL are
energized.
Connect the negative lead of a 24VDC power supply to terminal
3.
FOR NO MORE THAN 1 SECOND, press the positive lead of the
24VDC power supply to terminal 2.
If the solenoid clicks and the mechanism transfers, fuse F6 is
functional. If not replace fuse.
Disconnect the 24VDC power supply and reconnect the wires
that were installed in terminals 1, 2, and 3, in the correct order.
Fuse Replacement
CAUTION
ATS cannot be live or installed to perform this procedure. Be
sure all power is disconnected before continuing. Failure to
do so can result in serious injury or death.
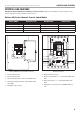
1. Locate and remove the ATS cover plate by removing the
mounting screws (1-4) shown below.
4
2. Mounting screws:
2a. Locate and remove the Bus Bar mounting screws
(2 – 8/32) (A shown below).
2b. Locate and remove mounting bracket screws
(4 – 10/32) (B shown below).
DO NOT MISPLACE SCREWS – MUST RETURN TO SAME
LOCATION.