
Use and Care Manual


100434 - 24 IN. 2-STAGE SNOWBLOWER
OPERATION
20
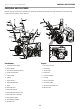
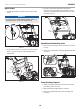
Auger control handle
Self drive control handle
Figure 14
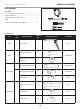
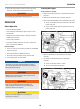
Drive System
Your snowblower has 6 forward speeds and 2 reverse to regulate
forward and backward motion (Fig. 15).
The speed-adjusting system has forward speeds ranging from
slowest position 1 to fastest position 6. In reverse, R1 is the
slowest speed and R2 the fastest.
Adjusting the self-propelled drive system:
1. Release the self-drive control handle to bring the snowblower
to a stop.
2. Move the speed-control lever to the gear (either forward or
reverse) that you require (Fig. 15).
R2
1
R1
6
Figure 15
3. Press the self-drive control handle to engage the drive
system.
WARNING
Watch out for rotating auger. Keep hands, feet, hair and loose
clothing away from any moving parts on the machine.
Adjusting the Snow Discharge Direction and
Height
Change discharge direction:
Turn the lever counter-clockwise – the
snow discharge guide turns to the left.
Turn the lever clockwise – the snow
discharge guide turns to the right.
Change discharge height:
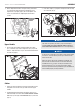
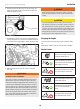
1. Loosen the locking knob to adjust the snow discharge
deflector to a suitable height (Fig. 16).
Locking knob
Figure 16
2. Adjust the snow discharge deflector from 0 – 60°.
3. Tighten the locking knob.
Low - shorter ejection distance
High - longer ejection distance
WARNING
If snow clogs the discharge chute do not try to remove it
before:
– Releasing the auger control handle.
– Stopping the engine.
– Disconnecting the cable from the spark plug.
Do not put your hand inside the chute or auger. Use the chute
clearing tool included with your snowblower.