Owner's Manual CRAFTSMAN+ 3000 Watt AC Generator Model No. 580.329120 C usGemneraHt°lp li ne_ HOURS: Mon.- Fri. 8 a.m. to 5 p.m. (CT) CAUTION: Before using this product, read this manual and follow all its Safety Rules and Operating Instructions. Sears, Roebuck and Co., Hoffman Estates, Visit our Craftsman website: www.sears.com/craftsman Part No.
SAFETY RULES .......................... 3 TROUBLESHOOTING ASSEMBLY ............................. 5 SCHEMATIC/WIRING OPERATION ........................... 5-9 SPECIFICATIONS MAINTENANCE ....................... 10 ....................... 10-12 STO RAG E ............................. 12 LIMITED WARRANTY REPLACEMENT .................... DIAGRAM .......... PARTS ................ EMISSION SYSTEM WARRANTY ESPANOL 13 16-22 ......... ........................... HOW TO ORDER PARTS ..........
The engine exhaust from this product contains chemicals known to the State of California to cause cancer, birth defects, or other reproductive harm. A AUTION! Before allusing thisRules product, manual and follow Safety and read this Operating Instructions. WARNING! You must isolate the generator from the electric utility by opening the electrical system's main circuit breaker or main switch if this unit is used for backup power.
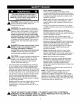
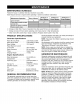
KNOW YOUR GENERATOR Read the owner's manual and safety rules before operating your generator. Compare the illustrations with your generator to familiarize yourself with the locations of various controls and adjustments. Save this manual for future reference.
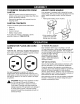
TO REMOVE GENERATOR CARTON FROM • Slice two corners at end of carton from top to bottom so the panel can be folded down fiat, then remove all packing material. • Remove the generator and contents from the shipping carton. CARTON ADJUST GUIDE HANDLE Your generator is equipped with a wheel kit for easy maneuvering. After you remove the generator from the carton, adjust the guide handle. Use the following steps: • Raise guide handle, secure in place.
HOW TO USE YOUR GENERATOR If you have any problems operating your generator after reading the manual, please call the generator helpline at 1-800-222-3136. Grounding The Generator The National Electrical Code requires that the frame and external electrically conductive parts of this generator be properly connected to an approved earth ground. Local electrical codes may also require proper grounding of the unit. For that purpose, a grounding wing nut is provided on the generator housing.
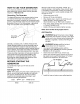
To Start The Engine Stopping the Engine • Unplug all electrical loads from the generator receptacles before starting the engine. Never start or stop the engine with electrical devices connected to the receptacles AND turned on. • Unplug all electrical loads from the unit. Never start or stop the engine with electrical devices plugged in and turned on. • • Be sure the spark plug wire is attached to the spark plug.
Charging a Battery WARNING! Storage batteries emit explosive gas while charging that remains around a battery for a long time after it has been charged. The slightest spark can ignite the gas, causing an explosion that can shatter the battery and cause blindness or other injury. _ • Connect battery charge cable connector plug to panel receptacle identified by the words "12 VOLT D.C." • Connect battery charge cable clamp with red handle to battery post or terminal indicated by POSITIVE, POS or (+).
DON'T OVERLOAD GENERATOR THE Overloading a generator in excess of its rated wattage capacity can result in damage to the generator and to connected electrical devices. Observe the following, to prevent overloading the unit: • Add up the total wattage of all electrical devices to be connected at one time. This total should NOT be greater than the generator's wattage capacity. • The rated wattage of lights can be taken from light bulbs.
MAINTENANCE SCHEDULE Follow the hourly or calendar intervals, whichever occurs first. More frequent service is required when operating in adverse conditions noted below. Maintenance Operation Every 5 Hours Check oil level Clean spark arrester screen Chan_e oil Service air cleaner cartridcle Replace spark plucls x 20 Hours or Eve_ Season i 50 Hours or Eve_ Season iiiiiiiiiiiiiiiiii, x 100 Hours or EYe_ Season ....
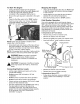
To Clean the Generator: • • Use a damp cloth to wipe exterior surfaces clean. • A soft bristle brush may be used to loosen caked on dirt, oil, etc. _ • AUTION! Never insert anyeven object or tool through the air cooling slots, if the engine is not running. A vacuum cleaner may be used to pick up loose dirt and debris. Low pressure used to blow and openings must be kept ,_ Check electrode gap with wire feeler gauge and set spark plug gap to 0.030 inch (0.76mm) if necessary.
Cleanandinspectthesparkarresterasfollows: • Removethe screwthatattachesthe sparkarrester screen. • Inspectthe screenandreplaceiftorn,perforated or otherwisedamaged.Do Notusea defective screen.If screenis notdamaged,cleanit with commercial solvent. • Reattach the screen. Spark Arrester Muffler GENERAL Change Oil The generator should be started at least once every seven days and allowed to run at least 30 minutes.
Problem Cause Engine is running, but no AC output is available. 1. 2. 3. 4. One of the circuit breakers is open. Fault in generator. Poor connection or defective cord set. Connected device is bad. Correction 1. Reset circuit breaker. 2. Contact Sears service facility. 3. Check and repair. 4. Connect another device that is in good condition. 1. 2. 3. Short circuit in a connected load. Engine speed is too slow. Generator is overloaded. 1. 2. 3. 4. Shorted generator circuit. 4. 1. 2. 3. 4.
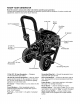
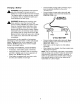
BRIDGE RECTIFIER FIELD 11 11 POWER 22 20A C.B. <_ 20A C.B 22 11B 20 VAC 20A 11 11B BATTERY CHARGER 66 77 13 55 < } <+} 15 14.
TO SCREW ON PANEL 22 22 SS 120 VAC 1S I 11B CAUTION!!! OUTLET TAB BE BROKEN. 3 MUST IOA C.B. AUTO RESET SS 20A NOTE: >kPOSITIVE BRUSH C.B.
CRAFTSMAN 3000 Watt AC Generator Main Unit m Exploded 580.329120 View 33 "\\\ is 9OO < 14 \ 3S 19 58 16 / 34 6O 41 3O 57\ \ \ 43 / 38 / 50 / 45 /$4 HA_ /55 ----_-39 _/ / 48 16 46 56
CRAFTSMAN 3000 Watt AC Generator 580.329120 Main Unit m Parts List Item 1 2 3 4 5 6 7 8 9 10 11 12 13 14 15 16 17 18 19 PaN# Qty. B187358 1 B186974 1 85652 2 14353621 1 86292 1 75475 2 85651 2 99617 2 66849A 1 38150 2 186953A 1 66365-F 1 B2816J 1 65791 1 47480 1 66825B 1 AB3061 1 90418 1 86308G 4 20 21 22264 66849 2 2 22 23 24 25 26 27 28 29 30 65795 68759 77247 187095 91825 96796 23365 51715 74908 1 1 2 1 1 1 2 2 4 31 32 33 86494 84242 86307 1 2 4 Description HANDLE BASE MOUNT, Vibration AIt.
CRAFTSMAN Engine 4 Cycle Engine 143.016005 Exploded View 279 161 307 310 -- ao5 I \ 159 130 151 135 Lo 41 / 86 30 24O / 245 250A / 250 / 380 d 238 d_ 18 d 251
CRAFTSMAN Engine 4-Cycle Exploded Engine 143.016005 View 301 J 4oo 65 60 25A J 26 / .
CRAFTSMAN Engine Item 1 2 14 15 16 19 20 25 25A 26 30 35 37 38 40 40 41 41 42 42 43 45 46 48 49 50 60 64 65 69 70 72 75 80 81 82 83 86 89 90 92 93 94 96 100 101 103 103A 110 110A 111A 119 120 125 125 126 130 130A 135 150 151 151A 153 154 155 4-Cycle Engine 143.
CRAFTSMAN Carburetor 4-Cycle Exploded Engine 143.016005 View and Parts List Item 0 1 PaN # Qty.
CRAFTSMAN Recoil Starter 4-Cycle Engine Exploded 143.016005 View and Parts List --11 / Item 0 1 2 3 4 5 6 7 8 PaN # Qty. 1 590748 590599A 1 1 590600 1 590679 1 590601 1 590678 590680 2 590412 2 590681 1 13 11 12 590747 590535 1 1 13 590701 1 _8 22 Description Recoil Starter Spring Pin (Incl. 4) Washer Retainer Washer Brake Spring Starter Dog Dog Spring Pulley & Rewind Spring Assembly Starter Housing Assembly Starter Rope (Length 98"x 9/64" dia.
CALIFORNIA & US EPA EMISSION CONTROL WARRANTY STATEMENT Warranty Service can be arranged by contacting either a Tecumseh Authorized Service Outlet or by contacting Tecumseh Products Co., c/o Service Manager, Engine and Transmission Group Service Division, 900 North Street, Grafton, WI 53024-1499. Telephone 1-262-377-2700, or see your local telephone yellow pages under "Engines, Gasoline" for the name, address and telephone number of a Tecumseh Authorized Service Outlet near you. The U.S.
B. General Emissions Warranty Coverage: Tecumseh Products Co. warrants to the original, end-use purchaser of the new engine or equipment and to each subsequent purchaser that each of its small off-road engines is: 5. 1.
GARANTIA........................................................... 26 REGLASDESEGURIDAD.................................. 27 MONTAJE............................................................ 29 FUNCIONAMIENTO ........................................ 29-33 MANTENIMIENTO .......................................... 34-36 ESPECIFICACIONES ........................................... 34 GARANTIA LIMITADA ALMACENAMIENTO ............................................ 36 REPARACION DEAVERIAS......................
combustible podria rebosarse y caer sobre el motor caliente y ocasionar un INCENDIO o una EXPLOSION. iPRECAUClON! Lea este manual y siga todas las Reglas de Seguridad e Instrucciones de Operaci6n antes de usar este producto. iADVERTENClA! Siesta unidad se usa para energia de refuerzo, usted debe aislar el generador de cualquier utilidad el6ctrica usando un equipo de transferencia aprobado.
CONOZCA SU GENERADOR Lea este manual del propietario y las reglas de seguridad antes de operar su generador. Compare las ilustraciones con su generador para familiarizarse con la ubicaci6n de los diferentes ajustes. Conserve este manual para referencias futuras.
PARA RETIRAR DE LA CAJA • • EL GENERADOR AJUSTE GUIA Su generador esta equipado con un juego de ruedas para un manejo facil. Despu6s de retirar el generador de la caja, debera ajustar la manija guia. Lleve a cabo los siguientes pasos. Corte dos esquinas en el extremo de la caja de la parte superior a la inferior, de manera que pueda doblar el panel hacia abajo en forma plana, despu6s retire todo el material de protecci6n. • Levante la manija guia, asegQrela en su sitio.
COMO USAR SU GENERADOR • Coloque la generador en una superficie nivelada. SI TIENE PROBLEMAS operando su generador despu6s de leer el manual, por favor Ilame a la linea de ayuda para generadores al 1-81)0-222-3136. • Limpie el area alrededor del Ilenado de aceite. • Retire el tap6n del orificio de Ilenado y la varilla de medici6n. • Limpie la varilla de medici6n, ins6rtela en el orificio de Ilenado y aprietela firmemente; retire la varilla de medici6n.
Para Darle Arranque Parado del Motor al Motor • Desconecte todas las cargas el6ctricas de los tomacorrientes del generador antes de darle arranque al motor. Nunca arranque o detenga el motor con todos los dispositivos el6ctricos conectados en los tomacorrientes del panel y encendidos. • AsegQrese de que el alambre de la bujia est6 conectado a la bujia. • Coloque el interruptor de Marcha/Parado "RUN" (MARCHA). • Oprima el Bot6n del Cebador 2 6 3 veces.
Procedimiento de Carga de la Bateria iADVERTENCIA! Las baterias de acumuladores producen gas explosivo cuando son cargadas, el cual permanece alrededor de la bateria por un periodo de tiempo prolongado despu6s de haber sido cargada. La chispa mas pequeSa podria encender el combustible y causar una explosi6n que puede destruir la bateda, causar ceguera y otras lesiones serias. ,_ • Si la bateria esta equipada con tapas de desfogue, asegQrese de que estan instaladas y apretadas.
NO SOBRECARGUE GENERADOR EL Sobrecargar el generador mas alia de su capacidad de vatiaje puede ocasionar daSos al mismo y a los dispositivos el6ctricos conectados. Siga las siguientes instrucciones para evitar sobrecargar la unidad: • Sume el vatiaje total de todos los dispositivos el6ctricos que van a ser conectados al mismo tiempo. Este total No debe ser mayor que la capacidad de vatiaje del generador. • El vatiaje nominal de las luces puede ser tomado de los bombillos.
PROGRAMA DE MANTENIMIENTO Siga los intervalos horarios o de calendario, Io que ocurra primero. Se requiere de servicio con mayor frecuencia opere la unidad en las condiciones adversas descritas a continuaci6n. Operacibn de Mantenimiento Cada 5 horas Revise el nivel del aceite Limpie la pantalla del aDaclachispas Cambie el aceite ++ X Proporcione servicio al cartucho del depurador de aire Reemplace la buiias cuando .....................................................................................
Para Limpiar el Generador: • Utilice un trapo h6medo para limpiar las superficies exteriores. • Puede usar un cepillo de cerdas suaves para retirar la suciedad endurecida, aceite, etc. ,_ • Reemplace la bujia si los electrodos estan picados, quemados o si la porcelana esta rota. Para su reemplazo, 6nicamente utilice Champion RC12YC o una de tipo equivalente. • Revise la separaci6n del electrodo con un calibrador de alambre y ajuste la separaci6n a 0.030 pulgadas (0.76mm) si es necesario.
Limpie e inspeccione el apagachispas manera: de la siguiente • Retire el tornillo que sujeta la pantalla del apagachispas. • Inspeccione la pantalla y reemplacela si esta rota, perforada o en general daSada. No use pantallas defectuosas. Si la pantalla no esta daSada, limpiela con un disolvente comercial. • Vuelva a instalar la pantalla.
Problema El motor esta funcionando pero no existe salida de AC disponible. Causa Solucibn 1. 2. Uno de los cotacircuitos esta abierto. Falla en el generador. 1. 2. 3. Mala conexi6n ojuego de cordones defectuoso. El dispositivo conectado esta en mal estado. 3. 4. El motor funciona bien sin cargas pero "funciona mal" cuando las cargas son conectadas. El motor no arranca; o arranca y funciona mal. El motor "no funciona continuamente" o se detiene. Desconecte la carga el6ctrica en corto.
DECLARACION DE LA GARANTIA DEL CONTROL DE EMISIONES PARA CALIFORNIA Y US EPA Co. podria negarle cubrimiento de garantia si su equipo de servicio, c6sped y jardin, o cualquier parte, ha fallado debido a abuso, negligencia, mantenimiento incorrecto o modificaciones no aprobadas. La Agencia de Protecci6n Ambiental de los Estados Unidos ("EPA"), la Junta Directiva de Recursos del Aire de California ("CARB") y Tecumseh Products Co.
GARANTIA DEL SISTEMA DE CONTROL DE EMISIONES bajo la Garantia ECS, estar_ garantizada por el tiempo restante del periodo de la Garantia ECS antes del primer punto de reemplazo programado para dicha parte relaciona con las emisiones. Garantia del Sistema de Control de Emisiones ("Garantia ECS") para motores de equipo de servicio, c6sped y jardin aSos 1995 y posteriores de California (para otros estados, motores modelos 1997 y posteriores): 4. A.
For in-home major brand repair service: Call 24 hours a day, 7 days a week 1-800-4-MY-HOM Para pedir servicio E SM(1-800-469-4663) de reparacibn a domicilio - 1-800-676-5811 In Canada for all your service and parts needs call Au Canada por tout le service ou les pi6ces For the repair or replacement - 1-800-665-4455 parts you need: Call 7 am - 7 pm, 7 days a week 1-800-366-PART Para ordenar (1-800-366-7278) piezas con entrega a domicilio - 1-800-659-7084 For the location of a Sears Parts and Re