
Owner`s manual


Page 8
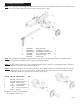
STEP 3: Attach the tongue assembly (5) to the tank assembly (4) using two 1/2” NC x 4-1/2” hex cap bolts (1), two 1/2”
lock washers (2) and two and two 1/2” hex nuts. Tighten. (3).Tighten.
ITEM NO PART NO. DESCRIPTION QTY.
1 O/L 1/2”NC x 4-1/2” Bolt 2
2 O/L 1/2” Lock Washer 2
3 O/L 1/2” NC Hex Nut 2
4 401102R22 Tank Assembly 1
401102RC22 Tank Assembly (CA) 1
5 40126300 Tongue Assembly 1
O/L- Obtain locally. Common fasteners available through hardware
and farm stores.
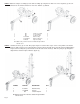
ITEM NO. PART NO. DESCRIPTION QTY.
1 401613R0 Beam Assembly 1
2 071022WC Pivot Pin 1
3 O/L 1/2”-3/4” R Clip Pin 1
O/L- Obtain locally. Common fasteners available through hardware
and farm stores.
STEP 4: Stand the beam (1) up on end. Two people may be needed for this step to ensure safety. Make sure that the
beam is stable and on a level surface.Remove the pivot pin (2) and clip pin (3) from the tank assembly.Roll the
tongue/ tank assembly into position between the two tabs on the beam (1). Slide the pivot pin (2) through the
aligned holes and lock in place with the clip pin (3)
4
5