
Installation Guide


102006 - AUTOMATIC TRANSFER SWITCH WITH aXis CONTROLLER™ MODULE
UNPACKING
8
UNPACKING
1. Use care when unpacking to avoid damaging transfer switch
components.
2. Allow the ATS to acclimate to room temperature for
a minimum of 24 hours before unpacking to prevent
condensation on the electrical apparatus.
3. Use a wet/dry vacuum cleaner or a dry cloth to remove dirt
and packing material that may have accumulated in the
transfer switch or any of its components during storage.
4. Do not use compressed air to clean the switch, cleaning with
compressed air can cause debris to lodge in the components
and damage the switch per the ATS manufacturers
specifications.
5. Retain the ATS manual with or near the ATS for future
reference.
TOOLS REQUIRED NOT INCLUDED
5/16 in. Hex Wrench
Mounting Hardware
Line Voltage Wire
1/4 in. Flat Screwdriver
Conduit
Fittings
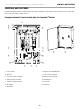
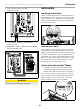
Location and Mounting
Install the ATS as close as possible to utility meter socket. Wires
will run between the ATS and main distribution panel, proper
installation and conduit are required by code. Mount the ATS
vertically to a rigid supporting structure. To prevent the ATS or
enclosure box from distortion, level all mounting points; use
washers behind the mounting holes (outside the enclosure,
between enclosure and supporting structure), see following image.
The recommended fasteners are 1/4” lag screws. Always follow
local code.
16 in.
406.4 mm
24 in.
609.5 mm
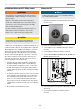
Electrical Grommet(s)
Grommets can be used in any enclosure knockout for NEMA 1
installations. Grommets can only be used in the bottom enclosure
knockouts for NEMA 3R installations, when installed outside.