
Installation Guide

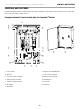

102006 - AUTOMATIC TRANSFER SWITCH WITH aXis CONTROLLER™ MODULE
UNPACKING
9
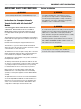
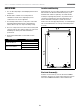
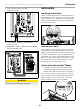
Installation Wiring for ATS Utility Socket
WARNING
The manufacturer recommends that a licensed electrician or
an individual with complete knowledge of electricity perform
these procedures.
Always be certain that the power from the main panel is
turned “OFF” and all backup sources are locked out prior to
removal of the cover or removal of any wiring of the utility
main electrical distribution panel.
Be aware, automatic start generators will start upon loss of
utility main power unless locked in the “OFF” position.
Failure to do so could result in serious injury or death.
CAUTION
Consult with your Local municipal, State and National
electrical codes for proper mandatory wiring methods.
Conductor sizes must be adequate to handle the maximum current
to which they will be subjected. The installation must comply fully
with all applicable codes, standards and regulations. Conductors
must be properly supported, of approved insulation materials,
protected by approved conduit and with the correct wire gauge
size in accordance with all applicable codes. Before connecting
wire cables to terminals, remove any surface oxides from the
cable ends with a wire brush. All power cables must enter the
enclosure through the enclosure knockouts.
1. Determine where the flexible, liquid tight conduit will pass
through the building from the inside to outside. When you
are certain that there is adequate clearance on each side of
the wall, drill a small pilot hole through the wall to mark the
location. Drill an appropriate sized hole through the sheathing
and siding.
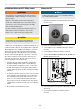
2. In compliance with all local electrical codes, route the conduit
along ceiling/floor joists and wall studs to the location where
the conduit will pass through the wall to the exterior of the
house. Once the conduit is pulled through the wall and in
proper position to attach to the HSB generator, place silicone
caulk around the conduit on both side of the hole, inside and
outside.
3. Mount the ATS near the Utility meter socket.
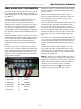
Wiring the ATS
NOTICE
US ATS model shown for reference. For Canadian installation,
refer to ATS Installation Manual.
1. Have authorized utility personnel pull the utility meter from
the meter socket.
2. Remove door and deadfront of ATS.
3. Connect Utility (L1-L2) to ATS Utility side breaker. Torque to
275 in-lbs.
4. Connect Utility N to Neutral lug. Torque to 275 in-lbs.
5. Connect earth GROUND to GROUND bar. NOTE: GROUND and
NEUTRAL bonded in this panel.
6. Connect Generator L1-L2 to Generator side breaker. Torque to
45-50 in-lbs.
7. Connect Generator Neutral to neutral bar. Torque to
275 in-lbs.