
Users Manual


Char-Broil Model # 11361
Color Change RF Programmable Meat Thermometer
THANK YOU FOR YOU PURCHASE!
User Manual:
[1] Base Unit
[2] Remote Unit
[3] Temperature Probe
Expert meat cooking requires correct measurement of internal temperatures.
The thermometer should be inserted into the thickest part of the meat where the tip is ¾” past
The center of the meat, but not in contact with bone, fat or gristle. When the desired
temperature
has been reached, remove from the grill or oven. Allow meat to stand 5 to 10 meetings before
serving. Unit requires [4] “AAA” 1.5V batteries (not included)
Caution:
Avoid contact with sharp points.
Keep out of reach of small children
.
Battery Disposal Warning:
Do not mix old and new3 batteries.
Do not mis alkaline, standard (carbon-zinc) or rechargeable (nickel-cadmium) batteries.
Do not dispose of batteries in a fire. Batteries may explode or leak.
Please dispose of batteries properly.
Heat Warning:
Thermometer probe may become hot during
usage. Char-Broil Welder’s Quality Gloves or a
heavy duty oven mitt recommended
© 2021 BASE4 Ventures, LLC Addison, Texas 75001
All Rights Reserved. All inquiries relative to this product
Should be directed to:
BASE4 Ventures, LLC.
(888) 988-2427 Between 8:00 AM and 5:00PM Central Time Zone
Designed in US – Made in China
Char-Broil® is a registered trademark of W.C. Bradley Company
This product is distributed under license from W.C. Bradley to BASE4 Ventures, LLC
Functions of your Color Change RF Programmable Meat Thermometer
• Remote timer for timed grilling
Set you minutes, set your seconds, pause and restart.
When your time has expired, the unit beeps and the LCD screen changes to GREEN and
flashes to alert you
to attend to your meat.
• [8] Meat Selections
Fish
Beef
Lamb
Veal
Pork
Turkey
Burger
Chicken
Each Meat Selection has preset FDA doneness settings to track your selected doneness and that
temperature is displayed on the LCD screen of the Remote Unit.
The Temperature Probe continually tracks the internal temperature of your meat and you see the
current internal temperature on the Remote Unit and the Base unit.
When the internal temperature reaches you preset doneness, the unit beeps and the LCD screen
changes color (based on the taste setting) and flashes to alert you to attend to your meat.
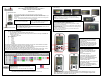
Base Unit [1]:
[B] Indicator Light
[A] LCD
Screen
[C] Cradle
[D] Battery Door
[E] Off/On Switch
[F] Probe Port
Battery Installation – Base Unit [1]:
Turn Base Unit [1] over & remove battery compartment door [D].
Insert [2] 1.5 V AAA batteries into the battery compartment following
polarity.
Replace battery compartment door [D].
[3] Temperature Probe
Turning on the Base Unit [1]:
Insert the Temperature Probe [3] into the Probe Port [F]
Turn the Off/On Switch [E] to the “On” position
If the Temperature Probe [3] is inserted correctly, you’ll see a readout
displaying the current temperature
(Base Unit Ready)
on the LCD Screen [A] as shown above and the Indicator
Light [B] will blink once.
If the Temperature Probe [3] has not been inserted or isn’t making contact,
you will see a readout displaying
LLL
(Base Unit Error)
on the LCD Screen [A] as shown above and the
Indicator Light [B] will blink once.
Remote Unit [2]:
[B] Off/On Button
[A] LCD Screen
[C] Meat Selection
Start/Stop
[D] Temperature Up
Minutes Up
[F] Taste Selection
Clear
[G] Temperature Down
- Seconds Up
[E] Mode
[H] Belt Clip
[I] Battery Door
Remote Unit Ready
Remote Unit Error
Battery Installation – Remote Unit [2]:
Turn Remote Unit [2] over & slide the
belt clip [H] off & remove the battery
compart door [I].
Insert [2] 1.5 V AAA batteries into the
battery compartment following polarity.
Replace battery compartment door [I]
and slide the belt clip [H] back on.
Turning on the Remote Unit [2]:
Depress the Off/On Button [B].
The LCD Screen [A] should turn Red,
then Green, then Blue and go to the
normal
screen color (grey/green).
If the Remote Unit [2] is successfully
connected with the BASE Unit [1],
you’ll see a readout displaying
(Remote
Unit Ready)
on the LCD Screen [A]
as shown TO THE LEFT.
If the Remote Unit [2] has not connected
with the BASE Unit [1],
you will see a readout displaying LLL
(
Remote Unit Error)
on the LCD Screen
[A] as shown TO THE LEFT.
If you have successfully connected the Remote Unit [2] with the BASE Unit [1] and you see the
(Base Unit Ready)
on the LCD Screen [A] as shown above, your Color Change RF Programmable
Meat Thermometer is configured and ready for use.