P RODUCT G U I DE G UíA DE L P RODUCTO MODU LAR OUTDOOR KITCH E N TH RE E B U RN E R G RI LL COCI NA MODU LAR EXTE RIOR PARRI LLA DE TRES QU E MADORES M O D EL M O D ELO 463246018 S E R IA L N U M B E R NÚM E R O D E S E R I E • See rating label on grill for serial number. • El número de serie se encuentra en la etiqueta deespecificaciones de la parrilla.
I M P ORTANT SAFETY I N FORMATION CONTE NTS I M PORTANT SAFETY I N FORMATION PAG E 2 FOR YOU R SAFETY - I NSTALLI NG YOU R G RI LL .
FOR YOU R SAFETY - I NSTALLI NG YOU R G RI LL WARNING • • • • • • • • • • • WARNING Keep grill area clear and free from materials that burn. Do not block holes in sides or back of grill. Use grill only in well-ventilated space. NEVER use in enclosed space such as carport, garage, porch, covered patio, or under an overhead structure of any kind. Apartment Dwellers: Check with management to learn the requirements and fire codes for using an LP gas grill in your apartment complex.
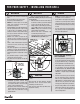
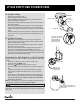
LP GAS SAFETY AN D CYLI N DE R CARE L P C ylin d e r R e m ov al , Tran s p or t an d S t o ra ge • • LP CYLI N DE R VALV E SAFETY CAP NEVER store a spare LP cylinder under or near the appliance or in an enclosed area. Turn OFF all control knobs and LP cylinder valve. Turn coupling Nut counterclockwise by hand only - do not use tools to disconnect. Loosen cylinder screw beneath bottom shelf or disconnect other retention means, then lift LP cylinder up and out of cart.
LP GAS SAFETY AN D CYLI N DE R CARE l oc k wis e Of f C L P C ylin d e r F il l i n g • • • • • • • Use only licensed and experienced dealers. LP dealer must purge new cylinder before filling. Dealer should NEVER fill LP cylinder more than 80% of LP cylinder volume. Volume of propane in cylinder will vary by temperature. A frosty regulator indicates gas overfill. Immediately close LP cylinder valve and call local LP gas dealer for assistance. Do not release liquid propane (LP) gas into the atmosphere.
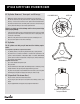
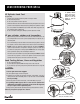
LEAK CH ECKI NG YOU R G RI LL If “growing” bubbles appear, do not use or move the LP cylinder. Contact an LP gas supplier or your fire department! LP C y l i n d e r Le a k Te s t For your safety • Leak test must be repeated each time LP cylinder is exchanged or refilled. • Do not smoke during leak test. • Do not use an open flame to check for gas leaks. • Grill must be leak tested outdoors in a well-ventilated area, away from ignition sources such as gas fired or electrical appliances.
FOR YOU R SAFETY - WH I LE OPE RATI NG YOU R G RI LL CAUTION WARNING For Safe Use of Your Grill and to Avoid Serious Injury: • Controls and gas source or tank OFF when not in use. • Do not let children operate or play near grill. • Check burner flames regularly. • Do not use charcoal or ceramic briquets in a gas grill. • Do not cover grates with aluminum foil or any other material.
FOR YOU R SAFETY - LIG HTI NG YOU R G RI LL LIG HTI NG TH E MAI N BU RN E RS Main Burner Ignitor Lighting Main Burner Match-Lighting • Do not lean over the grill while lighting. 1. Turn gas burner control valves to 2. • Do not lean over the grill while lighting. (OFF). 1. Turn gas burner control valves to Open lid during lighting or re-lighting. 2. Open lid during lighting or re-lighting. 3. Turn ON gas at LP cylinder. 3. Turn ON gas at LP cylinder. 4.
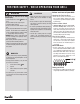
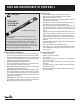
CARE AN D MAI NTE NANCE OF YOU R G RI LL Safety Tips • • • • CAUTION SPIDER ALERT! • SPIDERS AND WEBS INSIDE BURNER • YOUR BURNER MIGHT BE DIFFERENT • If your grill is getting hard to light or the flame is weak, check and clean the venturis and burners. Spiders or small insects are known to create “flashback” problems by building nests and laying eggs in the grill’s venturi or burner, obstructing the flow of gas. The back-up gas can ignite behind the control panel.
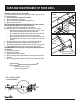
CARE AN D MAI NTE NANCE OF YOU R G RI LL Cleaning the Burner Assembly Follow these instructions to clean and/or replace parts of burner assembly or if you have trouble igniting grill. 1 . Turn gas off at control knobs and LP cylinder. 2 . Remove cooking grates and heat tents. 3 . Remove carryover tubes and hardware securing burners. 4 . Detach electrode from burner. NOTE: Removal/Detachment method will depend on the burner configuration. See different configurations in illustrations below. 5 .
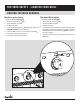
G RI LL LIG HTS - OPE RATION AN D BU LB RE PLACE M E NT Li gh t O p e ra t ion • • • • If your grill is hot, make sure the grill has been turned OFF and allowed to cool. Ensure the Grill Light Switch is in the OFF position. Connect the light plug to an extension cord, then put the extension cord plug into the wall receptacle. Turn the light switch ON 1 Bul b R e p la c e m en t • 1. 2. 3. 4. 5. 6. 7.
I N FORMACIÓN I M P ORTANTES DE SEG U RI DAD Í N DICE IMPORTANTE INFORMACIÓN DE SEGURIDAD PÁGINA 12 PARA SU SEGURIDAD - INSTALACIÓN DE SU PARRILLA PÁGINA 13 SEGURIDAD DEL GAS DE LP Y CUIDADO DEL CILINDRO PÁGINA 14 COMPROBACIÓN DE FUGAS EN SU PARRILLA PÁGINA 16 PARA SU SEGURIDAD - OPERACIÓN DE SU PARRILLA PÁGINA 17 PARA SU SEGURIDAD - ENCENDIDO DE SU PARRILLA PÁGINA 18 SÍ M BOLOS DE SEG U RI DAD Las declaraciones de PELIGRO, ADVERTENCIA y PRECAUCIÓN se usan a lo largo del Manual del Propieta
PARA SU SEG U RI DAD - I NSTALACIÓN DE SU PARRI LLA ADVE RTE N C IA • • • • • • • • • • • Mantenga el área de la parrilla libre de materiales que ardan. No bloquee los orificios en los lados o la parte trasera de la parrilla. Utilice la parrilla solo en un espacio bien ventilado. NUNCAla use en lugares cerrados como un estacionamiento, garaje, porche, patio cubierto o bajo una estructura superior de cualquier tipo.
SEG U RI DAD DE L GAS DE LP Y CU I DADO DE L CI LI N DRO Remoción, transporte y almacenamiento del cilindro de gas LP • • VÁLVULA DEL CILINDRO DE GAS LP TAPA DE SEGURIDAD NUNCA almacene un cilindro de gas LP de repuesto debajo o cerca del aparato o en un área cerrada. Gire todas las perillas de control y la válvula de cilindro de gas LP hacia la posición OFF. Gire la tuerca de acoplamiento del regulador hacia la izquierda solo a mano. No use herramientas para la desconexión.
SEG U RI DAD DE L GAS DE LP Y CU I DADO DE L CI LI N DRO l oc k wis e Of f C Llenado del cilindro de gas LP • • • • • • • Utilice únicamente distribuidores de gas con licencia y experiencia. El distribuidor de gas LP debe purgar el nuevo cilindro antes del llenado. El distribuidor NUNCA debe llebar el cilindro de gas LP más del 80% del volumen del cilindro. El volumen de propano en el cilindro variará con la temperatura. Un regulador escarchado indica que se ha llenado gas en exceso.
COM PROBACIÓN DE FUGAS E N SU PARRI LLA Si aparecen burbujas "crecientes" no utilice ni mueva el cilindro de gas LP. ¡Póngase en contacto con un proveedor de gas LP o con el departamento de bomberos! Prueba de fugas del cilindro de gas LP Para su seguridad • La prueba de fugas debe repetirse cada vez que se vuelva a llenar o se intercambie el cilindro de gas LP. • No fume durante la prueba de fugas. • Nunca utilice una llama expuesta para comprobar que no existan fugas de gas.
PARA SU SEG U RI DAD - OPE RACIÓN DE SU PARRI LLA ADVE RTE N C IA Para el uso seguro de su parrilla y para evitar lesiones serias: • Coloque los controles y la fuente o el tanque de gas en la posición OFF cuando no use el artefacto. • No deje que los niños operen o jueguen cerca de la parrilla. • Verifique las llamas del quemador con regularidad. • No use carbón o briquetas de cerámica en una parrilla de gas. • No cubra las rejillas con papel aluminio o ningún otro material.
PARA SU SEG U RI DAD - E NCE N DI DO DE SU PARRI LLA E NCE N DI DO DE LOS QU E MADORES PRI NCI PALES Encendido del encendedor del quemador principal Encendido con fósforo del quemador principal • No se incline sobre la parrilla cuando la esté encendiendo. 1. Gire las válvulas de control del quemador de gas hacia la posición de (OFF). 2. Abra la tapa durante el encendido o el reencendido. 3. Abra el gas del cilindro de gas LP para que esté en la posición de ON. 4.
CU I DADO Y MANTE N I M I E NTO DE LA PARRI LLA Consejos de seguridad • PRECAUCIÓN • • • ¡ A L E R TA D E A R A Ñ A S ! AR AÑAS Y TE LAR AÑAS D E NTR O D E L QUEMADOR • • SU QUEMADOR PODRÍA SER DIFERENTE Si se está volviendo difícil que se encienda el fuego de su parrilla o la llama es débil, revise y limpie los venturi y los quemadores.
CU I DADO Y MANTE N I M I E NTO DE LA PARRI LLA Limpieza del conjunto del quemador Siga estas instrucciones para limpiar y/o reemplazar partes del conjunto del quemador o si tiene problemas para encender la parrilla. 1 . Coloque todas las perillas de control y el cilindro de gas LP en la posición de off. 2 . Retire las rejillas de cocción y las barras de sabor. 3 . Retire los tubos de arrastre y la tornillería que asegura los quemadores. 4 . Desconecte el electrodo del quemador.
LUCES DE LA PARRILLA - OPERACIÓN Y REEMPLAZO DE LA BOMBILLA Operación de las luces • • • • Si su parrilla está caliente, asegúrese de que la parrila se haya apagado (OFF) y deje que se enfríe. Asegúres de que el interruptor de la luz de la parrilla estén la posición de OFF. Conecte el enchufe de la luz a una extensión, y luego coloque el enchufe de la extensión en el receptáculo de la pared. Encienda el interruptor de luz (ON) 1 Reemplazo de la bombilla • 1. 2. 3. 4. 5. 6. 7.
R E PLAC E M E NT PARTS D IAG R AM / D IAG RAMA DE PI EZAS DE R E PU E STO #54 #48 #59 #52 #51 #45 #41 #43 #56 #57 #53 #47 #44 #46 #46 #58 #49 #50 #39 #38 #55 #40 #42 #36 #35 #34 #29 #37 #33 #30 #32 #27 #26 #31 #21 #22 #72 #62 #66 #73 #79 #78 #71 #74 #65 #61 #76 #16 #28 #23 #24 #20 #75 #17 #19 #18 #25 #77 #64 #63 #60 #69 #70 #15 #67 #14 #68 #11 #10 #7 #9 #8 #12 #13 #2 #5 #4 #3 #1 #6 Page 22 C H A R B R O I L.
RE PLACE M E NT PARTS LIST / LISTA DE PI EZAS DE RE E M PLAZO Key 1 2 3 4 5 6 7 8 9 10 11 12 13 14 15 16 17 18 19 20 21 22 23 24 25 26 27 28 29 30 31 32 33 34 35 36 37 38 39 40 41 42 43 44 Qty 1 2 1 4 4 2 1 1 1 4 1 1 1 1 2 1 1 1 3 3 1 2 1 1 1 1 4 1 1 1 1 1 1 1 1 2 1 1 1 2 1 3 3 1 Description BOTTOM SHELF DOOR STOP LP TANK SHELF ASSEMBLY CASTER, FIXED LEVELER WEIGHT BLOCK LEFT CART PANEL MIDDLE CART PANEL RIGHT CART PANEL DRAWER SLIDE REAR PANEL, UPPER CART REAR PANEL, LOWER CART REAR PANEL, DRAWER CART UP
RE PLACE M E NT PARTS LIST / LISTA DE PI EZAS DE RE E M PLAZO Clv. Cant.
ASSE M BLY / ASAM BLEA 1 #57 2 #58 IMPORTANT: Infrared emitters must be placed keeping both flat walls overlapped to prevent any flare-up. IMPORTANTE: los emisores infrarrojos deben colocarse de tal forma que se empalmen las dos superficies planas para prevenir llamaradas. Page 25 C H A R B R O I L.
ASSE M BLY / ASAM BLEA 3 #59 #59 #58 4 #56 #56 Page 26 C H A R B R O I L.
ASSE M BLY / ASAM BLEA 5 #71 6 Page 27 C H A R B R O I L.
ASSE M BLY / ASAM BLEA 1ST 2ND OR/ OU 1ST 2ND Page 28 C H A R B R O I L.
ASSE M BLY / ASAM BLEA 7 8 Page 29 C H A R B R O I L.
ASSE M BLY / ASAM BLEA 9 10 CAUTI O N / ADVE RTE N C IA Cylinder valve must face as shown once tank is attached. Failure to install cylinder correctly may allow gas hose to be damaged in operation, resulting in the risk of fire. Una vez que el tanque haya quedado instalado, la válvula del tanque debe quedar orientada como se ilustra. Si no se instala correctamente el tanque, se puede dañar la manguera de gas durante el suministro,lo que puede ocasionar el riesgo de incendio.
ASSE M BLY / ASAM BLEA 11 Page 31 C H A R B R O I L.
ASSE M BLY / ASAM BLEA 12 A-6 C-6 B-6 D-2 1st C B A Replace plastic cap with included grommet when connecting two modules together. Reemplace la tapa de plástico con la arandela incluida al conectar dos módulos juntos. 2nd A Page 32 C H A R B R O I L.
ASSE M BLY / ASAM BLEA 3rd B C D 4th C A B D Page 33 C H A R B R O I L.
TROU BLESHOOTI NG EMERGENCIES: If a gas leak cannot be stopped, or a fire occurs due to gas leakage, call the fire department. EMERGENCIES POSSIBLE CAUSE • Damaged hose. PREVENTION / SOLUTION • Turn off gas at LP cylinder or at source on natural gas sys- • • Mechanical failure due to rusting or mishandling. • • Replace LP cylinder. Gas leaking between LP cylinder and regulator connection. • Improper installation, connection not tight, and/or failure of rubber seal in clyinder valve.
TROU BLESHOOTI NG PROBLEM POSSIBLE CAUSE Burner(s) will not light using ignitor. (See Electronic Ignition Troubleshooting also) Continued on next page. ELECTRONIC IGNITION: • No spark, no ignition noise. • No spark, some ignition noise. • Sparks, but not at electrode or at full strength. • See “GAS ISSUES:” • Match will not reach. • Improper method of match-lighting. • Out of gas. • Excess flow valve tripped. Burner(s) will not match light. Sudden drop in gas flow or low flame.
RESOLUCION DE PROBLE MAS EMERGENCIAS: Si no es posible detener la fuga de gas, o ocurre un incendio debido a la fuga de gas, llame al departamento de bomberos. EMERGENCIAS CAUSA POSIBLE Fuga de gas desde una manguera agrieta- • Manguera dañada. PREVENCIÓN / SOLUCIÓN • Cierre el gas del cilindro de gas LP en el origen en sistemas de gas natural. Interrumpa el uso del producto y reemplace la válvula/manguera/regulador.
RESOLUCION DE PROBLE MAS PROBLEMA CAUSA POSIBLE PREVENCIÓN / SOLUCIÓN Los quemadores no se encienden usando el encendedor. (También consulte Resolución de problemas del encededor electrónico) Continúa en la siguiente página. ENCENDIDO ELECTRÓNICO: • Sin chispa, si ruido de encendido. • Sin chispa, con poco ruido de encendido. • Chispas, pero si electrodo o a plena potencia. • • • Consulte la Sección I del Sistema de Encendido Electrónico. Consulte la Sección II del Sistema de Encendido Electrónico.
LI M ITE D WARRANTY This warranty only applies to units purchased from an authorized retailer. Manufacturer warrants to the original consumer-purchaser only that this product shall be free from defects in workmanship and materials after correct assembly and under normal and reasonable home use for the periods indicated below beginning on the date of purchase*.
GARANTÍA LI M ITADA Esta garantía solo se aplica a las unidades compradas en un minorista autorizado. El fabricante únicamente garantiza al comprador-consumidor original que este producto estará libre de defectos materiales y de materiales después de corregir el montaje y bajo uso doméstico normal y razonable durante los periodos indicados a continuación a partir de la fecha de la compra*.
P a ge 40 C H A R B R O I L.
P a ge 41 C H A R B R O I L.
P a ge 42 C H A R B R O I L.
PRODUCT REG ISTRATION Two convenient ways to register your product: Deux manières pratiques d’enregistrer votre produit: Dos maneras convenientes de registrar su producto: 1 Online En ligne @ WWW.CHARBROIL.COM/REGISTER En línea 2 By Mail | Par la poste | Por correo Please fill out this card and attached a copy of your sales receipt. Return it within 10 days of purchase for warranty service. Proof of purchase will be required. The warranty is not transferable.
2017 Char-Broil, LLC. Columbus, GA, 31904. Imprimé en China. Impreso en China. 2017 Assembly instructions. ©2017 Instrucciones de ensamblado. The product associated with this guide was manufactured in China. Tel producto asociado con esta guía ha sido fabricado en China. © © 2017 Char-Broil, LLC. Columbus, GA, 31904. Printed in China. Imprimé en Chine. Impreso en China.