
Warranty Guide

CHARBROIL.COMPage 10
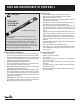
Cleaning the Burner Assembly
Follow these instructions to clean and/or replace parts of burner assembly or if you
have trouble igniting grill.
1. Turn gas off at control knobs and LP cylinder.
2. Remove cooking grates and heat tents.
3. Remove carryover tubes and hardware securing burners.
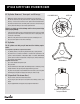
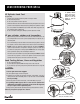
4. Detach electrode from burner.
NOTE: Removal/Detachment method will depend on the burner configura-
tion. See different configurations in illustrations below.
5. Carefully lift each burner up and away from valve openings.
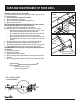
We suggest three ways to clean the burner tubes. Use the one easiest for you.
• Bend a stiff wire (a light weight coat hanger works well) into a small
hook. Run the hook through each burner tube several times.
• Use a narrow bottle brush with a flexible handle (do not use a brass wire
brush). Run the brush through each burner tube several times.
• Wear eye protection: Use an air hose to force air into the burner tube
and out the burner ports. Check each port to make sure air comes out
each hole.
6. Wire brush entire outer surface of burner to remove food residue and dirt.
7. Clean any blocked ports with a stiff wire such as an open paper clip.
8. Check burner for damage due to normal wear and corrosion, some holes may
become enlarged. If any large cracks or holes are found, replace burner.
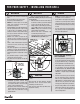
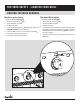
VERY IMPORTANT: Burner tubes must re-engage valve openings. See illus-
tration below.
9. Attach electrode to burner.
10. Carefully replace burners.
11. Attach burners to brackets on firebox.
12. Reposition carryover tubes and attach to burners. Replace heat tents and cook-
ing grates.
13. Before cooking again on grill, perform a “Leak Test” and “Burner Flame Check”.
STEP 5: Example of a bent, stiff
wire for cleaning your burner.
STEP 10: CORRECT BURNER
TO VALVE ENGAGEMENT
FIREBOX BURNER
SUPPORT
CARRYOVER TUBE
FIREBOX
Pry off electode with a
flat blade screwdriver.
Electrode
CARE AND MAINTENANCE OF YOUR GRILL