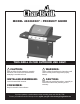
MODEL 463260307 • PRODUCT GUIDE THIS GRILL IS FOR OUTDOOR USE ONLY. CAUTION: Read and follow all safety statements, assembly instructions, and use and care directions before attempting to assemble and cook. INSTALLER/ASSEMBLER: Leave this manual with consumer. CONSUMER: WARNING: Failure to follow all manufacturer’s instructions could result in serious personal injury and/or property damage.
WARNING DANGER If you smell gas: 1. 2. 3. 4. Shut off gas to the appliance. Extinguish any open flame. Open lid. If odor continues, keep away from the appliance and immediately call your gas supplier or your fire department. WARNING 1. Do not store or use gasoline or other flammable liquids or vapors in the vicinity of this or any other appliance. 2. An LP cylinder not connected for use shall not be stored in the vicinity of this or any other appliance.
TABLE OF CONTENTS For Your Safety . . . . . . . . . . . . . . . . . . . . . . . . . . . . . . . . . . . . . . 2 Grill Service Center. . . . . . . . . . . . . . . . . . . . . . . . . . . . . . . . . . . 2 Product Record Information . . . . . . . . . . . . . . . . . . . . . . . . . . . . 2 Installation Safety Precautions . . . . . . . . . . . . . . . . . . . . . . . . . . 2 Safety Symbols. . . . . . . . . . . . . . . . . . . . . . . . . . . . . . . . . . . . . . 2 Use and Care. . . . . . . . . . . . . . . . .
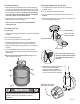
USE AND CARE DANGER • NEVER store a spare LP cylinder under or near the appliance or in an enclosed area. • Never fill a cylinder beyond 80% full. • An over filled or improperly stored cylinder is a hazard due to possible gas release from the safety relief valve. This could cause an intense fire with risk of property damage, serious injury or death. • If you see, smell or hear gas escaping, immediately get away from the LP cylinder/appliance and call your fire department.
LP Cylinder Exchange Connecting Regulator to the LP Cylinder • Many retailers that sell grills offer you the option of replacing your empty LP cylinder through an exchange service. Use only those reputable exchange companies that inspect, precision fill, test and certify their cylinders. Exchange your cylinder only for an OPD safety feature-equipped cylinder as described in the "LP Cylinder" section of this manual. 1. LP cylinder must be properly secured onto grill. (Refer to assembly section.
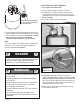
Leak Testing Valves, Hose and Regulator 1. Turn all grill control knobs to OFF. 2. Be sure regulator is tightly connected to LP cylinder. Str aig ht 3. Completely open LP cylinder valve by turning hand wheel counterclockwise. If you hear a rushing sound, turn gas off immediately. There is a major leak at the connection. Correct before proceeding. Hold coupling nut and regulator as shown for proper connection to LP cylinder valve. 4. Brush soapy solution onto areas circled below. 6.
WARNING For Safe Use of Your Grill and to Avoid Serious Injury: • Do not let children operate or play near grill. • Keep grill area clear and free from materials that burn. • Do not block holes in sides or back of grill. • Check burner flames regularly. • Use grill only in well-ventilated space. NEVER use in enclosed space such as carport, garage, porch, covered patio, or under an overhead structure of any kind. • Do not use charcoal or ceramic briquets in a gas grill.
WARNING Turn controls and gas source or tank OFF when not in use. CAUTION If ignition does NOT occur in 5 seconds, turn the burner controls OFF, wait 5 minutes and repeat the lighting procedure. If the burner does not ignite with the valve open, gas will continue to flow out of the burner and could accidently ignite with risk of injury. Match-Lighting s Do not lean over grill while lighting. 1. Open lid. Turn on gas at LP cylinder. 2.
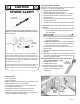
Cleaning the Burner Assembly CAUTION SPIDER ALERT! SPIDER AND WEBS INSIDE BURNER TUBE If you notice that your grill is getting hard to light or that the flame isn’t as strong as it should be, take the time to check and clean the venturi’s. VALVE CONTROL PANEL SPIDER WEBS INSIDE VENTURI BURNER In some areas of the country, spiders or small insects have been known to create “flashback” problems.
Indirect Cooking Food Safety Poultry and large cuts of meat cook slowly to perfection on the grill by indirect heat. The heat from selected burners circulates gently throughout the grill, cooking meat or poultry without the touch of a direct flame. This method greatly reduces flare-ups when cooking extra fatty cuts because there is no direct flame to ignite the fats and juices that drip during cooking. Food safety is a very important part of enjoying the outdoor cooking experience.
CARE AND CLEANING OF YOUR STAINLESS STEEL GRILL Routine cleaning is necessary to preserve the appearance and corrosion resistance of Stainless Steel. The perception that many people have is that stainless steel will not rust. That is not the case in certain conditions. Rust marks are regular sttel particles that have become attached to the surface of stainless steel. They may also occur if you are using a steel wool or wire wool scouring pad in stead of a nylon scouring pad to clean your grill.
PARTS LIST – Model No. 463260307 Key A B C D E F G H I J K L M N O P Q R S T U V W X Y Z AA BB CC DD EE FF GG HH II JJ KK LL MM NN OO PP QQ Qty 1 1 1 1 2 1 2 2 1 1 2 1 1 1 1 4 3 5 1 1 1 1 5 1 1 1 1 1 1 1 1 1 1 1 1 1 1 1 1 1 1 1 1 Description Part # Cart Side Panel Right . . . . . . . . . . . . . . . . . 80009650 Cart Side Panel Left . . . . . . . . . . . . . . . . . . 80009654 Bottom Shelf . . . . . . . . . . . . . . . . . . . . . . . . 80009698 Valance. . . . . . . . . . . . . . . . . . . . . . . . . . .
QQ PARTS DIAGRAM – Model No.
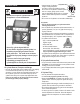
ASSEMBLY – Model No. 463260307 1 Attach the two cart sides to bottom shelf using one 1/4-20x2¾” screw, 7mm flat washer, 7mm lock washer and 1/4-20 hex nut at upper hole in each rear leg. Insert another 1/4-20x2¾” screw into lower hole, through caster socket, and secure with 7mm flat washer, 7mm lock washer and 1/4-20 hex nut.
Place lower back panel between side panels at rear of bottom shelf. Make sure the slots are positioned as shown (A). Secure lower back panel to side panels using two 1/4-20x1/2" screws, 7mm lock washers and 7mm flat washers on each side. Attach upper rail to cart assembly. Tabs on rail fit inside legs. Secure rail to back of front legs using two ST4.2x10mm self-tap screws on each side. 3 Upper rail 1/4-20x1/2” screw 7mm flat 7mm lock washer washer Rear view Lower back panel ST4.
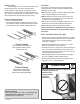
5 Secure grill head to leg braces using four 1/4-20x3/4” screws, 7mm lock washers, and 15mm fiber washers. Screws must be attached from inside of grill head into brace. Do not fully tighten screws until side shelf and sideburner shelf are assembled. 15mm fiber washer 7mm lock washer 1/4-20x3/4” screw 6 Place side shelf over right cart legs. Lip of shelf should fit between grill bottom and leg brace.
7 Place sideburner shelf over left cart legs. Lip of shelf should fit between grill bottom and leg brace. Secure shelf brackets to cart legs using two 1/4-20x1/2” screws, 7mm lock washers and 7mm flat washers. Fully tighten screws inside grill bottom and at back of grill at this time. Refer to Steps 4 and 5. Repeat bracket screws on front leg 1/4-20x1/2” screw 7mm lock washer 7mm flat washer CAUTION Sideburner shelf assembly SHARP EDGES! Wear gloves if necessary.
9 Insert sideburner into shelf, placing end of burner over sideburner valve. Valve should be in center hole of burner tube. Make sure pin on bottom of burner is in center hole in shelf bracket. Secure burner to bracket with two #10-24x3/8” screws, 5mm lock washers, and 5mm flat washers. See illustration below for correct burner-tovalve engagement.
flametamers (4) over burners by inserting tabs into slots in front of firebox. 11 Place Opposite ends of flametamers rest on pins in back of firebox. Fro nt o f Fl am Fla me tam er fire box et am er ox fireb f o k Bac 12 Place cooking grates into grill bottom. Grate wires running front to back should be facing upward . . . side to side wires downward. Side-to-side wires on bottom.
To assemble SwingAway, first insert pivot wire into holes in side of grill lid. Second, insert leg wires into holes in sides of grill bottom. 13 Pivot wire ay gAw n i w S wi Leg 14 re Insert wire ends into lower back panel (A). Attach front right side of wire shelf to the right side panel with one #8-32x3/8” screw, 4mm flat washer and 4mm lock washer (B). Leg attaches to bottom shelf with a 4mm flat washer and 4mm lock washer and a #8-32x3/8” screw (C).
15 Insert bottom door pin into hole in valance. Press the top door pin down, align with hole in door brace, release door pin. Repeat procedure on remaining door. Press pin on door top CAUTION SHARP EDGES! Wear gloves if necessary. 16 Slide grease tray into back of grill.
17 Slide grease pan into rails beneath grease tray. CAUTION • Failure to install pan on tray will cause hot grease to drip from bottom of grill with risk of fire or property damage. Grease pan 18 LP tank is sold separately. Fill and leak check the tank (see Use & Care section) before attaching to grill and regulator. Once tank has been filled and leak checked, place tank into tank hole in bottom shelf. Make sure tank valve is facing front of grill. Secure tank with tank screw at rear of bottom shelf.
19 VERY IMPORTANT! Regulator and hose must pass UNDER hose bracket before connecting to LP tank. Read “Connecting Regulator to the LP Tank” in the Use and Care section of this manual. NOTE: Doors not shown for clarity. Hose Bracket 20 Regulator and hose must pass UNDER hose bracket. Unscrew ignitor cap and place AA battery into ignitor slot with positive end (+) facing outward. Screw ignitor cap onto ignitor.
EMERGENCIES: If a gas leak cannot be stopped, or a fire occurs due to gas leakage, call the fire department. Emergencies Possible Cause Prevention/Solution Gas leaking from cracked/cut/burned hose. • Damaged hose. • Turn off gas at LP cylinder or at source on natural gas systems. If anything but burned, replace valve/hose/regulator. If burned, discontinue use of product until a plumber has investigated cause and corrections are made. Gas leaking from LP cylinder.
Troubleshooting (continued) Problem Possible Cause Prevention/Solution Burner(s) will not light using ignitor. (See Electronic Ignition Troubleshooting also) ELECTRONIC IGNITION: • No spark, no ignition noise. • See Section I of Electronic Ignition System. • No spark, some ignition noise. • See Section II of Electronic Ignition System. • Sparks, but not at electrode or at full strength. • See Section III of Electronic Ignition System. Burner(s) will not match light.
Troubleshooting - Electronic Ignition Problem (Ignition) SECTION I No sparks appear at any electrodes when ignition button is pushed; no noise can be heard from spark module. SECTION II No sparks appear at any electrodes when ignition switch is pushed; noise can be heard from spark module. SECTION III Sparks are present but not at all electrodes and/or not at full strength Possible Cause Check Procedure Prevention/Solution • Battery not installed properly. • Check battery orientation.
LIMITED WARRANTY Manufacturer warrants to the original consumer-purchaser only that this product shall be free from defects in workmanship and materials after correct assembly and under normal and reasonable home use for the periods indicated below beginning on the date of purchase. The manufacturer reserves the right to require that defective parts be returned, postage and or freight pre-paid, by the consumer, for review and examination.
Page Blank Intentionally 28 • 463260307
Page Blank Intentionally 463260307 • 29
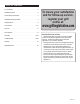
Please register your product online at: www.grillregistration.com (If you register online, you do not need to send in this registration card.) PLEASE FILL OUT THIS CARD AND RETURN IT WITHIN 10 DAYS OF PURCHASE. FAILURE TO RETURN MAY AFFECT YOUR WARRANTY COVERAGE. FOR WARRANTY SERVICE PROOF OF PURCHASE WILL BE REQUIRED. PLEASE KEEP YOUR SALES RECEIPT. THIS WARRANTY IS NON-TRANSFERABLE. LLENE ESTA TARJETA Y DEVUELVALA DENTRO DE LOS 10 DIAS DE LA COMPRA.
Page Blank Intentionally 463260307 • 31
STOP Should you encounter a problem with our product CALL US FIRST Do not return this product to the store. WE CAN HELP GRILL SERVICE CENTER 1-800-241-7548 HOURS 8AM-6PM EST Mon-Fri Please ensure your warranty registration is complete. Grilling Safety Checklist Read and understand owners manual. Never overfill LP cylinder. Overfilled cylinders may cause freeze-up of regulator. Check tubes for spider webs. Ensure valves are correctly installed in burner tubes.